
Jira Dashboard
Last updated on Jan 19, 2024

What is a Jira dashboard?
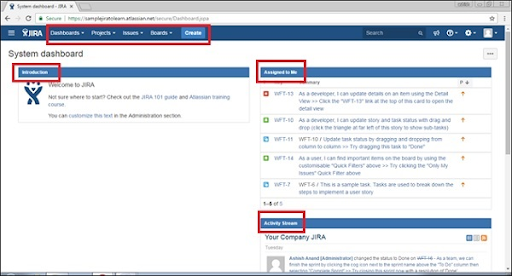
When you log in to Jira, the dashboard is the first thing that you see. The dashboard gives overall information about a project. It shows the key metrics that help facilitate the management of your project. An admin customizes the dashboard according to the project requirement or his preference. The dashboard can be customized according to company standards like change colors, add the company logo, etc.
If you plan and arrange the dashboard in the right way, you will get to know all information at a single glance. A dashboard consists of gadgets that give access to content that you like. You can change their layout, switch between the left and right columns, reorder them, etc. When you first log in to Jira, you can see the following three sections.
- Introduction - Shows information about Jira.
- Assigned to Me - Shows the issues assigned to you.
- Activity Stream - Shows all the activities done by your team members.
Become a master of Jira by going through this HKR Jira Training!
Projects in Jira dashboard
The projects tab in the main navigation bar at the top of the page lets you select a project that you want to view.
Current Project - It shows the name of the project that the user is viewing on the dashboard. When you click on it, it will show the gadgets and issues list of that project.
Recent Projects - It shows the name of the projects that you visited previously. You can access any previous project by directly clicking on it.
Software - When you click on it, you will get navigated to a page that shows a list of all the projects that were created with software as the project type.
Business - When you click on it, you will get navigated to a page that shows a list of all the projects that were created with business as the project type.
View all Projects - It will navigate to a list of all the projects that you are involved in.
Create Project - This option is for creating a new project. This option might not be visible for some users. An admin or a user with create access will be able to see this option.

Jira Training Certification
- Master Your Craft
- Lifetime LMS & Faculty Access
- 24/7 online expert support
- Real-world & Project Based Learning
Issues in Jira dashboard
The issues tab in the main navigation bar at the top of the page lets you choose an issue that you want to view.
- Search for issues - You can search through the available issues. To narrow down the search results, you can give search criteria.
- Recent issues - It shows the list of issues that you visited previously.
- Import issues from CSV - If you have a list of issues in a CSV file, you can directly add them to your project by importing the CSV file.
- My open issues - When you click on it, you can see the list of open issues that were assigned to you.
- Reported by me - You can view the list of issues that were created by you.
- Manage filters - If you have saved any search filters before, or made any filter ad favorite, you can see them here.
If you want to Explore more about Jira? then read our updated article - Jira Tutorial
Boards in Jira dashboard
The 'Boards' option in the navigation bar provides you access to different boards. It can either be an agile methodology board or a kanban board.
Recent boards - It shows the list of all the boards that you visited recently.
View all boards - It shows the list of all the available project boards that you have access to.
Gadgets in Jira dashboard
Gadgets are layouts that show summaries of issues on the dashboard. They can be customized to show user-relevant project or issue details. Jira provides in-built
- gadgets that the user can add in their dashboard. Here are some of the gadgets.
- Administration Gadget - It shows a checklist of common administration tasks and links to administrative documentations.
- Average Age Gadget - It shows the average days that issues have been unresolved.
- Calendar Gadget - It displays the issues, their versions, and due dates in a calendar format.
You can also add extra gadgets by configuring the relevant plug-ins.
frequently asked Jira Interview Questions and Answers !!
Subscribe to our YouTube channel to get new updates..!
Creating a dashboard
Click on the 'Dashboards' button, and the 'System dashboard' page will open. Click on the ellipses (…) button and select the 'Create Dashboard' option.
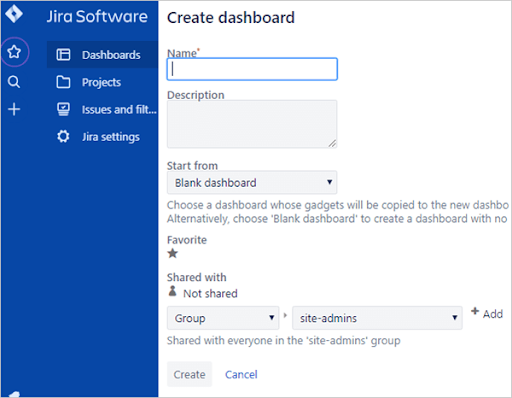
Name - Give a name for your dashboard.
Description - Enter the description that briefly explains your dashboard.
Start from - You will have 2 options to choose from a drop-down list.
Blank dashboard - A plain dashboard that does not contain any gadgets.
System dashboard - A pre-existing dashboard from which the gadgets will be copied.
Favorite - If you want this dashboard to appear in your favorite list, select this option. If you do not want it to add to your favorites, leave it as is.
Shared with - Select the users or groups that you want to share the dashboard with.
Once all the fields are filled, click on the 'Create' button.
Customizing the dashboard
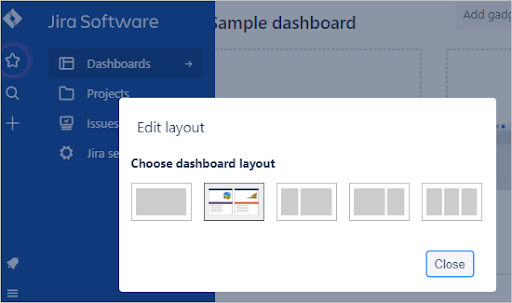
You can customize your dashboard layout and add gadgets. Open the dashboard that you want to customize. Click on the 'Edit Layout' button at the top right corner. You can see the list of available dashboard layouts. Choose one that you like and click on the 'Close' button
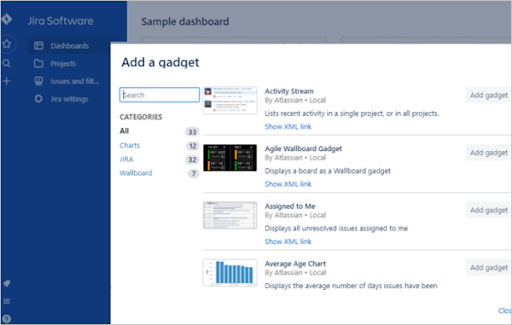
To add a gadget, click on the 'Add Gadget' button at the top right corner. You will have a search bar through which you can search through the available gadgets. Once you found the desired gadget, click on the 'Add Gadget' button next to the gadget. Once you have added all the gadgets that you want, click on the 'Close' button.
Conclusion :
Jira dashboard is very flexible for project managers, developers, and customers to manage project development interactively. Admins will have full control on the dashboards or projects that are created. Users will have view access for all the content of the dashboard. Users will also have additional functionalities based on the role that the admin assigns to them. In this post, we have explained everything that you need to know about the Jira dashboard. For more details, have a look at our other Jira posts on our website.
Related Articles
About Author
Upcoming Jira Training Certification Online classes
| Batch starts on 17th Jul 2026 |
|
||
| Batch starts on 21st Jul 2026 |
|
||
| Batch starts on 25th Jul 2026 |
|