
Snowflake Documentation
Last updated on Nov 25, 2024

Snowflake Documentation - Table of Content
- Key Concepts of Snowflake
- Architecture of Snowflake
- Supported Cloud Platforms
- Snowflake Editions
- Prerequisites
- Implementation steps for working with Snowflake
- Conclusion
This Snowflake Documentation introduces essential concepts and tasks using the Snowflake command-line client, SnowSQL.
Creating required Snowflake objects (databases, tables, etc.) for storing and querying data.
Loading a small amount of sample data from CSV files into a table.
Querying the table.
Let’s go through the Snowflake concepts in detail.
1. Introduction to Snowflake
In this section, the introduction part covers the key concepts and architecture of Snowflake.
Become a Snowflake Certified professional by learning this HKR Snowflake Training !
1.1 Key Concepts of Snowflake
Snowflake Data Cloud is based on a cutting-edge data platform that is available as Software-as-a-Service (SaaS). Snowflake offers data storage, processing, and analytic solutions that are faster, more user-friendly, and more customizable than traditional systems.
The Snowflake data platform isn't based on any existing database or "big data" software platforms like Hadoop. Snowflake, on the other hand, combines a completely new SQL query engine with an innovative cloud-native architecture. Snowflake gives all of the capability of an enterprise analytic database to the user, as well as several additional special features and capabilities.
Data Platform as a Cloud Service
Snowflake is a real software-as-a-service solution. To be more specific.
- There's no hardware (physical or virtual) to choose, install, configure, or manage.
- There isn't much software to set up, administer, or manage.
- Snowflake is responsible for all maintenance, management, upgrades, and tuning.
Snowflake is entirely based on cloud infrastructure. Snowflake's service (except for command-line clients, drivers, and connectors, which are optional) is run entirely on public cloud infrastructures.
Snowflake's computational needs are met by virtual compute instances, and data is stored permanently through a storage service. Snowflake isn't compatible with private cloud environments (hosted or on-premises).
Snowflake isn't a user-installable package of software. Snowflake is responsible for all software installation and update activities.
1.2 Architecture of Snowflake
The architecture of Snowflake is a mix of classic shared-disk and shared-nothing database technologies. Snowflake employs a central data repository for persisting data, similar to shared-disk architectures. All computing nodes in the platform have access to this repository. Snowflake, however, performs queries utilizing MPP (massively parallel processing) compute clusters, in which each node in the cluster maintains a piece of the full data set locally, akin to shared-nothing systems. This method combines the ease of data management of a shared-disk design with the performance and scale-out advantages of a shared-nothing architecture.

Snowflake Training
- Master Your Craft
- Lifetime LMS & Faculty Access
- 24/7 online expert support
- Real-world & Project Based Learning
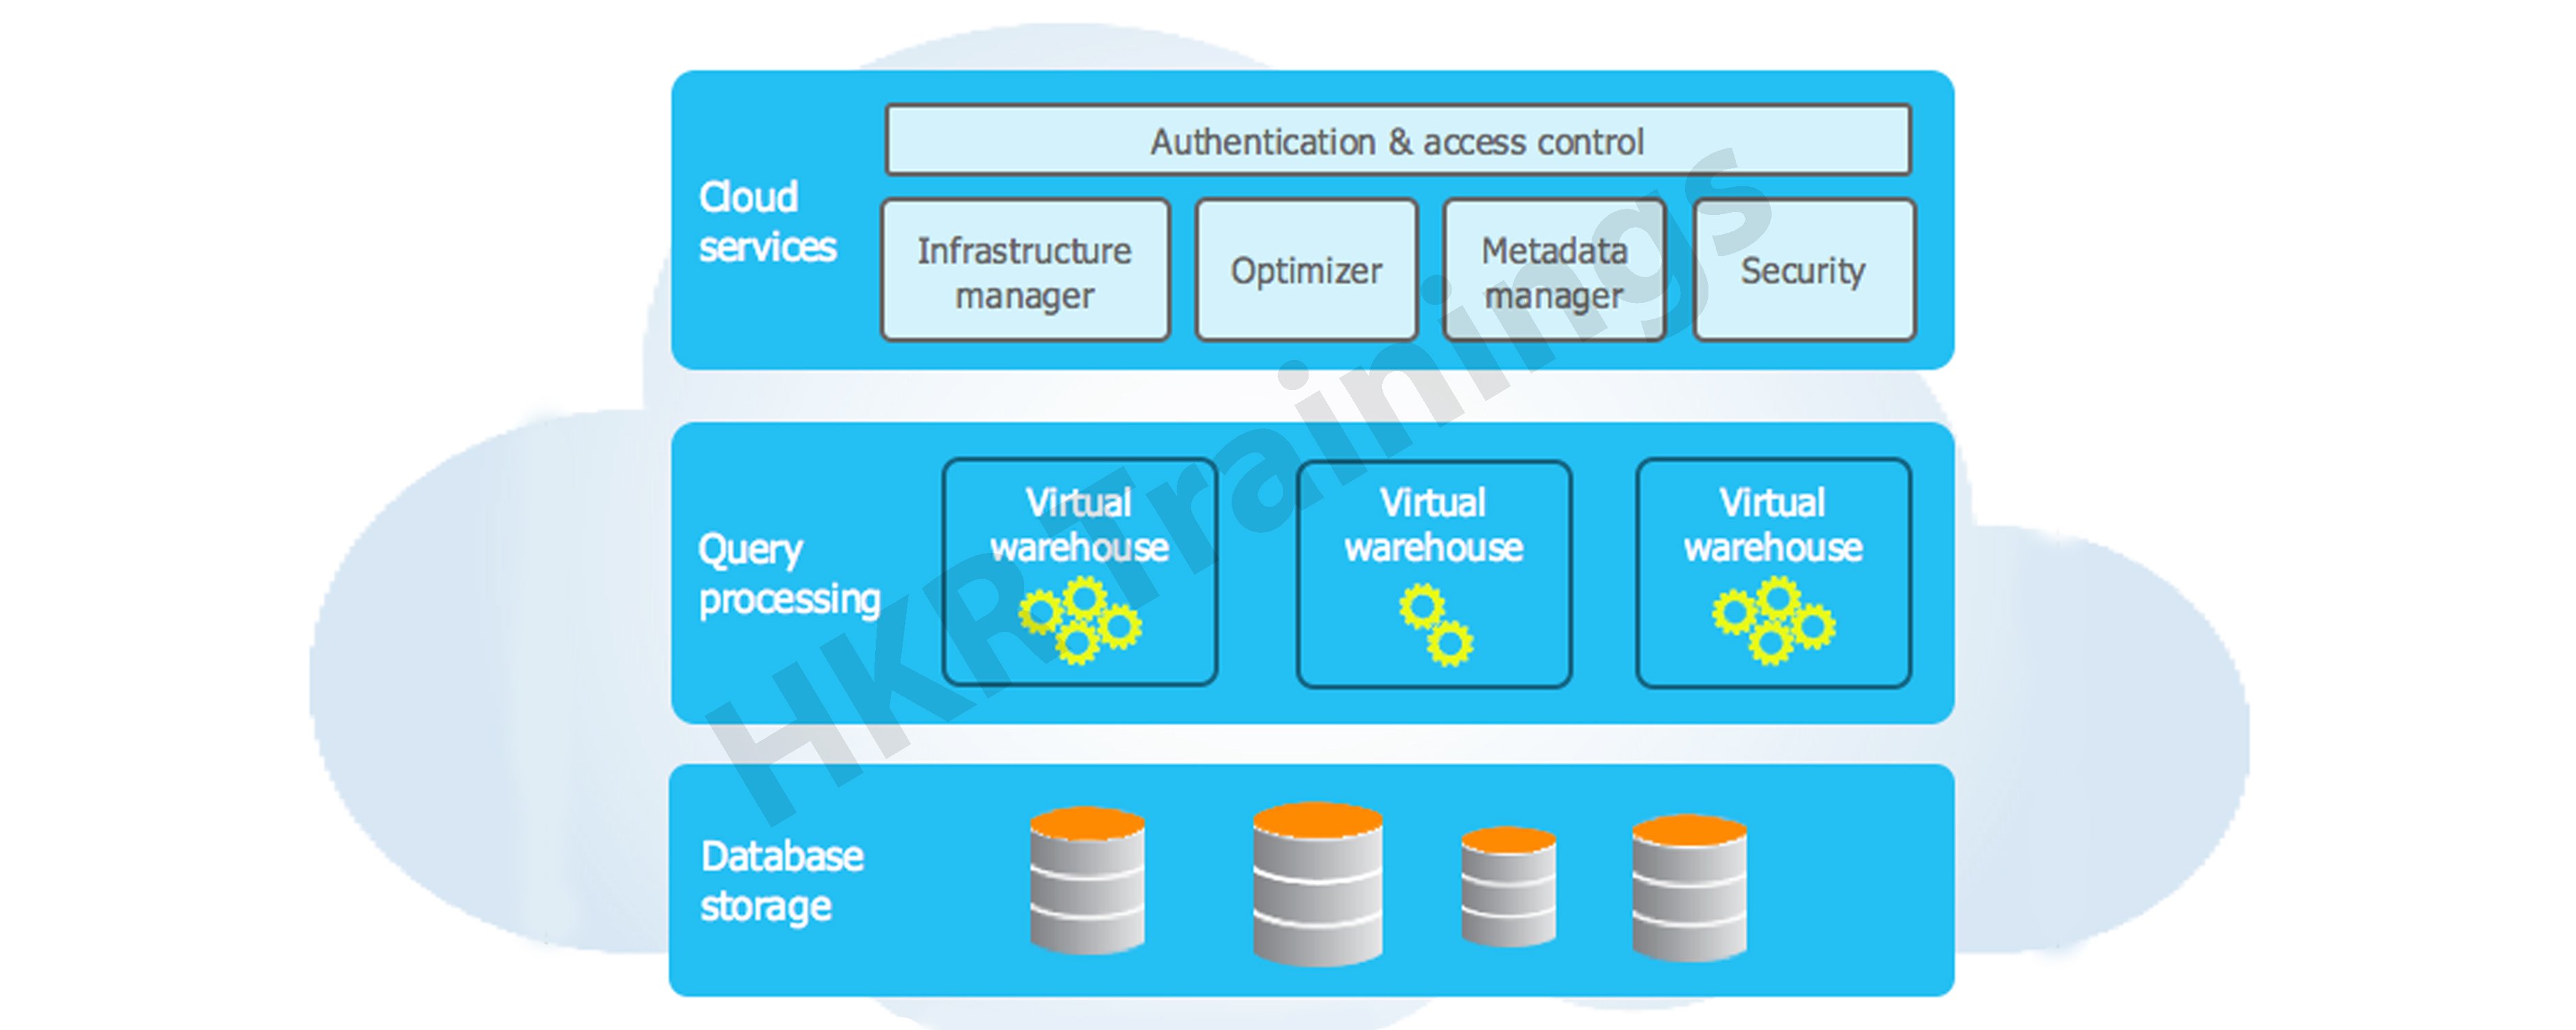
The three major layers that makeup Snowflake's unique architecture are:
- Database Storage
- Query Processing
- Cloud Services
Database Storage
When you import data into Snowflake, it's restructured into a columnar format that's optimized and compressed internally. The optimized data is saved to the cloud through Snowflake.
Snowflake is in charge of all aspects of data storage, including file size, structure, compression, metadata, statistics, and other features. Customers cannot see or access the data objects stored by Snowflake; they can only access them through SQL query operations executed through Snowflake.
Get ahead in your career with our Snowflake Tutorial !
Query Processing
The processing layer is where queries are executed. Snowflake employs "virtual warehouses" to process queries. Each virtual warehouse is an MPP compute cluster made up of numerous compute nodes provided by a cloud provider and allotted by Snowflake.
Each virtual warehouse has its own compute cluster, with no shared resources. As a result, one virtual warehouse's performance has no bearing on the performance of the others.
Cloud Services
The cloud services layer is a set of services that help Snowflake coordinate activities. From login to query dispatch, these services connect all of Snowflake's many components to perform user requests. Snowflake provisioned compute instances from the cloud provider for the cloud services layer.
This layer manages the following services:
- Authentication
- Infrastructure management
- Metadata management
- Query parsing and optimization
- Access control
1.3 Connecting to Snowflake
Snowflake allows you to connect to the service in a variety of ways:
- A web-based user interface is available for all elements of administering and using Snowflake.
- All aspects of administering and using Snowflake can be accessed using command line clients (for example, SnowSQL).
- Other applications (such as Tableau) can connect to Snowflake through ODBC and JDBC drivers.
- Native connectors (for example, Python, Spark) can be used to create Snowflake-connected applications.
- Third-party connectors for connecting applications to Snowflake, such as ETL and BI tools (for example, ThoughtSpot).
2. Supported Cloud Platforms
Snowflake is a Software-as-a-Service (SaaS) application that is entirely hosted on cloud infrastructure. This implies that Snowflake's three levels of architecture (storage, computation, and cloud services) are all deployed and managed on a single cloud platform.
Any of the following cloud platforms can be used to host a Snowflake account:
- Amazon Web Services (AWS)
- Google Cloud Platform (GCP)
- Microsoft Azure (Azure)
Pricing
Differences in credit and data storage unit charges are calculated by geography on each cloud platform. More information on pricing as it relates to a certain region and platform may be found on the pricing page (on the Snowflake website).
Data Loading
Regardless of the cloud platform hosting your Snowflake account, Snowflake may load data from files stored in any of the following locations:
- Internal (i.e. Snowflake) stages
- Amazon S3
- Google Cloud Storage
- Microsoft Azure blob storage
Snowflake can handle both batch and continuous data loading (Snowpipe). Snowflake also allows you to dump data from tables into any of the staging sites listed above.
HITRUST CSF Certification
This certification strengthens Snowflake's security posture in regulatory compliance and risk management, and it applies to Business Critical and higher Snowflake editions.
The table below lists the AWS and Azure regions that support the HITRUST CSF certification. The HITRUST CSF certification will be supported in any new AWS and Azure regions. HITRUST CSF is not currently supported by Snowflake on the Google Cloud Platform.
AWS Cloud Region ID
- us-west-2
- us-east-1
- us-east-2
- eu-west-1
- eu-central-1
- ap-southeast-2
- ca-central-1
Azure Cloud Region ID
- east-us-2
- west-europe
- canada-central
- us-gov-virginia
3. Snowflake Editions
Snowflake comes in a variety of versions, allowing you to tailor your usage to your organization's specific needs. Each edition expands on the preceding one by adding edition-specific features and/or providing higher service levels. It's also simple to switch editions as your company's demands evolve.
3.1 Standard Edition
Standard Edition is our entry-level product, giving you complete, unrestricted access to all of Snowflake's standard features. It achieves a good combination of functionality, support, and price.
Subscribe to our YouTube channel to get new updates..!
3.2 Enterprise Edition
Enterprise Edition includes all of the features and services of Standard Edition, as well as new features tailored to the needs of large businesses and organizations.
3.3 Business-Critical Edition
Business Critical Edition, formerly known as Enterprise for Sensitive Data (ESD), provides even greater data security to meet the needs of enterprises with extremely sensitive data, notably PHI data that must adhere to HIPAA and HITRUST CSF regulations.
It comes with all of the Enterprise Edition's features and services, plus increased security and data protection. Database failover/failback also adds business continuity and disaster recovery support.
3.4 Virtual Private Snowflake (VPS)
For companies with the toughest needs, such as financial institutions and other major enterprises that collect, analyze, and communicate highly sensitive data, Virtual Private Snowflake delivers our greatest level of protection.
It has all of the features and services of Business Critical Edition, but it runs in its own Snowflake environment, independent from the rest of your Snowflake accounts (i.e. VPS accounts do not share any resources with accounts outside the VPS).
4. Prerequisites
To load and query data, you'll need a database, a table, and a virtual warehouse. To create these Snowflake objects, you'll need a Snowflake user with the appropriate role and access control rights. SnowSQL is also necessary to complete the SQL statements in the tutorial. Finally, the course involves the loading of CSV files containing sample data.
Note that you can complete the course with your local data files and an existing Snowflake warehouse, database, and table; however, we recommend utilizing the Snowflake objects and data files we've given for convenience.
4.1 User and Permissions Requirements
Your Snowflake user must have a role that has been granted the required rights to build the database, table, and virtual warehouse used in this tutorial.
Please contact one of your account or security administrators (users with the ACCOUNTADMIN or SECURITYADMIN roles) if you don't have a Snowflake user yet or if your user doesn't have the right role.
4.2 Installation of SnowSQL
The SnowSQL installation is available from the Snowflake Client Repository for download. There is no need for authentication. This version of the SnowSQL installer supports patch auto-update.
Installing SnowSQL has more detailed instructions.
To set up SnowSQL, follow these steps.
1.Open a terminal window.
2.To download the SnowSQL installer, run curl.
Snowflake offers both Amazon Web Services (AWS) and Azure destinations for downloading the SnowSQL installation for further flexibility. The installer can be downloaded from any endpoint for accounts hosted on any compatible cloud platform.
For Windows OS:
AWS endpoint:
$ curl -O https://sfc-repo.snowflakecomputing.com/snowsql/bootstrap/1.2/windows_x86_64/snowsql-1.2.17-windows_x86_64.msi
Microsoft Azure endpoint
$ curl -O https://sfc-repo.azure.snowflakecomputing.com/snowsql/bootstrap/1.2/windows_x86_64/snowsql-1.2.17-windows_x86_64.msi
3. Run the installer:
For Windows OS:
- To execute the installer MSI file, double-click snowsql-windows_x86_64.msi in the download directory.
- Follow the installer's instructions carefully.
Top 30 frequently asked snowflake interview questions & answers for freshers & experienced professionals
4.3 Loading Data Sample Files
Take a look at the sample data files. Save the link/file to your local file system by right-clicking the name of the archive file, getting-started.zip.
The sample files can be unpacked anywhere; however, we recommend utilizing the locations listed in the tutorial examples:
For Windows OS: C:\temp
The example files contain five rows of dummy employee data in CSV format. The comma (,) character serves as a field delimiter.
Example record:
Althea,Featherstone,afeatherstona@sf_tuts.com,"8172 Browning Street, Apt B",Calatrava,7/12/2017
5. Implementation steps for working with Snowflake
The following are the processing steps working with Snowflake:
- Log into SnowSQL
- Create Snowflake Objects
- Stage the Data Files
- Copy Data into the Target Table
- Query the Loaded Data
- Summary and Clean Up
Step 1: Log into SnowSQL
To log in after installing SnowSQL, follow these steps:
- Open a terminal window.
- At the command prompt, run SnowSQL:
$ snowsql -a-u Where:
Your Snowflake account's unique identifier.
The account identifier should be written in the following format:
organization_name-account_name
Your Snowflake account's and organization's names. If necessary, you can also give your account locator, and also the area and cloud platform where the account is hosted.- Your Snowflake user's login name is
.
- Enter your Snowflake user's password when SnowSQL prompts you.
Step 2: Creating the Snowflake Objects
Before you could even load data, you'll need a database and a table. This tutorial loads data into the sf_tuts table of a database.
Furthermore, loading and querying data necessitates the usage of a virtual warehouse, which offers the necessary compute resources. If you have your own warehouse, you can utilize it; if not, this topic includes a SQL command for creating an X-Small warehouse.
You can drop these objects to delete them from your account once you've finished the tutorial.
Database Creation
Using the CREATE DATABASE command, create the sf_tuts database:
create or replace database sf_tuts;
It's worth noting that you don't need to establish a schema in the database because each Snowflake database comes with a default schema named public.
Also, keep in mind that the database and schema you just established are now active for this session. This data is presented in your SnowSQL command prompt, but it may also be seen using the context functions.
select current_database(), current_schema();
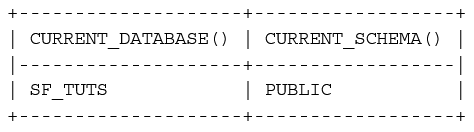
Table Creation
Using the CREATE TABLE command, create a table named emp_basic in sf_tuts.public
create or replace table emp_basic (

  first_name STRING ,

  last_name STRING ,

  email STRING ,

  streetaddress STRING ,

  city STRING ,

  start_date DATE

  );
The table's number of columns, their positions, and data types correspond to the fields in the example CSV data files you'll be staging in the next step of this tutorial.
Virtual Warehouse Creation
Using the CREATE WAREHOUSE command, create an X-Small warehouse named sf_tuts_wh:
create or replace warehouse sf_tuts_wh with

  warehouse_size='x-small'

  auto_suspend = 180

  auto_resume = true

  initially_suspended=true;
The warehouse is not started at first, but it is set to auto-resume, which means it will start automatically when you perform your first SQL operation that demands compute resources.
Also, keep in mind that the warehouse is now in use for your session. This data is shown in your SnowSQL command prompt, but it may also be seen using the context function:
select current_warehouse();

Step 3: Stage the Data Files
Snowflake may load data from files that have been staged internally (in Snowflake) or externally (in Amazon S3, Google Cloud Storage, or Microsoft Azure). If you already save data files in these cloud storage systems, loading from an external stage is convenient.
In this tutorial, we will upload (stage) the sample data files (downloaded in Prerequisites) to an internal table stage. The command used to stage files is PUT.
Files Staging
PUT is used to upload local data files to the table stage for the emp_basic table that you built. Because it refers to files in your local environment, the command is OS-specific:
For Windows OS:
PUT file://C:\temp\employees0*.csv @sf_tuts.public.%emp_basic;
Let’s take a closer look at the command:
- file: specifies the full location and names of the files to be staged on your local machine. Wildcards in the file system are permitted.
- @
.% signifies that the stage for the specified table, emp_basic in this case, should be used.
The following is the output of the command, which shows the files which were staged:

The TARGET_COMPRESSION column indicates that the PUT command compresses files by default using gzip.
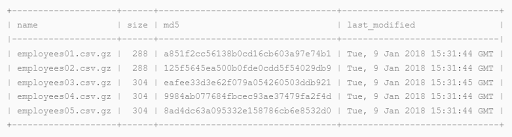
Listing the Staged Files (Optional)
Using the LIST command, you may see a list of the files you successfully staged:
LIST @sf_tuts.public.%emp_basic;
Step 4: Copy Data into the Target Table
To load your staged data into the target table, run COPY INTO
This command necessitates the creation of an active, functioning warehouse, which you did as a precondition for this tutorial. You'll need to construct a warehouse if you don't already have one.
COPY INTO emp_basic

  FROM @%emp_basic

  FILE_FORMAT = (type = csv field_optionally_enclosed_by='"')

  PATTERN = '.*employees0[1-5].csv.gz'

  ON_ERROR = 'skip_file';
Let's take a closer look at this command:
- The FROM clause specifies the location of the internal stage.
- The double-quote character (") is used to encapsulate strings in FILE FORMAT, which identifies the file type as CSV. Snowflake can handle a wide range of file types and options. CREATE FILE FORMAT describes how to do this. All additional default file format options are supported by the example COPY statement.
- PATTERN loads data from all files that match the regular expression .*employees0[1-5].csv.gz using pattern matching.
- When the COPY command discovers errors in the files, ON ERROR defines what to do. By default, the command stops loading data when it encounters the first error; however, we've told it to skip any files that contain errors and proceed on to the next one. Note that this is only for demonstration purposes; there are no mistakes in any of the files in this tutorial.
The COPY command also has a feature that allows you to validate files before loading them. Additional error checking and validation instructions may be found in the COPY INTO
topic and the other data loading tutorials.The following are the results of Snowflake:

Step 5. Query the Loaded Data
You can query the data loaded in the emp_basic table using standard SQL and any supported functions and operators.
You can also use typical DML instructions to change the data, such as changing the loaded data or introducing new data.
Query All Data
Return the entire table's rows and columns:
select * from emp_basic;

Insert Additional Data Rows

You can use the INSERT DML command to insert rows directly into a table in addition to loading data from staged files.
To add two extra rows to the table, for example:
insert into emp_basic values

  ('Clementine','Adamou','cadamou@sf_tuts.com','10510 Sachs Road','Klenak','2017-9-22') ,

  ('Marlowe','De Anesy','madamouc@sf_tuts.co.uk','36768 Northfield Plaza','Fangshan','2017-1-26');
Query Rows Based on Email Address
Using the LIKE function, return a list of email addresses with UK domain names:
select email from emp_basic where email like '%.uk';

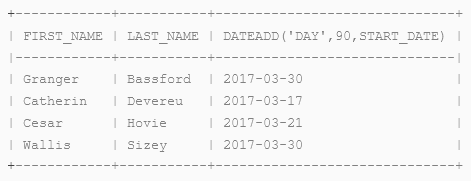
Query Rows Based on Start Date
To calculate when some employee benefits might begin, add 90 days to employee start dates using the DATEADD function. Filter the list to exclude individuals who started before January 1, 2017:
select first_name, last_name, dateadd('day',90,start_date) from emp_basic where start_date <= '2017-01-01';
Step 6. Summary and Clean Up
Congratulations! This tutorial has been finished successfully.
Please take a few moments to examine a brief summary of the tutorial's main elements. You could also wish to clean up by removing any objects you made during the course. We also provide links to other topics in the Snowflake Documentation at the bottom of the page if you want to learn more.
Become a Snowflake Certified professional by learning this HKR Snowflake Training in Hyderabad !
Summary of this Tutorial and Key Points
In conclusion, data loading is divided into two steps:
Step 1: Files containing data to be loaded should be staged. Internally (in Snowflake), or externally, the files could be staged.
Step 2: Data from the staged files should be copied into a target table. This step requires a fully operational warehouse. You must also have an existing table into which the data from the files would be loaded to complete this step.
When loading CSV files, there are a few points to keep in mind:
- A CSV file is made up of one or more records, each with one or more fields, and often a header record.
- Delimiters are used to separate records and fields in each file. The following are the default delimiters:
- Records: newline characters
- Fields: commas, In other words, Snowflake expects newlines to divide each record in a CSV file, and commas to separate the fields (i.e. individual values) within each record. You must explicitly indicate this as part of the file format when loading if different characters are used as record and field delimiters.
- In terms of the following, there is a direct correlation between the fields in the files and the columns in the table you will be loading:
- The number of fields (in the file) and columns (in the target table).
- Field and column positions inside their respective file/table.
- For fields and columns, data types such as string, number, or date are used.
The records will not be loaded if the numbers, positions, or data types do not all match.
Tutorial Clean Up (Optional)
To get your system back to where it was before you started the lesson, do the following DROP
Related Article:
About Author
Upcoming Snowflake Training Online classes
| Batch starts on 17th Jul 2026 |
|
||
| Batch starts on 21st Jul 2026 |
|
||
| Batch starts on 25th Jul 2026 |
|