- Jira Software Tool?
- Major advantages of using Jira Software
- Jira Architecture Overview
- Jira – core features
- Jira project types
- How to create your new project
- Jira Workflow
- Jira– Issue types
- Jira –Dashboard
- Types of boards
- Jira Reports
- Types of reports
- Differences between Jira and Bugzilla
- Conclusion
Jira Software Tool
JIRA is a software testing tool first developed by an Australian company called Atlassian. The main purpose of developing this software is to track bugs, issue tracking, and agile project management. The word “JIRA” was first inherited from the Japanese word “Gojira” which means “Godzilla”. In any software company, the main purpose of using this JIRA testing tool is used for detecting bugs, errors, and exceptional handling purposes. This JIRA software dashboard consists of useful tools and functions to handle all types of issues while developing any software product.
JIRA Software is an incidental testing tool and this is a platform-independent tool so that it runs on any operating systems. One important thing about JIRA is that this software tool is available in different languages as it is a multilingual tool. (Languages like English, German, Spanish, and Japanese, etc.). This JIRA tool can be integrated with many other tools like GIT, Team foundation software, Clear case, Mercury, and Concurrent system versions. JIRA software tool supports various programming languages like MySQL, PostgreSQL, Oracle Database, and SQL servers.
Become a master of Jira by going through this HKR Jira Training!
Major advantages of using Jira Software:
The below are the major advantages of using JIRA software, as I said earlier this is one of the popular testing tool widely used in Agile project management.
- JIRA is a multilingual tool and also platform-independent so that this can runs on different operating systems.
- JIRA workflows are easy to customize completely based on user requirements.
- Cost-effective and user-friendly software testing tool
- Using the JIRA tool user can easily debug the complex errors.
- JIRA software tool allows users to track the progress of a project on time to the time base.
- You can also use JIRA in HELP DESK support, and customer representatives to create the resolution to keep track of the bugs or tickets.
- JIRA is a useful tool in project management, requirement management, and task management.
Jira free trail and license:
The below points will give you a complete guide to JIRA membership and account details:
- JIRA software is a commercial tool and you will get a trial version of the software for a limited period.
- To utilize complete JIRA software a license is required.
- One important thing about JIRA is that this software tool offers a free license for academic projects.
Jira Architecture Overview
In this architecture section, you will see the overall dependencies and role of each component. Let us discuss further:
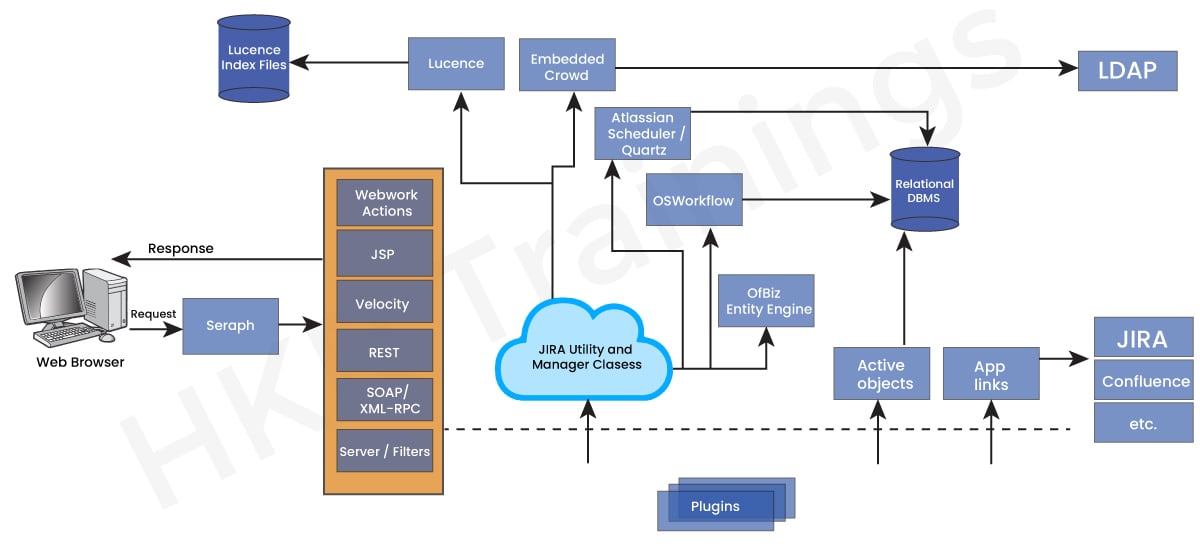
JIRA Software is a web application that is written in the JAVA language. This JIRA software will be deployed as a WAR file into a JAVA servlet container known as Tomcat. While working with JIRA software, Users can interact with the JIRA web application browser. Mainly JIRA uses the Symphony’s web logic work to process the web application requests. WebLogic is an MVC framework that is similar to struts. Each user request can be handled by MVC WebLogic actions that make use of other objects, for example, utility and manager classes utility. JIRA uses the java server page used for the view layer. So here almost all the HTML requests will be served to the user and get a response generated by JSP. To perform all these web-related request tasks uses the JSP servlets.
frequently asked Jira Interview Questions and Answers !!
Jira – core features
The following are the important commonly used JIRA features and their uses:
1. Boards:
Here JIRA supports the SCRUM, Agile, and Kanban boards. These boards offer an immediate snapshot of the project details to the teams. This also helps to get a quick review of the project and enables you to see the status of the individual tasks. The board workflow can also be used to customize the requirements to fulfill the team’s needs.
2. Business Project template:
JIRA software tool supports a number of templates where these are used to manage both the simple tasks as well as Complex tasks like Workflow. The templates can also be customized on the basis of team requirements. With the help of these business templates, each step is accounted for and teams can be moved to achieve their success.
3. Task details:
The task is nothing but work that is used to specify the individual progress level. Here you can also mention the status of each task, attachments, comments, and also due dates will be stored in one place.
4. Notifications:
Notification is nothing but an email that can be sent to the user to know about a particular task. In this notification feature, you can also perform voting and watching features to keep track of the work progress for the stakeholders. Here make use of @mention to get the complete attention of the specific project team members at the comment or description section.
5. Power search:
JIRA software tool supports a powerful search methodology with quick, and basic to advanced level features. Use this tool as a search tool to find out the answers related to the due date, and project information in one place.
6. Reports:
JIRA offers more than a dozen reports mainly used to keep track of the progress which is related to the mainframe, individual contribution, and deadlines, etc. Reports can help you to better understand each task and create different report types to analyze the performance. With the help of this report feature, it’s easier to configure and display various matrices to the stakeholders.
7. Scale with team growth:
JIRA supports the business team and any project type irrespective of team size or complexity.
8. Add-Ins:
In JIRA you can see more than 150 add-ins that are used to connect with different software to reduce the complexity of the project. Here Wide range of add-ins can be used across the globe for business purposes.
9. Multilingual:
JIRA Software supports more than 10 programming languages used as English, French, German, Spanish, Korean, Russian, and Japanese.
10. Mobile application:
JIRA software is also available in the form of mobile applications. So you will get this app on Google play store and iTunes App Store. It’s very easy to connect with the team while moving the notification or comment.
Related Article: Jira Dashboard
Jira project types
JIRA contains various types of projects. A project also consists of issues, and a JIRA also holds a collection of issues.
- Marketing project
- Software development projects
- Migration to other project platforms
- Help desk tracking projects
- Leave request management systems
- Employee performance system and website enhancement.
How to create your new project
In this section, we are going to the steps involved to create your first project.
Steps:
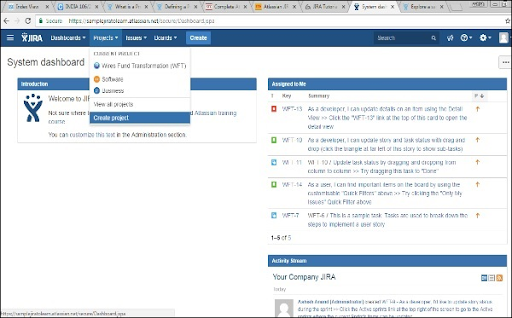
1. To create your first project -> the first login as a JIRA service desk admin -> then click on the project -> create the project.
The below screenshot will explain this step and here you need to click on the create Project button available on the dashboard.
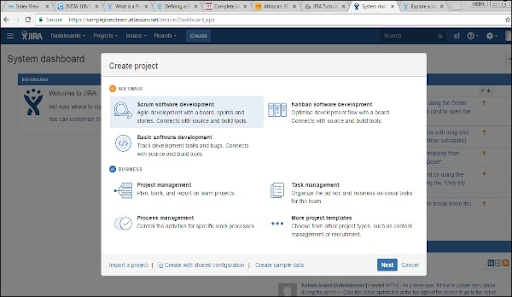
2. Now choose the type of project -> that suits your requirements and the process to follow.
The below screenshot will explain the type of JIRA projects available:
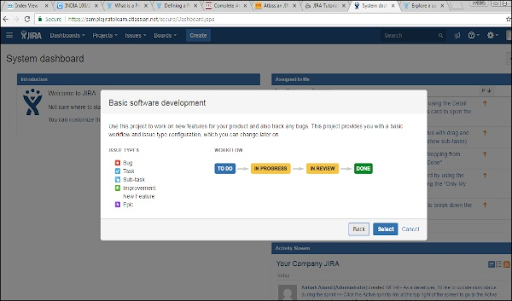
3. Once you selected the type of project -> to click next -> here the user can see the flow of the project -> we have selected the basic software development.
The below screenshot will display the available issue types and the workflow details as shown in the diagram.
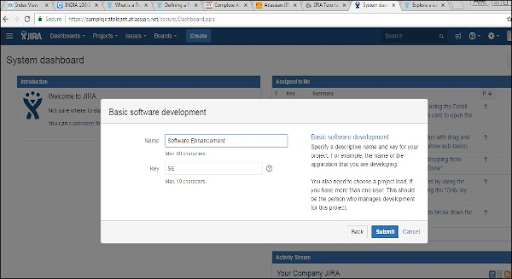
4. Now click on the select button -> enter the name of the project -> click the confirmation key -> finally click on the submit button.
This step as shown below:

Jira Training Certification
- Master Your Craft
- Lifetime LMS & Faculty Access
- 24/7 online expert support
- Real-world & Project Based Learning
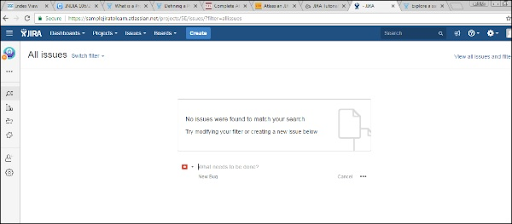
5. The page which consists of issues will be displayed here. The below screenshot shows any issues that are linked with a newly created project.
Jira Workflow
JIRA workflow is a set of software-related activities that are used to perform operations like tracking an issue and transitions during the software development life cycle. The transition is a link between the two statues and issues move from one transition status to another status. The status defines the nature of the work which is done by the tester.
The following diagram explains the different issue phases that occur during the JIRA workflow.
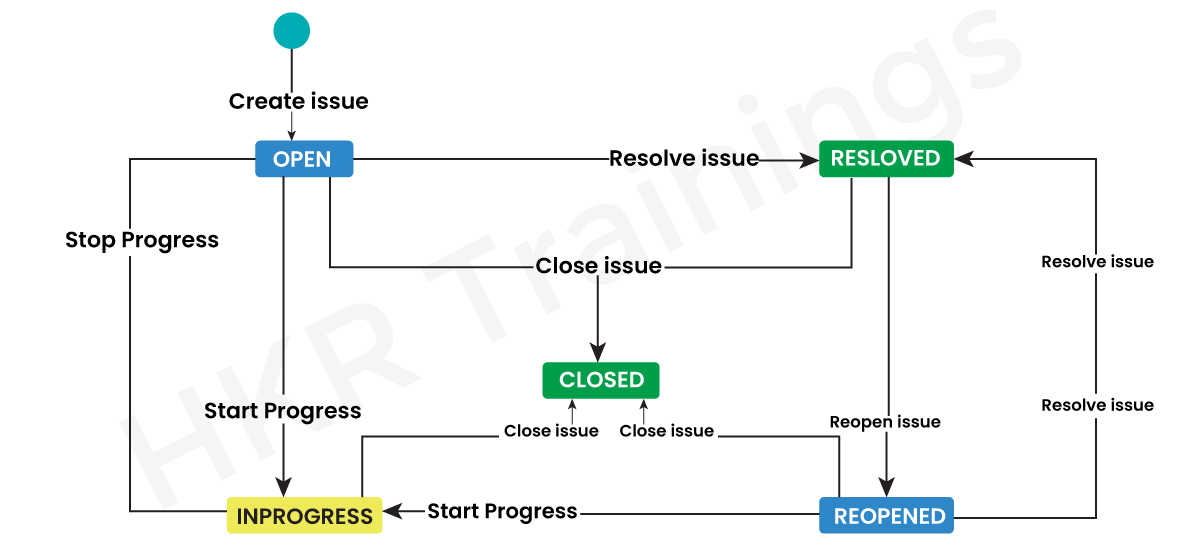
JIRA workflow is a set of software-related activities that are utilized to track issues and manage transitions during the software development life cycle. The transition acts as a link between different statuses, allowing issues to move from one status to another. Each status represents a specific phase of work performed by the tester. To gain a comprehensive understanding, let's delve into the various phases that occur within the JIRA workflow:
1. Open issue: At the start of the workflow, issues are created and assigned to the tester to begin working on them.
2. In progress issue type: This phase indicates that the software testers are actively engaged in performing issue tracking operations.
3. Resolved issue type: In this phase, all sub-tasks and main tasks related to the issue are completed. The issue is then ready to be verified by the appropriate reporter. If the verification is successful, the issue task is closed. However, if any modifications are required, the issue is reopened for further changes.
4. Reopened issue type: This phase arises when an issue has previously been resolved, but the resolution did not address all the necessary aspects. Modifications are required at this stage, and the issue is marked for further changes.
5. Close issue type: This final phase signifies the completion of the issue. If the resolution meets the requirements, the issue can be closed.
In addition to these phases, a JIRA workflow encompasses various components that contribute to its functionality:
- Statuses: These represent the positions of the issues within the workflow, indicating their progress or completion.
- Transitions: These connect statuses and enable the movement of issues from one status to another, tracking their flow through different stages.
- Assignee: The assignee is responsible for a specific issue and manages how the task is performed, ensuring accountability.
- Resolution: This signifies the final state of an issue, typically transitioning from an open status to a closed one, indicating its resolution or completion.
- Conditions: These control who can perform a transition, ensuring that relevant criteria or requirements are met before moving an issue to the next status.
- Validators: Validators ascertain that a transition can take place based on the state of the issue, validating the necessary information or requirements before proceeding.
- Properties: JIRA identifies properties on transitions, which can be used to further customize or define the behavior of the workflow.
Understanding these components and the different phases of a JIRA workflow provides a comprehensive overview of its structure and functionality, ensuring efficient tracking and management of software development processes.
Jira– Issue types
JIRA Issue types are a crucial aspect of managing work progress. They allow you to specify the individual progress level of tasks within a project. In addition to tracking progress, JIRA Issues provide a centralized location to store relevant details and information. This includes important aspects such as task status, attachments, comments, and due dates. By consolidating all these elements in one place, JIRA ensures that you have a comprehensive overview of each task's status and associated information. This comprehensive approach simplifies project management and facilitates effective collaboration among team members.
Here we are going to mention a few issue types which are rises based on requirements or organization:
- Task of a story
- Story of any project type
- Sub-task story type
- A defect or bug can also be called an issue.
- Tickets in helpdesk can also be logged as an issue.
- Leave a request.
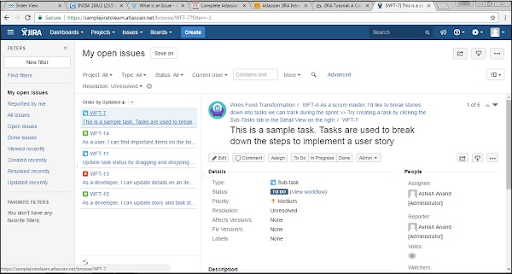
The following screenshot explains the basic issue page and details of an open issue type:
How can I search for and perform functions on issues in JIRA?
In JIRA, there are different types of issues that you can work with. Let's explore them in detail:
- Search for issues: This option allows you to navigate to the search JIRA page, where you can provide specific search criteria to find the desired issues. It provides a convenient way to locate and work with specific items.
- Recent issue: This functionality displays a list of issues that you have recently viewed. It helps you quickly access and review the items that are of interest to you.
- Import issue from CSV: If you have a list of issues in a CSV file, this feature allows you to easily import them into JIRA. You can map the relevant fields to ensure accurate data transfer, saving you time and effort.
- My open issue type: This filter section is particularly useful for managing your own workload. It displays all the issues that are currently open and assigned to you. This way, you can prioritize and focus on your tasks efficiently.
- Reported by me type: This filter section allows you to view the issue types that have been created by you. It helps you track and manage the items you have reported, ensuring their progress and resolution.
- Manage filter type: With this functionality, you can customize your filter types according to your specific requirements. Additionally, it provides access to any saved or favorite filters, enabling quick and easy retrieval of specific sets of issues.
By familiarizing yourself with these different types of issues and utilizing the corresponding functionalities, you can effectively search for and perform various functions on issues in JIRA.
Jira –Dashboard
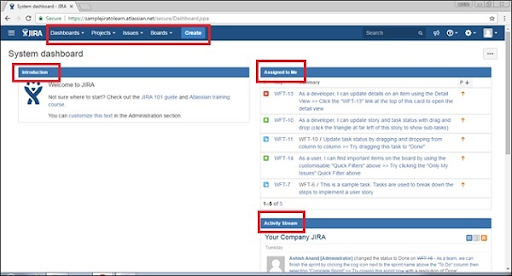
Here the JIRA dashboard is the first page when you logged into the JIRA software. This type of JIRA dashboard is also customized by System Admin. Admin has all the right to change and logo of JIRA software.
Important points to be considered in the Dashboard:
The following are the important factors in the dashboard:
- Go to the navigation bar-> which is present at the top of the JIRA page -> JIRA pages are the same for all the pages, screens, dashboards, projects, issues, boards and creates in the main links. These main links also consist of sub-links to navigate other JIRA functionalities.
- This navigation bar also consists of links that offer a quick assessment of the useful system functions in JIRA software.
- Then under the navigation bar -> you can find the system dashboard.
- The information available in the system dashboard area -> dashboard functionalities can also be customized by the system admin.
- by default -> there are three main sections are available -> Introduction, assigned to me or display the issue list assigned to other users, and activity streams (these activities can also be done by the users).
The following screenshot explains the overview of the JIRA dashboard:
Types of projects:
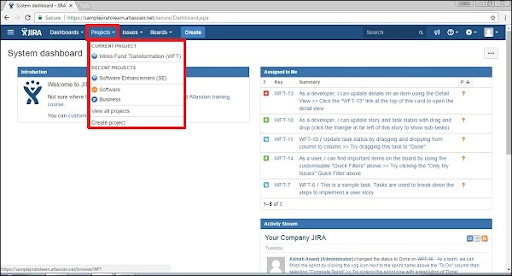
The project link contains several sub-links, which will be explained in detail:
- Current project type: this project displays the project name, where the user can view the dashboard of the project. By clicking on the project name -> this will display the list of different issues associated with the project.
- Recent project type: This project type displays the name of the recent project and the user has to access this project. If the user finds an already existing project -> where the user can access the project list under the header.
- Software type: This software type is a kind of sub-link this navigates to a list of project types. These project types are called software.
- Business type: This is also known as the project type. Once you click here -> this will display the list of business project types.
- View all projects type: this will display the project lists, and these are associated with the logged files.
- Create project type: this create project link is accessed by a System admin or depends on different roles. If the link is visible, then the user can create a new project.
The following screenshot explains the various project types in JIRA:
Types of issues:
This consists of various sub links to access other functionalities. The following screenshot explains the type of issues category:
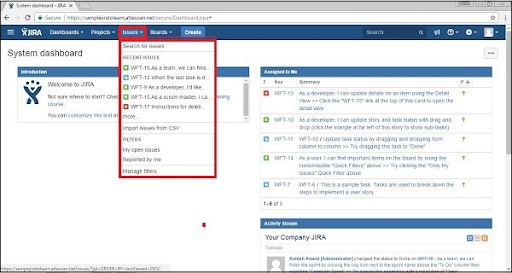
- Search for issues: this issue navigates to the search JIRA page -> here the user can offer search criteria.
- Recent issue: this displays the list of issues that are viewed by the user.
- Import issue from CSV: this feature allows the user to import the list of issues in the form of uploading CSV files and mapping the issue related fields.
- My open issue type: In this type of filter section, displays various issues that are open and assigned to the logged or authorized users.
- Reported by me type: in this filter section, you can view the issue type, which is already created by the already logged users.
- Manage filter type: this section helps to customize the filter types and also displays already saved filters or favorite filters.

Subscribe to our YouTube channel to get new updates..!
Types of boards:
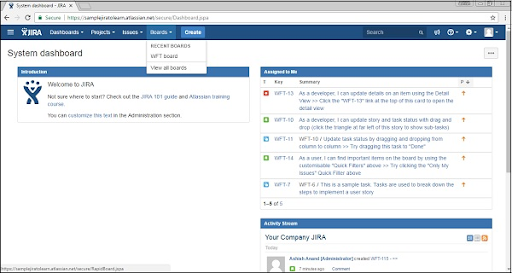
Boards are used to showcase the process that will be followed by a project. This board is one of the famous Agile boards if you are working on agile methodology projects. There are two boards available:
- Recent board type: this board displays a recent project board that is accessed by any user.
- View all boards’ type: this board displays the available project boards.
The following screenshot defines the board types:
JIRA – Screens:
There are two types of Screens available they are:
- View screen:
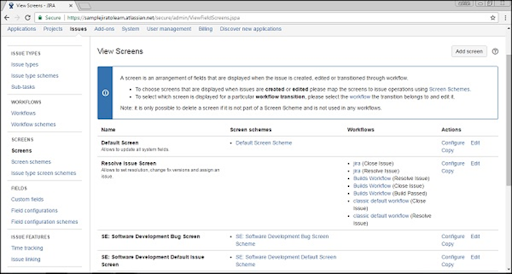
This is the arrangement and field representation to display in User Interface (UI) when you create a new issue is generated or an already existing issue is modified. This type of already existing issue is transitioned from one status to another. The navigation as follows:
If the user login into the system as Admin -> go to settings-> select issue -> then choose screens, then you will be able to see the screens which are available.
Now you can see the following screenshot:
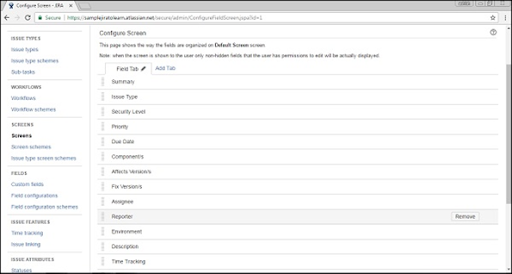
By clicking the configure tab -> you will be able to see all the available screens with fields. The below screenshot will show you how to configure the view screen field:
2. Screen Schemes:
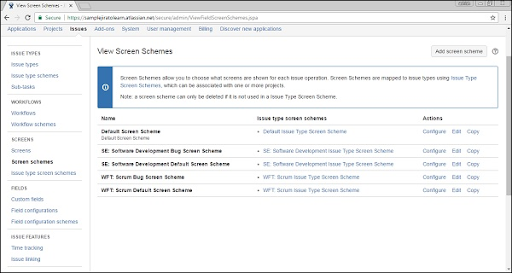
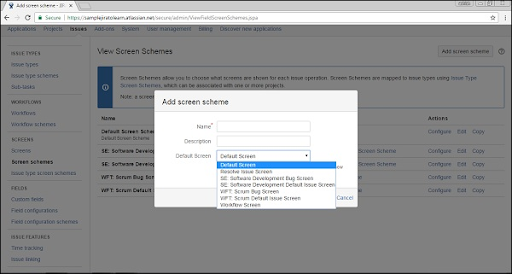
Screen scheme is used to provide an option to the filed screen; with the help of this, you can select a particular issue type. A screen scheme will be mapped with other issue types by using the issue type screen scheme. The screen schemes will be associated with one or more projects. You can also delete the screen scheme if it is not used by any type of screen scheme. Here user can also insert a new screen scheme only by clicking on the “add screen scheme tab”. The following screenshot will show you how to add a new screen scheme:
Here you need to provide all the required details and then click on the “Add” button. Screen shot explains this:
Jira – how to clone an issue:
Cloning is a type of copy. Cloning issue in JIRA allows users to generate a duplicate of the original issue so this makes the developer work on a single issue in a single project. The clone issue in JIRA can be connected to the original issue and holds various information.
Below points are considered to be very important when you performing cloning an issue task:
- A cloned issue is a spate issue from the already existing original issue.
- Any action or task that has taken place on the original issue will not affect any clone issue or vice versa.
- The link will be created to connect between the original and the clone issue.
- The following are the important information that will be carried from the original issue type to the clone issue:
- Summary details
- Description details
- Assignee
- Work environment info
- Issue type
- Security info
- priority detail
- Reporter and component detail
- data affects version
- Fix version method
- Attachments
- projects
- cloning the contents and customization of the field.
In JIRA some information cannot be cloned:
- time tracking details
- Comment section
- Issue tracking info
- Links to different confluence pages.
Jira Reports
JIRA offers different types of reports in the project development. These reports help to analyze the progress, showstoppers, timelines, and issues, etc. The JIRA reports also help to utilize the resources.
How to access reports:
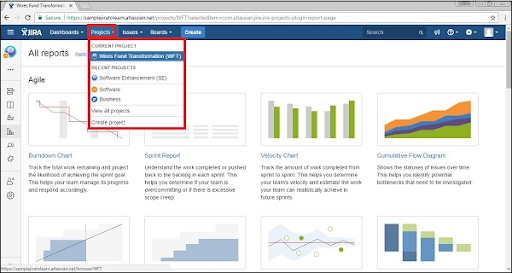
To access any report in JIRA, first, go to project -> choose the project (that you required). The below screenshot explains this navigation:
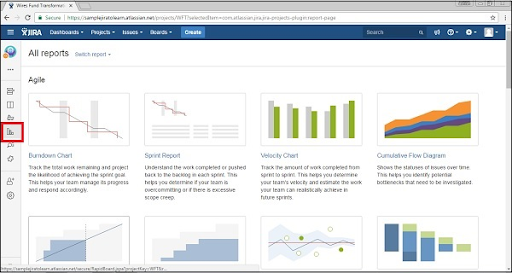
Next click on the report icon available on the left side of the page. This will display all the report types supported by JIRA. The following screenshot will explain this;
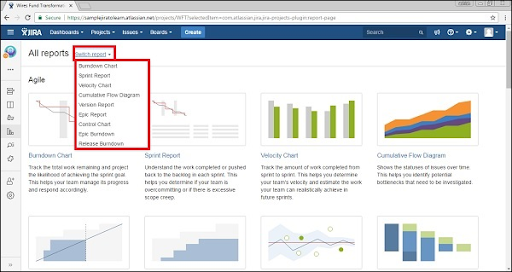
When the user clicks on the Switch report -> this will display the list of reports. This is shown below:
Types of reports
JIRA can be categorized into four levels of reports, they are-
- Agile
- Forecast and management
- Issue analysis
- Others.
Let me explain them one by one:
1. Agile:
The following are the list of agile reports:
- Burndown chart: this report tracks the total work and also used to check whether the project goal is achieved or not.
- Velocity chart: This report tracks the total amount of work completed from one sprint to another.
- Sprint chart: here the total amount of work completed or pushed back to the backlog file in each sprint chart.
- Version report: this report tracks the project release date and version.
- Cumulative flow diagram: this report shows the status of an issue and also helps to identify the high-level risks.
- Control chart: this type of report shows the product cycle time, version, and sprint.
- Epic burn down: used to track the project sprint numbers and sprints are used to finish the epic.
2. Issue analysis:
The following are important reports of issue analysis:
- Average Age report: this displays the average age of unsolved issues.
- Created versus Resolved issue report: this displays the number of issues is created versus the number of issues resolved.
- Pie chart report: with the help of a pie chart you can show the number of issues in a given time period.
- Resolution time report: with the help of this report, you can display the average time taken to resolve the issue.
3. Forecast and management:
1. Time tracking report: This report shows the time estimates (for both original and current issue) in the current project type. It also helps to check whether work is on track or not.
2. User workload report: this report shows the estimated time required for unsolved issues and also helps to understand how much user is occupied in the project work.
3. Version workload report: this report displays how much work is remaining to complete the task. And this also helps to understand the work version.
Differences between Jira and Bugzilla:
Let me explain a few important differences between JIRA and Bugzilla:
Bugzilla:
- Bugzilla is an open-source software tool.
- Bugzilla is not a user-friendly tool.
- Drag and drop issue options are not available in Bugzilla.
- Bugzilla has only one configuration link type.
- Supports clocks/user depends on the custom option available.
- Bugzilla owns, shows/hides customized common filed and specific values.
JIRA:
- whereas JIRA is a commercial software tool.
- JIRA ids a user-friendly software tool.
- Drag and drop issue options are available in JIRA.
- JIRA has a configuration link types which contains user-defined semantics.
- JIRA has pluggable debugging links and users can access them outside of the tool.
- JIRA software tool allows customized configuration based on the project type and type fields.

What is JIRA Agile and how can I create an issue in Agile?
JIRA Agile, also known as the Scrum method, is a widely used framework by development teams to plan and manage the features and versions of their products. It provides a roadmap for tracking issues, similar to other JIRA methods.
To create an issue in JIRA Agile, follow these steps:
1. Navigate to the main menu and click on the Agile tab.
2. Select "Getting Started" to begin the process of creating a new issue board.
3. You will be prompted to choose between creating a Scrum or Kanban board for your issues.
In JIRA Agile, an "epic" is a specific type of issue. It represents a large body of work that can be broken down into smaller user stories. Epics may span across multiple sprints to complete. You have the option to create a new epic or utilize an issue that has already been created in the normal JIRA board.
Similarly, you can create a "story" in Agile Scrum, which represents a smaller, more manageable piece of work.
By following these steps, you can effectively utilize JIRA Agile to plan, track, and manage issues within your development team.
What is JIRA Scheme?
JIRA Scheme refers to a comprehensive configuration system in JIRA that allows users to customize various aspects of their project. It provides a way to define and manage settings for permissions, custom fields, workflows, issue types, notifications, screens, and field configurations within JIRA.
With JIRA Scheme, administrators have the ability to fine-tune and control the access and actions that different users or groups can perform within the system. This includes setting permissions at different levels, such as project, issue, or even field level, ensuring that only authorized individuals can view, edit, or transition issues.
Furthermore, JIRA Scheme enables the creation and management of custom fields, allowing users to capture specific information relevant to their project or organization. These custom fields can be customized with different data types, validations, and options, enhancing the flexibility and usability of the JIRA system.
Workflows are another important aspect of JIRA Scheme, offering the ability to define and customize the life cycle of an issue, specifying the different statuses, transitions, and conditions required for issue progression. This enables users to tailor workflows to their specific business processes, ensuring a smooth and efficient project management experience.
Issue types, on the other hand, allow users to categorize and differentiate different types of issues within a project, providing a way to organize and manage diverse sets of tasks, bugs, or enhancements.
In terms of notifications, JIRA Scheme allows users to configure who should be notified and when, ensuring that relevant stakeholders are kept up to date with changes, updates, or important events occurring within the project.
Screens refer to the user interface components that display and capture information in JIRA. With JIRA Scheme, administrators can customize these screens to match their specific requirements, adding or removing fields, and arranging them in a way that optimizes user productivity and experience.
Conclusion
JIRA is a software tool that is used to perform bug tracking, issue tracking, and project management. In recent times, more than 48% of companies are implementing JIRA software while working on agile, waterfall, From this tutorial, you might get a few ideas about the JIRA software tool. I hope this tutorial helps you to un eash your knowledge in software testing tools.
About Author
As a Senior Writer for HKR Trainings, Sai Manikanth has a great understanding of today’s data-driven environment, which includes key aspects such as Business Intelligence and data management. He manages the task of creating great content in the areas of Digital Marketing, Content Management, Project Management & Methodologies, Product Lifecycle Management Tools. Connect with him on LinkedIn and Twitter.
Upcoming Jira Training Certification Online classes
| Batch starts on 11th Feb 2026 |
|
||
| Batch starts on 15th Feb 2026 |
|
||
| Batch starts on 19th Feb 2026 |
|

