
JMeter Installation
Last updated on Nov 07, 2023

1. Installation of JMeter
You must always utilize the newest version of JMeter, according to the article titled "9 Easy Solutions for a JMeter Load Test "Out of Memory" Failure". Verify the JMeter Release Notes to see which version is the most current and stable.
The following are the steps to take:
- Install the most recent 64-bit Java Runtime Environment (JRE) or Java Development Kit (JDK). JMeter is a pure Java application, so this is vital.
- Go to the Apache JMeter website and download the Binary to your computer.
- Move this file to your chosen location after downloading it, extract it, then go to the folder, then the bin directory.
- Look over it. A succession of scripts should appear, each of which can execute JMeter in a different mode.
Now you have everything you need to get started on your test plan.
Postscript, We suggest that you install Java and JMeter using the approach described above for the following reasons:
JMeter might be available through your Linux distribution package manager. The authenticity of the version, on the other hand, is a significant question mark. For example, JMeter 5.4, which was published at the end of 2020, is currently available in Ubuntu (one of the most widely distributed Linux distributions).
There are certain exceptions that JMeter comes with all the files you need to build and run most tests. For database load testing, for example, you'll need the JDBC driver, and for JMS load testing, you'll need the MQ client libraries.
Become a master of Jmeter by going through this HKR JMeter Online Training
2. Developing Your First JMeter Test Plan
To get JMeter up and running, do the following:
- In the command-line interpreter application, navigate to the JMeter installation's "bin" directory. (For Windows, use cmd.exe or Powershell; for Mac/Linux/Unix, use Terminal.).
- Type the following command in the prompt:
For Mac/Linux/Unix: ./jmeter.sh
For Windows: jmeter.bat
It is suggested that you use the command-line interpreter since you will be able to see the output in the console window when something goes wrong. If JMeter does not start after you double-click the icon of its startup script or the ApacheJMeter.jar file, you will be unaware of the failure reason.
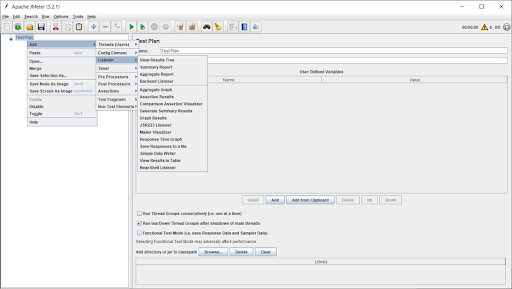
You must now have an empty test plan (as seen in the below picture):

You haven't seen the JMeter graphical user interface yet? Verify that:
- The JAVA_HOME environment variable specifies the location of the JRE or JDK installation folder.
- The PATH environment variable now includes the JAVA_HOME/bin folder.
- The jmeter.log file (which is generated in JMeter's "bin" folder when you start JMeter) is the output of JMeter starting script execution in the command-line interpreter window.
We have the perfect professional JMeter Tutorial for you. Enroll now!

Jmeter Training
- Master Your Craft
- Lifetime LMS & Faculty Access
- 24/7 online expert support
- Real-world & Project Based Learning
3. What is a Test Plan?
You should provide the overall parameters and the steps you need JMeter to perform when it runs in your test plan. You can also give it a name and leave comments for future reference.
Creating a Complete Test Plan
You have To:
Configure at Least One Thread Group and Sampler
The number of users you would like to simulate is specified in a Thread group. One thread = one user. You could also tell JMeter how long it should take to reach all of the threads you've selected by specifying the ramp-up period. With the Loop Count, you can also specify the number of iterations for each person in the group.
Configure Samplers
Samplers are critical since they are the ones who do the actual work in JMeter. JMeter runs the samplers and logs the results, including the start time, length, success, response messages, and so on. These results can be viewed using listeners (but more on that later). The HTTP Request sampler is the most often used sampler since it allows you to submit an HTTP or HTTPS request to a web server.
We Suggest That You:
Add Timers
You can specify the duration of the delay between requests here (i.e. how long would you like JMeter to wait before jumping from the home page to the features page?). Real users don't constantly hammer the system under test; they require time to "think" in-between activities, which is why it's critical to precisely imitate this behavior in order to provide a realistic network footprint. For further information, see the article A Comprehensive Guide to JMeter Timers.
Add Configuration Elements
These allow you to control aspects such as the cache and cookies while the test is running. To simulate browser behavior, we recommend installing the "HTTP Cache Manager" and "HTTP Cookie Manager." This article explains how to make JMeter behave like a real browser.
Add Assertions
You can use these to define your test's pass or fail criteria. Let's imagine you want your website or app to reply in less than 100 milliseconds. A Duration Assertion could be used to state that any answer that lasts longer than 100 milliseconds will result in the sample being classed as "failed."
The Response Assertion is the most crucial assertion to comprehend. It's no surprise that this covers 99 percent of your requirements. It lets you test the URL, response body, messages, embedded resources, redirects, and headers, among other things. This assertion allows you to test regular expressions rather than text patterns, which provides you a lot of versatility. Regular expressions are handled in JMeter in a similar way to Perl, with the exception that the expression is not enclosed in //'s.
In our blog post, how to use JMeter Assertions in Three Easy Steps, we explain what assertions are, what they do, and how to use them.
FREQUENTLY ASKED JMeter INTERVIEW QUESTIONS
Subscribe to our YouTube channel to get new updates..!
Add Listeners
As previously stated, these allow you to view the outcomes of a sampler. You can see them as a table, graph, tree, or log file in a variety of formats. Listeners could be placed anywhere in the test, but they will only collect data from items on the same level or below.
The View Results Tree listener is the most popular since it displays all of the test plans results in a logical tree format. The Assertion Results, Aggregate Report, and Beanshell Listener are among the other listeners.
One thing to keep in mind is that when you perform the load tests, you should disable all of your listeners because they consume a lot of memory. The next blog post in this series will go into the dos and don'ts of running tests in greater depth.
4. Components to Include in Your Test Plan
Before you execute the test plan, you can set up and include all of these components. Here's how to do it:
- Right-click on the name of your test plan.
- Select ‘Add’.
- Select the component you would like to set up and configure.
[Related Blog: JMeter Performance Testing]
Conclusion
In this blog, we have successfully learned how to install JMeter as explained with implementation steps. Further, we have discussed how to build the test plan for JMeter using the command line interpreter. We have also learned about creating a complete test plan by implementing a Thread Group and sampler configurations and at last applying the configuration steps for adding components to the test plan.
About Author
Upcoming Jmeter Training Online classes
| Batch starts on 26th Jul 2026 |
|
||
| Batch starts on 30th Jul 2026 |
|
||
| Batch starts on 3rd Aug 2026 |
|