
MSBI Incremental load in SSIS
Last updated on Nov 07, 2023

Incremental load in SSIS
An incremental load is useful to check the target table against the source table based on timestamp. To keep data between two systems in sync with each other, we can use incremental loads in SSIS. It helps in cases where we need to load data into the destination regularly. SSIS provides features to easily perform incremental load with configuring a few steps.
Why incremental load?
After a data import, if new data is added to the source table, then data inconsistency occurs. If we send the entire table data into the target table again, there will be data duplication. To avoid these data inconsistency problems, we need to send only the data that has been added after the initial import.Incremental import in SSIS helps to send only the newly added data.
Become a SSIS Certified professional by learning this HKR SSIS Training !
Advantages of incremental load
The following are the advantages of performing an incremental load of data.
- If we modify any records in the source table, we can reflect on the changes on the target table.
- It takes very little time to perform incremental load in the ETL process.
- If we have performed reporting on the target table, then we would need that data to be updated frequently.
- We can always maintain the data consistent across source and target.
Types of incremental load in SSIS
We can perform incremental load in SSIS in four ways.
Lookup Transformation:
It checks each record of the table in the source database against the lookup (target) table in the destination database. If a record is not found, it will be added to the target table. If a record is found, the data of the record in the target table will be replaced with that of the source table.
Using CDC (Change Data Capture):
The Change Data Capture captures inserts, updates, and deletes into changed sets. We can enable CDC on the source database table. This will use the CDC change set and apply the transfer of data based on it.
Using SCD (Slowly changing dimension):
It compares the incoming source table data with the existing destination table data using a unique parameter (primary key). It checks the records for new, changed, and unchanged conditions. This method is best used for tables that are not frequently updated.
Using SQL task (Merge statement):
We can sort the data in both the source and target tables.We can then include the insert and update statements into a single merge statement. This will apply a full outer join based on a unique parameter (primary key).
Become a MSBI Certified professional by learning this HKR MSBI Training !

MSBI Training
- Master Your Craft
- Lifetime LMS & Faculty Access
- 24/7 online expert support
- Real-world & Project Based Learning
Sample table data
Let's take the below sample table as an example.
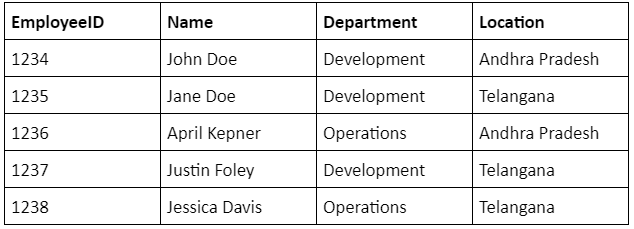
Let’s think that this table is already loaded to a target table in a destination database.Let’s add one more row to the source table that contains details like - 1239, Emily Edwards, Operations, Telangana. Now the table in the source database has 6 rows whereas the table in the target database has 5 rows.
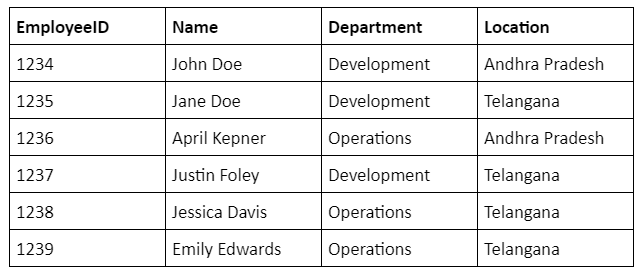
To view this source table data in SSIS,execute the below SQL query.
Want to know more about SSIS, visit here SSIS Tutorial.
SELECT [EmployeeID],

       [Name],

       [Department],

       [Location]

       FROM [HKR Trainings].[dbo].[]
would be the name of the table in your source database. You can see the below table in the Results pane.
Let’s take a look at the table in the destination database. Execute the below SQL query.
SELECT [EmployeeID]

             ,[Name]

             ,[Department]

             ,[Location]

  FROM [HKR Trainings].[dbo].[]
would be the name of the table in your destination database. You can see the below table in the Results pane. 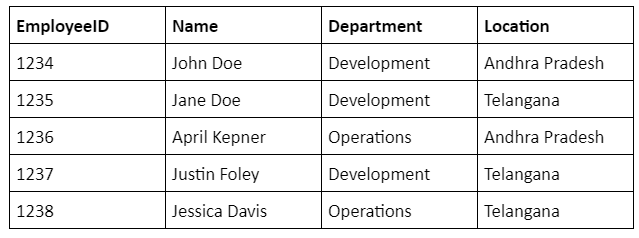
Subscribe to our YouTube channel to get new updates..!
How to Configure the incremental load in SSIS
Let us use the ‘Lookup Transformation’ method to configure the incremental load. We will have an activity called 'Data Flow Task' in the toolbox.Drag and drop it to the control flow region. Double-click on it to open the data flow region. Drag and drop the 'OLE DB Source' to the data flow region. Double-click on it to open the source editor.
Select the 'Connection Manager' from the left-side panel. Select the source database (HKR Trainings) and the source table (SourceTableName). Click on the 'Columns' tab in the left-side menu. You can see all the columns of the table that you have specified. You can uncheck the columns that you do not want. Click on 'Ok' to close the 'OLE DB Source'.
Drag and drop the 'Lookup Transformation' from the toolbox to the data flow region. Connect it to the 'OLE DB Source'. Double-click on the 'Lookup Transformation' to open its editor. Click on the 'General' tab from the left-side menu. Change the default 'Fail Component' to the 'Ignore Failure' option under the 'Specify how to handle rows with no matching entries' field. Click on the 'Connection' tab from the left-side menu. Select the connection manager (HKR Trainings) from the drop-down list. Select the 'Use results of an SQL query' radio button. Give the following query in it.
SELECT [EmployeeID] FROM []
Click on 'Columns' in the left-side menu. Select [EmployeeID] from the 'Available Input Columns', drag, and drop it to the 'Available Lookup Columns'. This creates a join between the source and the target table. Click on 'Ok' to come out of these settings.
Drag and drop the 'Conditional Split Transformation' from the toolbox to the data flow region. Connect it to the 'Lookup Transformation'. Double-click on it to open the condition settings. Set a condition for 'ISNULL'. This will check if the lookup (target) table EmployeeID is null or not. If the EmployeeID is null, then we have to insert the entire row in the lookup (target) table. If the EmployeeID is not null, then the row already exists in the destination table. We have to replace the row data with the updated one.
Drag and drop 'OLE DB Destination' and 'OLE DB Command Transformation' to the data flow region and connect them to the 'Conditional Split Transformation'. You will get a pop-up to select the input and output type, whether it is - insert or update. Select insert for 'OLE DB Destination' and update for 'OLE DB Command Transformation'.
Double-click on the 'OLE DB Destination' to open the settings. Select the 'Connection Manager' from the left-side menu. Select 'HKR Training' from the drop-down for the 'OLE DB Connection Manager'. Give the name of the destination table. Select the 'Mappings' tab from the left-side menu. Here you can see the columns mapping of source and target tables. Check if the mappings are correctly established and click on 'Ok'.
Double-click on the 'OLE DB Command Transformation' to open the advanced editor. Select the 'Connection Managers' tab and select the already created OLE DB Connection from the list. Select the 'Component Properties' tab to write the SQL Statement to perform updates. Select the 'SqlCommand' from the left-side menu and click on the browse button. A 'String Value Editor' pop-up appears. Write the below SQL query in it.
UPDATE []

   SET [Name] =?

      ,[Department] =?

      ,[Location] =?

WHERE EmployeeID =?
Want to know more about MSBI,visit here MSBI Tutorial.
Click on 'Ok'. Select the 'Column Mappings' tab and assign the column names to the parameters. Click on 'Ok' to finish the configuration. Run this data flow package, and you can observe the green tick marks on all the activities in the data flow region. You can check if the new rows are added to the target table or not by looking at the target table data.
Conclusion
While configuring an incremental load, make sure that every step is followed very carefully. Because even if there is a slight mistake in any of the configurations, the entire flow will go to waste. Also, make sure that the incremental load does not take up too much load on either source or the destination database.
Other Related Articles:
About Author
Upcoming MSBI Training Online classes
| Batch starts on 18th Jul 2026 |
|
||
| Batch starts on 22nd Jul 2026 |
|
||
| Batch starts on 26th Jul 2026 |
|