
Sonicwall Port Forwarding
Last updated on Nov 07, 2023


- Reviewed by
- Hrushikesh (Ethical hacker, Certified Security Analyst)
The device for this process could be any of the following:
- Email Server
- FTP Server
- Web Server
- PBX
- DVR (Digital Video Recorder)
- Terminal Server
- Printer
- IP Camera
- SIP Server
- Game Consoles
- Any custom Server Roles
- Application Server
By default, the SonicWall blocks all Inbound Traffic that isn't part of a connection that originated from an inside device, like the LAN Zone device. This is to safeguard internal devices from harmful access, although it is frequently required to open up specific elements of a network to the outside world, like servers.
SonicWall requires a Firewall Access Rule to enable traffic from the public Internet to the internal network, as well as a Network Address Translation (NAT) Policy to route traffic to the relevant device.
For Sonicos 7.X Resolution
This firmware provides significant user interface modifications as well as a slew of new capabilities not found in SonicOS 6.5 or older versions. Customers running SonicOS 7.X firmware should use the following resolution.
The following actions are required to manually open ports / enable port forwarding to enable traffic from the Internet to a server behind the SonicWall using SonicOS:
1. Creating the Address Objects that are required
2. Creating appropriate NAT Policies, like Inbound, Outbound, and Loopback
3. Creating the Firewall Access Rules that are required.
You can enable Port Address Translation with or without changing the IP addresses involved by following these steps.
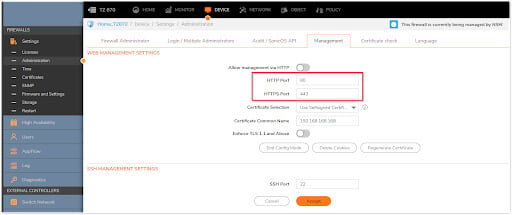
The following walkthrough explains how to accept HTTPS traffic from the Internet to a LAN server. After the configuration is complete, Internet users can connect to the server using SonicWall's WAN's Public IP Address. The examples below use the LAN Zone and HTTPS (Port 443), but they can be used with any Zone and any Port. Likewise, any Public IP that is routed to the SonicWall, such as a Public Range provided by an ISP, can be substituted for the WAN IP Address.
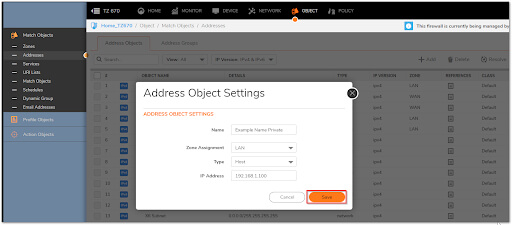
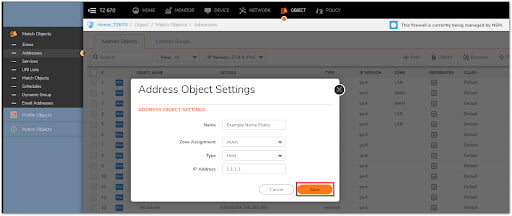
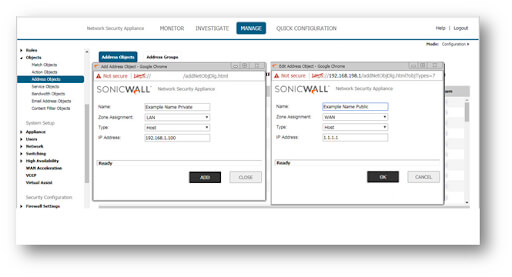
Creating The Essential Address Objects
1. Login to the SonicWall GUI.
2. From the top navigation menu, click Object.
3. Click Match Objects | Addresses.
4. By clicking Add, create two Address Objects for the Server's Public IP and Private IP.
5. To save the Address Object to SonicWall's Address Object Table, click Save.
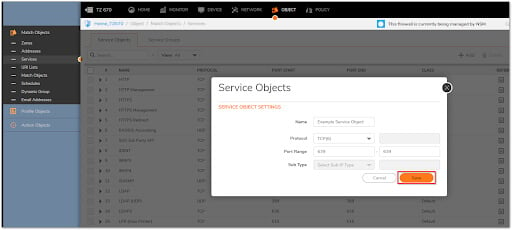
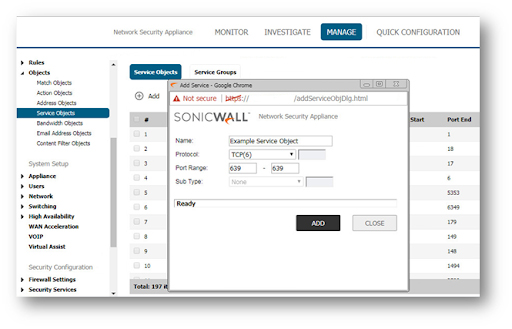
Creating The Essential Service Objective
1. From the top navigation menu, click Object.
2. Click Match Objects | Services.
3. Create the necessary Service Objects for the needed Ports by clicking the Add button.
4. Make sure you understand the Service Object's Protocol (TCP, UDP, etc.). Perform a Packet Capture if you're not sure which protocol is in use.
5. To save the Service Object to SonicWall's Service Object Table, click Save.
Creating Appropriate Nat Policies, Including Inbound, Outbound, And Loopback :
SonicOS will be able to transform incoming packets meant for a Public IP Address to a Private IP Address and/or a specific Port to another specific Port using a NAT Policy. SonicOS can inspect Packets and rewrite their Addresses and Ports for incoming and outgoing traffic using a NAT Policy.
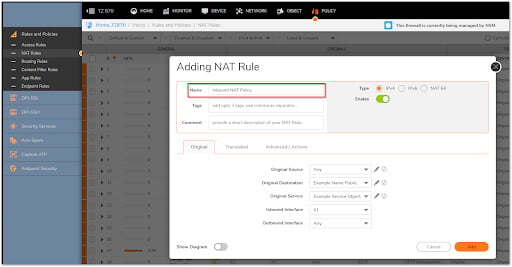
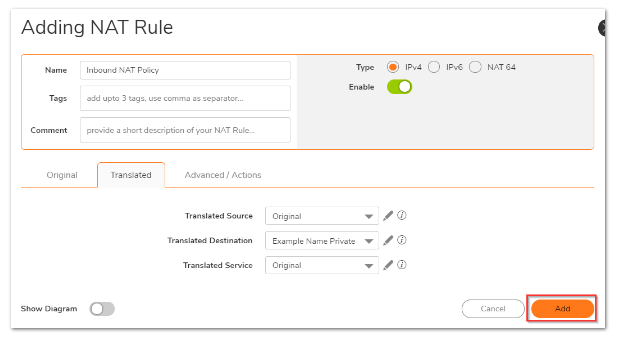
1. From the top navigation menu, click Policy.
2. Click Rules and Policies| NAT Rules.
3. A pop-up window would display when you click the Add button at the bottom of the page.
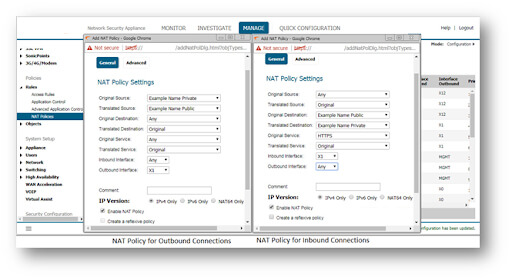
4. On the Original and Translated tabs, select the fields as shown below for the Inbound NAT policy. On the Advanced/Actions tab, leave all fields at their default values. To add the NAT Policy to the SonicWall NAT Policy Table, click Add.
5. On the Original and Translated tabs, select the fields as shown below for the Outbound NAT policy. On the Advanced/Actions tab, leave all fields at their default values. To add the NAT Policy to the SonicWall NAT Policy Table, click Add.

Sonicwall Certification Training
- Master Your Craft
- Lifetime LMS & Faculty Access
- 24/7 online expert support
- Real-world & Project Based Learning
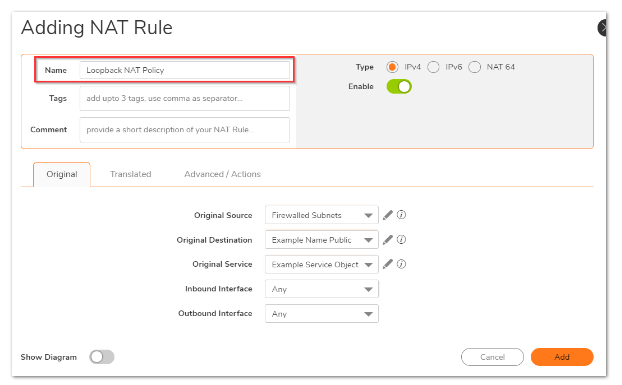
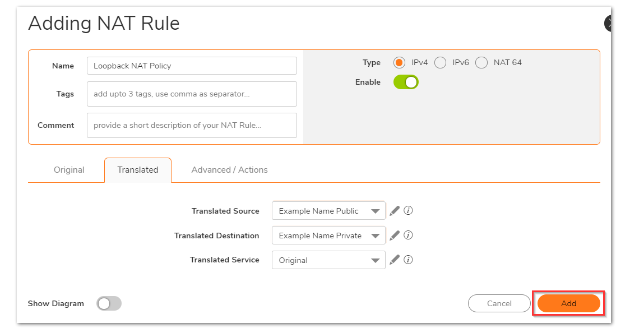
NAT Policy for Loopback
When local LAN/WLAN users need to access an internal server via its public IP/public DNS name, a Loopback NAT Policy is necessary. This policy interprets a user's request for access as originating from the WAN's public IP and then translates it to the Server's private IP. Internal Users would be compelled to use the Server's Private IP to access it if a Loopback NAT Policy is not in place, which will often cause DNS issues.
Consider implementing a Loopback NAT Policy if you want to reach this server from other internal zones using the public IP address Http://1.1.1.1:
On the tab "Original":
Original Source: Firewalled Subnets
Original Destination: Example Name Public
Original Service: Example Service Object
Inbound Interface: Any
Outbound Interface: Any
On the translated tab:
Translated Source: Example Name Public
Translated Destination: Example Name Private
Translated Service: Original
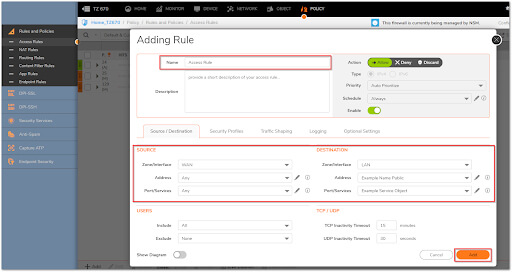
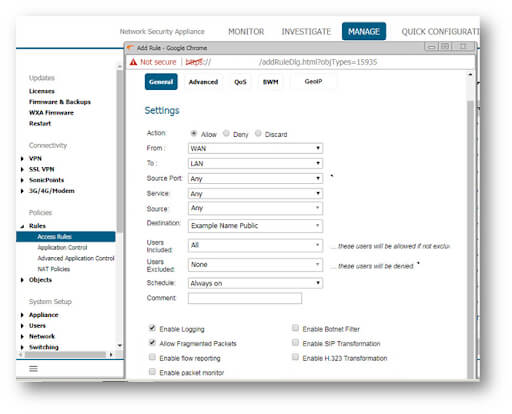
Creating The Essential For Firewall Access
1. From the top navigation menu, click Policy.
2. Click Rules and Policies | Access Rules.
3. Select Matrix as the View Type, and then your WAN to Appropriate Zone Access Rule. (This is the zone where the server's private IP is located).
4. Create the needed Access Rule by specifying the fields as shown below in the Source/Destination tab in the pop-up window by clicking the Add button at the bottom of the screen. All other tabs should be set to default.
5. When you're finished, click Add.
Subscribe to our YouTube channel to get new updates..!
For Sonicos 6.5 Resolution
This release incorporates significant user interface modifications as well as a slew of new features that set it apart from SonicOS 6.2 and previous releases. Customers running SonicOS 6.5 firmware should use the following resolution.
The following actions are required to manually open ports / enable port forwarding to allow traffic from the Internet to a server behind the SonicWall using SonicOS:
1. Creating the Address Objects that are necessary
2. Creating the proper NAT Policies which comprise (inbound, outbound, and loopback.
3. Creating the Firewall Access Rules that are needed
You can enable Port Address Translation with or without changing the IP addresses involved by following these steps.
Creating The Essential Address Objects
1. Log into the SonicWall GUI.
2. In the top navigation menu, click Manage.
3. Click Objects | Address Objects.
4. Create two Address Objects for the Server's Public IP and the Server's Private IP by clicking the Add a new Address object button.
5. To add an Address Object to the SonicWall's Address Object Table, click OK.
Establishing Appropriate Nat Policies, Including Inbound, Outbound, And Loopback
SonicOS will be able to transform incoming packets meant for a Public IP Address to a Private IP Address and/or a specific Port to another specific Port using a NAT Policy. SonicOS can inspect packets and rewrite their IP Addresses and Ports for incoming and outgoing traffic using a NAT Policy.
1. In the top navigation menu, click Manage.
2. Click Rules | NAT Policies.
3. A pop-up box will display when you click the Add a new NAT Policy button.
4. To add a NAT Policy to the SonicWall NAT Policy Table, click the Add button.
NAT Policy for Loopback
When users on the local LAN/WLAN need to access an internal server via its public IP/public DNS name, a Loopback NAT Policy is necessary. This policy will "Loopback" the User's access request as coming from the WAN's Public IP and then translate it to the Server's Private IP. Internal Users will be compelled to use the Server's Private IP to access it if a Loopback NAT Policy is not in place, which will often cause DNS issues. Consider implementing a Loopback NAT Policy if you want to reach this server from other internal zones using the public IP address.
Original Source: Firewalled Subnets
Translated Source: X1 IP
Original Destination: X1 IP
Translated Destination: Example Name Private
Original Service: HTTPS
Translated Service: Original
Inbound Interface: Any
Outbound Interface: Any
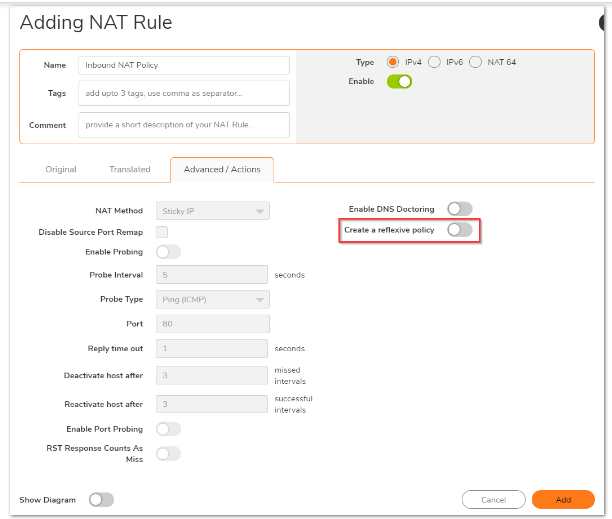
Comment: Loopback policy
Enable NAT Policy: Checked
Create a reflexive policy: Unchecked
Creating The Required Essential Access Rules
1. In the top navigation menu, click Manage.
2. Click Rules | Access Rules.
3. Select Matrix as the View Type, and then your WAN to Appropriate Zone Access Rule. (This will be the Zone the Private IP of the Server resides on.)
4. Create the required Access Rule by specifying the fields as shown below in the pop-up box after clicking the Add a new entry/Add... button.
5. When you're finished, click Add.
Conclusion:
In this blog, we have learned the measures to be used for enabling the port forwarding to access the server. We also discussed how to create essential address objects, service objects, Loopback NAT Policies, how to access the firewalls, how to create the address objects, accessing rules and other things.
About Author
Upcoming Sonicwall Certification Training Online classes
| Batch starts on 31st Jul 2026 |
|
||
| Batch starts on 4th Aug 2026 |
|
||
| Batch starts on 8th Aug 2026 |
|