
Sonicwall Firewall Configuration
Last updated on Nov 07, 2023


- Reviewed by
- Hrushikesh (Ethical hacker, Certified Security Analyst)
Configuring Firewall Security On A SonicWALL Device
Small and medium-sized businesses rely on SonicWALL firewalls. SonicWALL devices safeguard network communications for everyone from tiny charitable groups to medium-size and enterprise-class companies.
SonicWALL's firewall devices run on the company's proprietary SonicOS operating system. The SonicOS Enhanced operating system currently runs on almost every SonicWALL device. The Enhanced version of the operating system allows the system's firmware to provide ISP failover services, zone management, and WAN load balancing.
The Installation Wizard
SonicWALL firewall devices come with a number of wizards. Model-specific menus are available (for instance, Only models with wireless capabilities have access to the WEP/WAP Encryption options menu).
The Setup Wizard is an economical tool which makes the new router deployment easier. A SonicWALL device can also be reset to factory defaults and then rolled out again using the Setup Wizard when a network is being redesigned.
Log in to a SonicWALL firewall and click the Wizards button to see the Setup Wizard. On the main System | Status page, you'll find the Wizards (Figure A) button.
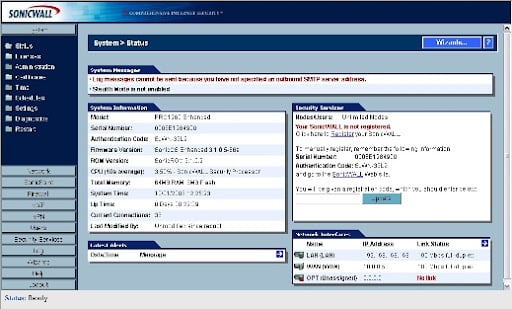
Figure A: The SonicWALL System Status page contains a lot of information about the configuration of a firewall.
A SonicWALL PRO 1260 is used to demonstrate the procedure. The SonicWALL Configuration Wizard displays four options after you select the Wizards button (Figure B).

Figure B: There are four options available in the SonicWALL Configuration Wizard. Administrators can utilize the Setup Wizard, the PortShield Interface Wizard, the Public Server Wizard, or the VPN Wizard to set up the SonicWALL device to secure network connections (for configuring access to a virtual private network).
Choose between the Setup Wizard, the PortShield Interface Wizard, the Public Server Wizard, and the VPN Wizard. In this instance, we'll select Setup Wizard and proceed to the next step. The Setup Wizard comes on the screen.
Step 1: The Password Change screen will appear. Enter the old password or default, then a new password, followed by a confirmation of the new input. When you're done, click Next.
Step 2: The Time Zone Change menu will appear. Select the appropriate time zone and select the box if you want the firewall to adapt for daylight savings time automatically, then click Next.
Step 3: The screen for WAN Network Mode appears. Choose the radio button that corresponds to the method you used to connect to your ISP (Static IP, DHCP, PPTP, or PPPoE). Then press the Next button. We'll use Static IP in this example. (See Figure C).
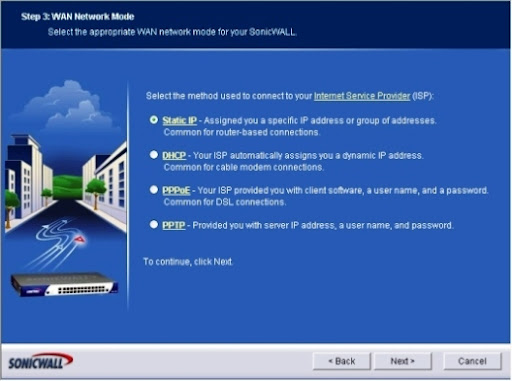
Figure C: The WAN Network Mode menu allows you to choose the best ISP connection method.
Step 4: The menu WAN Network Mode: NAT Enabled is displayed. Click Next after entering the SonicWALL WAN IP Address, WAN Subnet Mask, Gateway (Router) Address, DNS Server Address, and a secondary DNS address. (See Figure D).

Figure D: The WAN Network Mode page allows you to specify WAN settings.
- Master Your Craft
- Lifetime LMS & Faculty Access
- 24/7 online expert support
- Real-world & Project Based Learning
Step 5: The menu for LAN Settings will appear. Give the SonicWALL's LAN an IP address. Click Next after you've entered a subnet mask. (See Figure E).
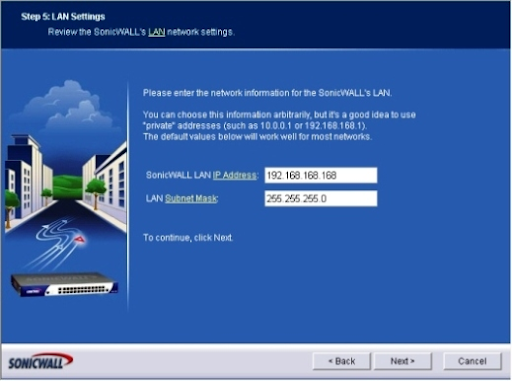
Figure E: Use the LAN Network Settings screen on the SonicWALL to configure LAN settings.
Step 6: The screen for LAN DHCP Settings appears. If you would like the SonicWALL device to provide DHCP services, check the Enable DHCP Server On LAN box. If you select this option, you must also input a valid LAN address range. When you're finished, click Next. (See Figure F).
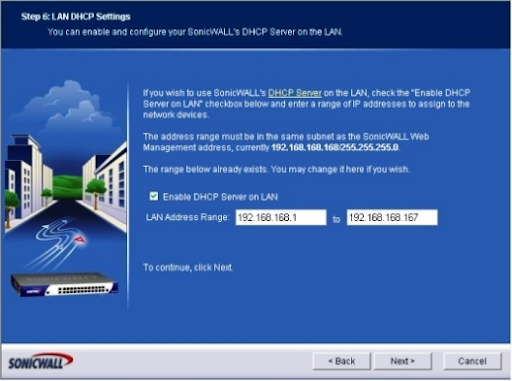
Figure F: Using the DHCP Server option, configure DHCP settings.
Step 7: Summary of SonicWALL Configuration (Figure G). Review the information provided by the wizard, and then click Apply if all of the settings are accurate. Click the Back button if the setup needs to be adjusted.
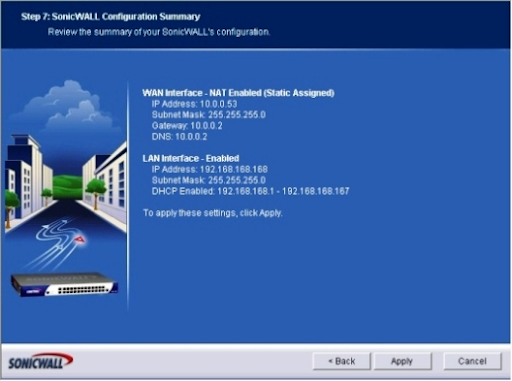
Figure G: Before proceeding, carefully examine the Confirmation Summary; selecting Apply activates the settings discussed on this menu.
You'll see a screen saying that the SonicWALL configuration is being stored and that you should wait. When the setting is finished, you'll get a message congratulating you on your changes and the Setup Wizard's completion.
Login to SonicWALL
Log in to the firewall using the IP address you specified to the SonicWALL device in Step 5 once the Setup Wizard is complete (on the LAN Settings menu). You'll be greeted by a typical dialogue box asking for your name and password. Click the Login button after entering the name and password you provided for the firewall.
The System | Status menu is displayed by default on the SonicWALL device. Click the Firewall option from the menu on the left edge of the SonicWALL interface screen to specify further firewall settings.
The Firewall | Access Rules | All menu will appear. This page in the SonicWALL program gives crucial information regarding the firewall's setup. The Access Rules menu also shows source and destination data, service type, action status, and user information, in addition to zone and priority information (Figure H)
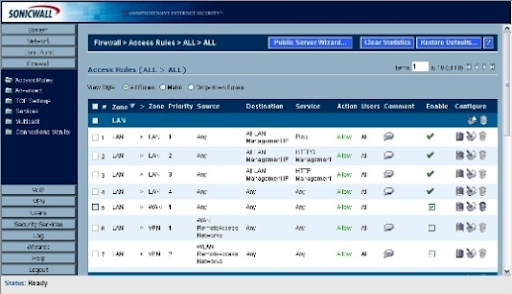
Figure H: Administrators can evaluate SonicWALL's Access Rules in three different ways; this page shows the All Rules view.
Simply hover your mouse over the graph icon towards the end of each access rule line to get traffic statistics for that access rule. The pencil and paper icon may be used to alter access rule configurations, while the trash can icon can be used to delete an access rule.
Creating Rules For Access
For access rule creation:
- To access the SonicWALL firewall, log on.
- Click the Firewall button.
- The Matrix or Drop-down Boxes View Style radio button should be clicked. (See Figure I)
- Click the From And To Zones that apply (like WAN to LAN).
- At the bottom of the menu, click the Add button.
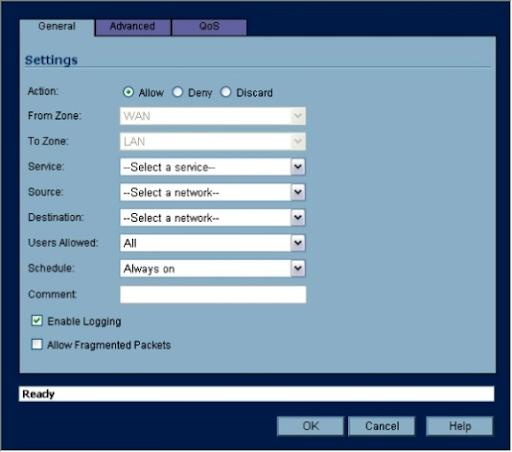
Figure I: You must include the necessary criteria when defining an access rule. For most settings, SonicWALL's firmware includes pre-populated drop-down boxes.
6. Specify the action to be taken with traffic that matches the access rule's settings using the General tab; the three options are Allow, Deny, and Discard.
7. In the Service drop-down box, select the appropriate service. Do the same with the drop-down boxes for Source, Destination, Users Allowed, and Schedule.
8. Enter a comment that describes the access rule or its purpose.
9. If you don't want events connected to the new access rule logged, uncheck the Enable Logging checkbox.
10. The Advanced tab can be used to set any advanced options (such as a timeout for inactive TCP connections or the maximum number of connections allowed).
11. Click OK.
Subscribe to our YouTube channel to get new updates..!
Editing Rules for Access
For editing an access rule:
- Go to the SonicWALL firewall and log on.
- Click the Firewall button.
- Select Access Rules.
- To edit an access rule, select it and click the pencil and paper icon.
- Adjust the access rule as needed using the drop-down options that appear (Figure J). You can also delete an access rule by clicking its appropriate trash can icon.
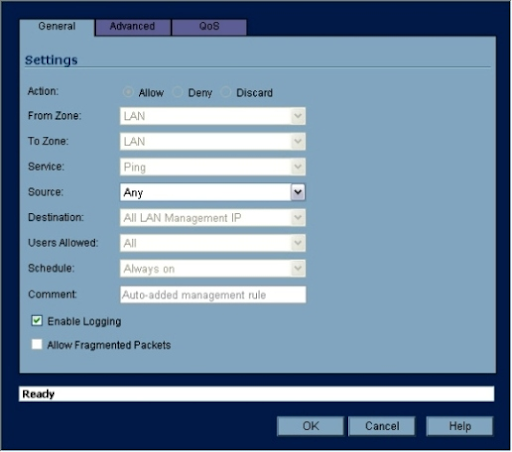
Figure J: When it comes to editing access rules, SonicWALL's drop-down boxes make it quick.
To apply the changes, click OK (When you confirm the action of deleting an access rule, the rule is deleted). The edits will be written to the SonicWALL firmware, which will then update the firewall's configuration.
Groups of Service Editing
Service objects and groups are included by default on SonicWALL devices to make firewall administration easier. Common apps and services (like PC Anywhere, ShoreTel, VNC, and Yahoo Messenger) are made available to network users via SonicWALL firewalls using service groups and objects.
To verify the services settings on a firewall, go to:
- Go to the SonicWALL firewall and log on.
- Click the Firewall button.
- Select Services.
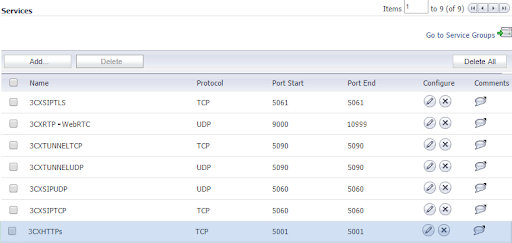
By default, there are a lot of service groups (Figure K). To add more groups or objects, apply the following steps:
- To access the SonicWALL firewall, first, log on.
- Click the Firewall button.
- Select Services.
- Click the radio button for Custom Services.
- To create a new Service Group, click Add Group, or to create a new service, click Add (Figure L).
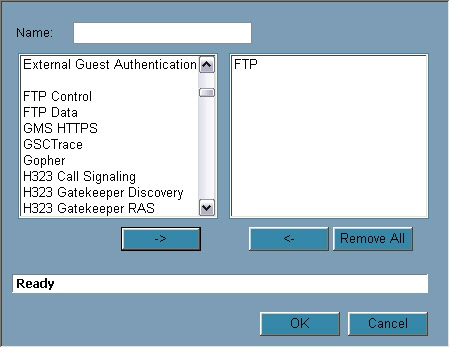
Figure K: To make firewall settings easier, SonicWALL firmware includes several pre-populated service groups.
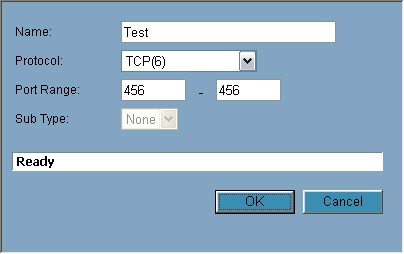
Figure L: Administrators that need to set up their firewall services could do this by defining the necessary criteria.
When you click Add Group, the left pane is pre-populated with multiple options. You can choose one of those or type in your name and click OK; to customize its settings, click the pencil and paper icon that appears next to it. To establish a new service, click the Add button, give it a name, choose a protocol, select a port range or subtype if necessary, and then click OK.
Using 3CX to configure a SonicWALL Firewall
The configuration of Dell Sonicwall devices based on a TZ100, TZ100W, TZ105, TZ105W, TZ200, TZ200W, TZ205, TZ205W, TZ210, TZ 210W, TZ215, TZ 215W, NSA 220, NSA 220W, NSA 240, NSA 2400, NSA 3500, NSA 4500, NSA 5000, NSA E5500, NSA E6500, NSA E7500, NSA E8500, NSA E8510 for using with 3CX Phone System is described in this blog. This manual is for Sonicwall’s with a Many-to-One NAT configuration.
Requirements
HotFix firmware SonicOS 5.8.1.15o HotFix 152075 or later is required for DELL Sonicwall firewalls.
Step 1: Service Objects Creation
You must establish service objects for each port or port range that has to be forwarded to successfully configure the SonicWall. After that, you must apply the policies to
these service objects by placing them in a service group.
1. Go to Network → Services in the DELL SonicWall Firewall Gateway's Web Management Console.
2. Add one service object to the section "Services" for each port that 3CX requires forwarding.
3. Add a new service group named "3CX Services" to the section "Service Groups" and add all of the aforementioned Service Objects as members.
4. Locate the section "Address Objects" under Network → Address Object.
5. Here include a new Address Object and set:
Name: 3CX PBX
Zone Assignment: LAN
Type: Host
IP Address: Your 3CX Server's LAN IP address
Step 2: NAT Policy Creation
1. Press "Add" under "Network NAT Policies."
2. Fill in the following fields to create your Inbound NAT policy:
“General” tab
Original Source: Any
Translated Source: Original
Original Destination: WAN Interface IP
Translated Destination: 3CX PBX (This is the Address Object was created in the first step)
Original Service: 3CX Services (This is the Service Group that was created in the first step)
Translated Service: Original
Inbound Interface: Choose the WAN interface that your 3CX will use.
Outbound Interface: Any
Comment: 3CX Inbound Connections
Enable NAT Policy: Checked/Enabled
3. Fill in the following fields after pressing "Add" to build your Outbound NAT policy:
“General” tab:
Original Source: 3CX PBX (This is the Address Object that was created in the first step.)
Translated Source: WAN Interface IP
Original Destination: Any
Translated Destination: Original
Original Service: Any
Translated Service: Original
Inbound Interface: Any
Outbound Interface: Choose the WAN interface that your 3CX will use.
Comment: 3CX Outbound Connections
Enable NAT Policy: Checked/Enabled
“Advanced” tab:
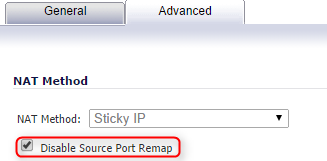
Disable Source Port Remap: Checked/Enabled
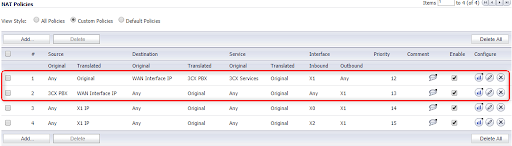
When you've finished creating the two necessary NAT Policies, they should look like this
Step 3: Creating Access Rules for the Firewall
Select "WAN to LAN" from the "Firewall → Access Rules" menu and press "Add."
Create a new Access Rule with the fields below:
“General” tab:
Action: Allow
From Zone: WAN
To Zone: LAN
Service: 3CX Services (This is the Service Group that was created in the first step.)
Source: Any
Destination: Choose the Address Object for the "WAN/Public IP" you've set up in 3CX.
Users Allowed: All
Schedule: Always on
Comment: 3CX Inbound Access
Allow Fragmented Packets: Checked/Enabled
Step 4: Disabling SIP Transformations
1. Navigate to ”VoIP → Settings”
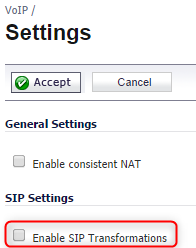
2. Disable option: Enable SIP Transformations in the “SIP Settings” section.
Step 5: Validating Your Configuration
Log into your 3CX Management Console → Dashboard → Firewall and run the 3CX Firewall Checker. This will check to see if your firewall is set up correctly for 3CX.
Conclusion:
In this blog, we have learned and understood the steps that should be applied for the successful configuration of SonicWall Firewall on devices.
About Author
Upcoming Sonicwall Certification Training Online classes
| Batch starts on 18th Jul 2026 |
|
||
| Batch starts on 22nd Jul 2026 |
|
||
| Batch starts on 26th Jul 2026 |
|