PowerApps Components - Table of Content
- What is PowerApps?
- PowerApps Components
- Creating a Component
- Importing PowerApps components from other applications
- Conclusion
What is PowerApps?
PowerApps is Software that is used to create custom business applications without being familiar with custom coding or application development. It is covered in Office 365 Subscription plans and is a feature of Office 365 like Planner, OneDrive, etc. PowerApps is unrelated to Sharepoint but is closely integrated with it and is becoming part of the Office 365 suite. While PowerApps is built to run with a number of different sources, such as external databases, we may easily connect PowerApps to any SharePoint library, List or OneDrive that enables us in storing and retrieving data without the knowledge of databases or SQL. We may even connect to other data sources like Box, Twitter, etc. Once we create PowerApps, we can run it On the web through Microsoft Dynamics 365, On the mobile device through Android, Windows or iOS, From SharePoint Library view or List.
Generally, developers come across situations like repeating a functionality across a form several times, and the best way to do it is to create components in PowerApps and reuse them when required. But What are components? How can we create them? How can we import or export them? Let us understand all these things in this blog.
Become a PowerApps Certified professional by learning this HKR PowerAppsTraining !
What are components?
The components are the building blocks for Canvas Apps that can be reused that you can use as the app makers. They can be used to build things which will be reusable. You may set some controls to be used within an application. You can also import a component into another application.

PowerApps Training
- Master Your Craft
- Lifetime LMS & Faculty Access
- 24/7 online expert support
- Real-world & Project Based Learning
PowerApps Components:
Now let us know about some of the major components of PowerApps. Following are some of the main components in PowerApps.

1.Gallery:
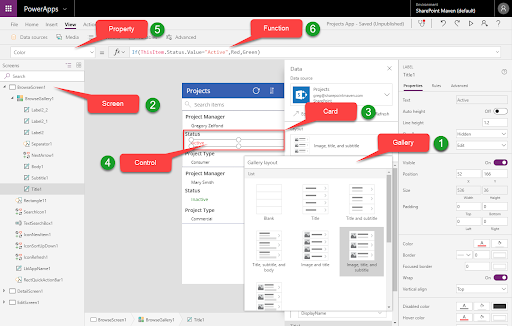
A gallery is one way to visualize data within the application. This is a screen template which enables you to view and navigate the data. For example, you may have a gallery that will contain a screen to view a given record or a screen to view all the records or a screen to edit a record. A screen can be blank, scrollable, List, form, tutorial, success, people, calendar, email, meeting, etc. All the screens together form a gallery. While creating a new application, you have different galleries to choose from. While you are making an application from the SharePoint list, you will get an already prebuilt default gallery for you.
2.Screen:
It is a way to view a specific dataset or a record on the screens such as Desktop, iPad, mobile. We usually have one screen to view all the records, one screen to display a specific record, one screen to modify it. When we create an application from a template, we already have screens prebuilt. They are the part of the gallery we choose. We may also add extra screens if required.
3.Card:
A screen includes cards. The card is an area on the screen which displays a particular record from the SharePoint list or other database that is used for building an application. In case you have a SharePoint list with project names and build PowerApp from that List, a card may include the Project Manager field or Project Name field or Project type field or status field. A card will include different attributes (known as Controls) that are related to the record display. For example, in the status field, a card includes a label called status along with a dropdown control for entering the status.
Want to know more about PowerApps,visit here PowerApps Tutorial !
4.Control:
Controls are what makes it possible for you to view and interact with the records. If we consider the previously mentioned example of the status field, the dropdown is a control to choose the project status. We have different types of controls based on the type of field we use. For example, we can use a radio button or a toggle switch instead of the dropdown control to make the selection a little more stylish on the mobile application. Some of the examples of controls are buttons, dropdown, date picker, combo box, Check box, list box, radio, slider, toggle, rating, etc.
5.Property:
Every control will have some properties. If we consider a text entry box, it has some properties like font size, font style, text colour, etc. Properties can be viewed and modified from the Properties dropdown menu on the left side of the screen and from the panel on the right side when selecting the property.
6.Function:
Function is the way in which you interact with and modify the properties. Functions in PowerApps are similar to Excel.

Subscribe to our YouTube channel to get new updates..!
Creating a Component:
Now let us learn how to create the component

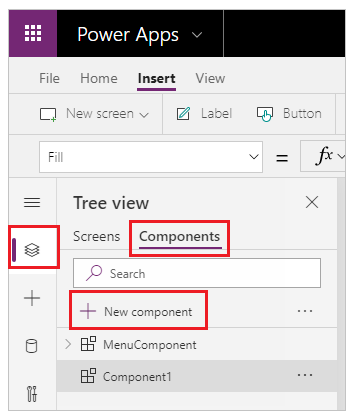
1.Under the tree view, select the components and select the new component to create a new component.
2.From the left navigation, select a new component and select ellipses (...), then select Rename. Enter or paste the name as the menu component.
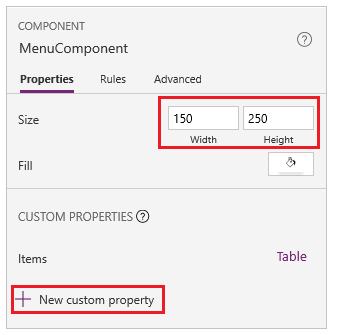
3.On the right panel, define the width of the component to 640 and height to 250, then select New custom property. You may define appropriate height and width values as well.
Custom properties:
The Custom properties are the enhanced customizations offered by PowerApps. Examples of custom Properties are text, colour. We may create our own custom properties or components of various types of data offered by PowerApps. We have two types of custom properties:
- Input Property: receives values from the application, and the values may be used in the component.
- Output Property: It is used for sending data from the custom property to the application.
4.Enter or paste the text as items in the display name, property name and the description boxes. The display name will appear in the Properties tab of the right panel when the component is selected. A descriptive display name assists you, as well as other makers, to understand this property's purpose. The description will appear in the tooltip when you hover on that property's display name on the Properties tab.
5.From the Data type list, select table and select create. The Item property will be defined as the default value according to the data type which is specified. We may also set its value which is suitable as per our requirement. If you have specified a Table or a Record data type, you can adjust the value of the Items property to fit the data schema that we want to input to the component. In such a situation, you may change it to a strings list. You may define the property value on the formulas bar when you choose the property name from the Properties tab of the right pane.
Top 30 frequently asked PowerApps Interview Questions !
Enabling PowerApps Components:
In order to create the usable components, we need to enable the feature in canvas applications. You can find this feature under file> settings> advanced settings> components.
When this setting is enabled, you need to navigate to the application screens. See the Components section adjacent to the section of the screen.
Adding a Custom Property:
We can add a new custom property to the component by just clicking on "New custom property" on the right pane.

Importing PowerApps components from other applications:
In order to import one or more than one component from one application to another, we need to select "Import components" from the Insert menu and use the custom dropdown menu.
To import one or more components of one application to another, select Import components from the Insert menu, then use the Custom dropdown menu. Or you can use Components in tree view in the left navigation. A dialogue box will list all applications containing components which you are allowed to change. Select the application, then select Import for importing the most recently released version of all components of that application. After importing one or more components, you may edit and delete the ones you don't need.
Exporting components from your application:
We can export the components to a file and can download them to import them into other applications. From the components section on the left navigation tree view, select the option Export components. By selecting the export components, the components to a file are downloaded.
Acquire Powerapps certification by enrolling in the HKR Powerapps Training in Banglore!
Conclusion:
In this blog, we have learned about the components of PowerApps, creating the components, enabling the components, adding a custom value to the component, Importing components from other applications and exporting the components from our application. We hope you found all this information helpful! Happy learning!
Related Article:
About Author
As a content writer at HKR trainings, I deliver content on various technologies. I hold my graduation degree in Information technology. I am passionate about helping people understand technology-related content through my easily digestible content. My writings include Data Science, Machine Learning, Artificial Intelligence, Python, Salesforce, Servicenow and etc.
Upcoming PowerApps Training Online classes
| Batch starts on 20th Feb 2026 |
|
||
| Batch starts on 24th Feb 2026 |
|
||
| Batch starts on 28th Feb 2026 |
|


