This tutorial covers a wide range of Denodo Platform features. We'll start with an overview of fundamental definitions like what is Denodo and why the Denodo platform is used and then will explore the topics of Data Virtualization, Data Services, integrating big data system to Denodo platform, implementing agile BI for Data Virtualization, what are 3C principles of Denodo, and how to create and deploy the web services.
Let’s go through the Denodo concepts in detail.
1. What is Denodo?
Denodo Express is Denodo Technologies, Inc.'s newest product, a free data virtualization utility with a graphical user interface-based studio. Denodo Express connects to and integrates structured, unstructured, and big data sources on-premises and in the cloud. End-users have access to these sources, as well as enterprise apps, dashboards, portals, Intranet, search, and other tools.
Take your career to next level in Denodo with HKR. Enroll now to get Denodo Training!
2. Why the Denodo Platform?
The Denodo Platform offers breakthrough performance in big data, logical data warehouses, and operational scenarios; it accelerates adoption via cloud data virtualization. It streamlines business users’ data through self-service data discovery and searches.
3. Basics of Data Virtualization
3.1 Why data virtualization?
Data virtualization produces a single virtual layer that connects different data and allows consuming apps to have uniform access to it. These apps will take advantage of the virtual layer's semantic components and reuse them as necessary. Your applications would be independent of the physical sources where the data is kept in this manner.
The Denodo Platform offers the following features:
- Data services are simple to create.
- Data Services that are not dependent on a physical source (s).
- Control your data sources from a single point.
- Development cycles are short and agile.
- Little to no coding!
- Simple needs require intuitive solutions.
- All clients will be able to reuse your models.
3.2 Installation & Bootstrapping
This section explains the prerequisites for utilizing Denodo, and also how to configure your Denodo setup and get started with Denodo Data Virtualization.
- Denodo Platform 8.0 - Download the installer and license from https://community.denodo.com/ express.
- MySQL 5.0 or higher - Some of the data sources used in the lesson will require MySQL (or another relational database). It's available for download here: http://dev.mysql.com/downloads/mysql/
- MySQL Connector/J 5.0 or higher - Denodo will be able to connect to MySQL using this JDBC driver: http://dev.mysql.com/downloads/connector/j/
- MySQL Workbench 5.0 or higher - These are some handy MySQL tools that you might want to use, although they aren't necessarily required for the tutorial:
http://dev.mysql.com/downloads/tools/workbench/ - Denodo Tutorial Files - Download and extract the contents of the zipped Tutorial files to a handy local directory, which will be referred to as
in this guide.
3.3 Initial Steps
The following are the first steps in using the Denodo Platform, which cover the most fundamental functionality:
- Starting the Denodo server and applications.
- Find out how to use the Denodo Administration tool.
- Make a database for development.
- Make folders to help you organize your database.
- Relational databases should be imported.
- Run the queries.
- Make an easy combination view.
3.4 Advanced Operations
You'll combine the unified customer view you've created with this billing information in this section to create a report that shows the total amount due for each of your clients.
- Create a data source for a Web Service.
- A hierarchical system that has been flattened.
- See how Tree View is used to create derived views.
- Make a view that brings together data from various sources.
- Create a view for aggregation.
3.5 Using your application to connect
The Denodo Platform is built on a client-server model, in which clients send requests to the server. One of the following interfaces could be used to send these requests:
- JDBC: Denodo's proprietary JDBC driver is provided.
- ODBC: An ODBC interface is provided by Denodo (additional components must be installed).
- ADO .Net: The Npgsql ADO.Net provider for PostgreSQL is compatible with Denodo.
- RESTful web service (XML, JSON, HTML outputs): For apps that can't connect to Denodo through JDBC or ODBC.
Several methods for accessing Denodo from outside apps are discussed in this section:Using a JDBC Client via a Third Party.
- Using ODBC.
- Use a Denodo RESTful Web service to consume it.
- Browse through Linked Data.
3.6 Performance of an Agile
Data through users. ItAfterata Virtualization software accesses and pulls data from target sources at runtime, then blends it in real-time to provide the desired outcome. Denodo is too vital, although not exclusive, part of any data management architecture. When assessing performance, it's critical to determine which elements constitute bottlenecks.
4. Data Services
The Data Services layer is an abstraction layer that can supply data to various users on an enterprise-wide scale. Using the views in the virtual layer, Data Virtualization software can quickly develop new Data Services. A uniform, consistent, and scalable data services infrastructure is required in many projects.
What are the most prevalent problems that these services encounter?
- Complex architectures make it difficult and time-consuming to integrate different systems.
- Rigid infrastructure that makes it difficult to respond swiftly to customer requests with new services.
- Excessive reliance on the IT department.
Advantages of a Data Services layer
- Every business application can access all information through a single data layer.
- Many issues can be solved by relying solely on the Data Services layer.
- As though all sources were homogeneous, you can access them all.
- Simple ESB software plugins
Defining contracts/interfaces
An interface is a form of view in Denodo that consists solely of the description of fields and their data types. The most typical application is in a top-down design, where you create the fields first and then associate the interface implementation(data).
SOAP Web services
Web services are software solutions that enable interoperable machine-to-machine communication via the internet. SOAP Web services would be covered in this section. To exchange messages, these Web services employ the SOAP (Simple Object Access Protocol) protocol. The messages are as follows, according to the specifications:
REST Web services
As you may know, Web services are software solutions that enable interoperable machine-to-machine communication over a network. In this section, we'll discuss REST Web services, which are different kinds of Web services. This type of service communicates through HTTP and uses the REST (REpresentational State Transfer) architectural style as the messaging protocol.
Publish Web services
The Web Container Status Window in the Denodo Administration Tool is used to manage REST and SOAP services. To bring up this window in the workspace, go to Tools > Web services container in the menu bar. A table will appear in the Administration Tool, listing the Web services generated in a certain Denodo Database.
Invocation of services
REST services work in the same way as RESTful services, however, you only have access to the views built with this REST service in this case. A SOAP client is used to call SOAP Web services.
Change Web service Implementation
It's to make a derived view and use it to implement the i_client_info interface. You'll set up the i_client_info interface to utilize client_info_impl as its implementation view in this section.

Denodo Training
- Master Your Craft
- Lifetime LMS & Faculty Access
- 24/7 online expert support
- Real-world & Project Based Learning
5. Big Data
The marketing department compiles a list of possible new clients on a regular basis. An Apache Hadoop distribution is in place to process the input data and produce the needed outputs in order to construct this list of prospects. You'll learn how to integrate a Big Data system into the Denodo Platform in this section.
Using Hive for creating JDBC Data Source
Apache Hive is a piece of software that makes querying and handling massive datasets in distributed storage easier. HiveQL is a SQL-like language that allows you to project structure onto this data and query it.
Connecting to Other Big Data systems
This explains using Denodo Platform 8.0 to access various Big Data platforms. Because Denodo Platform connects to so many different data sources, the following list is the best options that are used for connecting to these systems from Denodo Platform:
- Apache Impala
- HBase
- Presto
- SparkSQL
- HDFS
- Splunk
- MapReduce
Using the REST API for Accessing HCatalog
HCatalog is a Hadoop table and storage management layer that makes reading and writing data easier. Users can get a relational view of their data on HDFS with HCatalog, and they don't have to worry about where or how their data is stored.
6. Agile BI
Denodo Agile BI will go through the basics of leveraging Data Virtualization tools, as well as how the Denodo Platform analyzes enterprise data for operational insight. This article will demonstrate the key advantages of adopting Data Virtualization rather than connecting BI tools directly to data sources.
Agile BI we'll go through the following stages:
- Presenting the use case.
- Implementing Solutions with Denodo.
1) Connecting Data Sources.
2) Blending the Data.
3) Generating Final Reports for Publishing Data for Clients - Using a BI tool for consuming data.
Business problem
Traditional methods to business intelligence sometimes result in the same logic being built over and over again across many BI and Reporting systems in order to generate similar results. The business logic required to build all of the reports will be centralized by the Data Virtualization layer, allowing it to be simply maintained and modified, as well as easily shared with a range of external BI tools without having to duplicate code across them.
Connecting to Data Sources
All data is organized into a unified perspective of marketing promotion performance. This is how the procedure will go:
- Connect Denodo to your data sources for real-time data retrieval.
- Combine the information after applying the necessary transformations and normalizations.
- Prepare final reports for consumption.
- Publish the client application's data.
Combining the data
We can begin combining all of the data now that we have the data sources and base views in place. The first step is to create a denormalized, standardized view of each data source so that we can create a set of foundation business entities from which we may build more complex reports later.
Publishing the data for clients
This BI tool connects to Denodo through ODBC and sends regular SQL queries. Denodo automatically delivers all views (base and derived) over JDBC and ODBC by default; we just need to perform manual publishing procedures when establishing web services.
Using a BI tool
A client tool is used to access the views we developed in the Denodo Platform. We'll use Tableau, however, Denodo may be accessed using the JDBC, ODBC, or Web Services interfaces by any standard tool.
7. The 3 Cs Principles of Denodo
Data virtualization is a layer that allows organizations to integrate real-time data from multiple sources and make it available to them without exposing any technical details (e.g., data center, database, data source, data structure, etc.). Denodo's approach is based on the "Three Cs principle."
- Connect — Connecting any data source (e.g. APIs, files, databse, etc.).
- Combine — Since the goal of data virtualization is to collect data from different sources and blend it to meet a business need, this layer is designed to do just that. A developer is expected to define the data transformation and combination to suit business requirements in this layer.
- Consume — Finally, a method/medium for making real-time data available to data consumers. Denodo offers a number of options for users to access data, including an ODBC interface, JDBC drivers, and web services (SOAP/REST).
7.1 Steps to Get Started with the Denodo Admin Tool
Let's have a look at Denodo's 3 Cs implementation in practice after finishing the installation of Denodo installation.
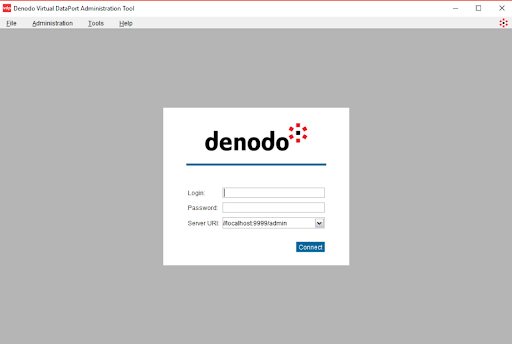
1) After installation, open the Denodo Admin Tool.

Subscribe to our YouTube channel to get new updates..!
2) Connect to the Denodo Admin Tool by logging in, providing login credentials, and clicking "connect." On the admin tool, you should be able to see the landing view (as shown below).
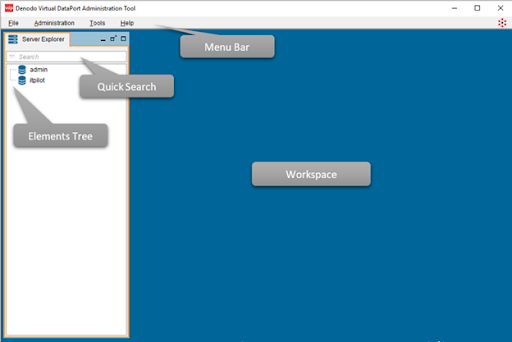
Note: Denodo's default databases are Admin and itpilot. You should keep them instead of deleting them.
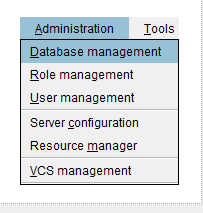
3) The best method to get started on a new project is to build a new database. Go to Menu -> Administration -> Database management -> New to create a new database.
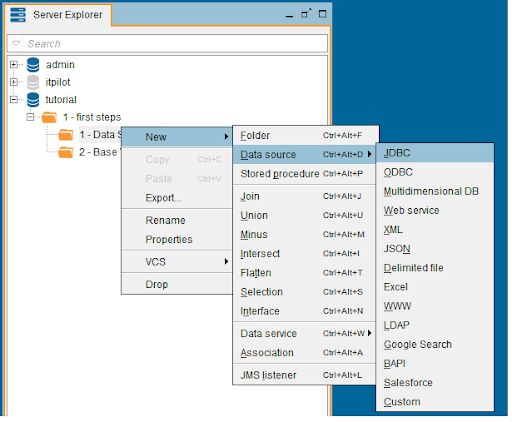
4) Denodo's nomenclature is split into layers — Derived View, Web Service, Data Source, Base View. Create these folders with the specified nomenclature in the new database (Right-click on database name-> New-> Folder). This will make it easier to maintain the various elements based on their functions.
7.2 Connect
Let's take a look at Denodo's first C Principle, which is "Connect." To connect to the desired data source, we'll construct a data source here.
Steps for Creating a Data Source
- Right-click on the Data Source folder -> New -> Data source -> JDBC.
- Give the data source a name.
- As the database adaptor, select "MySQL 5."
- To match the local MySQL installation, change the Database URI.
- Enter in the login and password for the database.
- Select “Connection Pool configuration” and make a connection test with “Test connection."
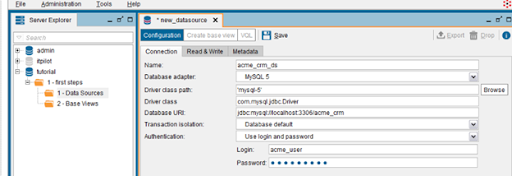
Note: We've only dealt with relational data sources so far, but Denodo also supports files, NoSQL databases, APIs, and other data sources.
7.3 Combine
The second key C premise is this. In this section, we'll learn how to make a base view. The base view would connect to the data source created in “Connect” and give a variety of operations on Base Views that can be used to generate Derived Views.
Steps for Creating a Base View
- Double click on the Data Source -> Create Base View.
- Choose the table/view from which to build the base view.
- Choose which columns should be included in the base view. The developer can choose which data to display on the Base View.
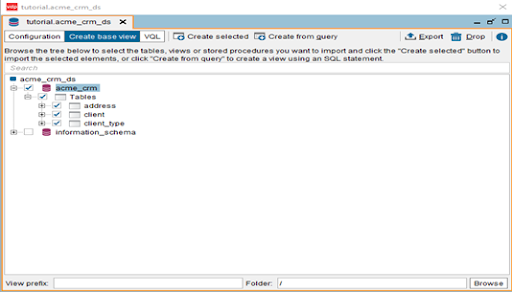
Steps for Testing the Base View
- Right-click on Base View -> VQL Shell -> Select -> Execute.
- On the right side of the element tree, you must see a select query that returns real-time results.
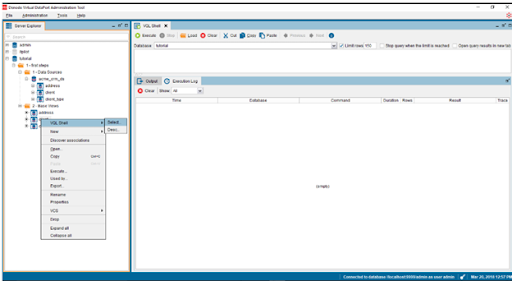
Note: Derived Views could be built by querying one or multiple Base Views after the Base View has been created.
Derived Views
Derived Views are simple views produced by combining single/multiple Base Views with various operations like JOIN/UNION/MINUS, and so on.
Steps for Join Operation
- Right-click on Base View -> New -> Join. A new view window will open.
- The views can be dragged and dropped from the element tree.
- Connect the join column of one view to the join column of other views by dragging it from one view to the other's join column. Denodo supports multiple join procedures, so you can join various views to reach the desired result. On Client_id, the client and address are joined, as shown in the screenshot below. On client_type and code, Client and client_type are joined.
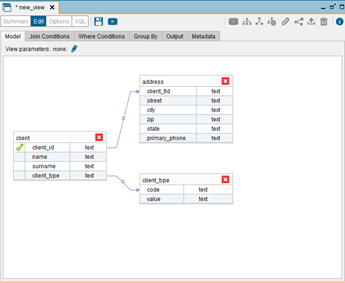
- To choose only the required columns from these three views, go to the Output tab and use the checkbox to delete the non-required columns.
- Click the save button or press ctrl + s to rename the view to a logical name.
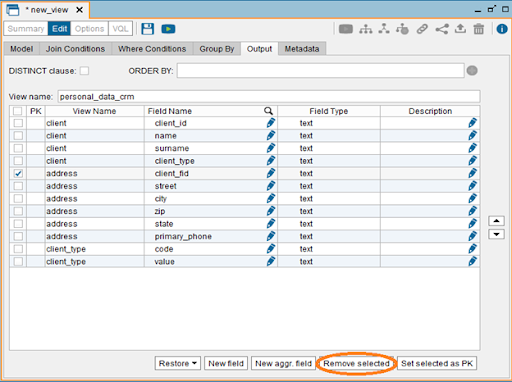
Aside from the JOIN operation, Denodo offers a variety of other relational operations: SELECTION, AGGREGATION, UNION, PROJECTION, FLATTEN, MINUS/INTERSECTION
Using the same steps as before, new views can be generated by Right-click-New Operation.
7.4 Consume
This is Denordo's third important C principle. The adoption of this idea would provide real-time data to business users/enterprise applications.
Let's examine how Denodo plans to make the data available to users. Denodo is a company that focuses on client-server architecture. It offers an ODBC interface, JDBC drivers, RESTful Web Services (with HTML, XML, JSON outputs).
Now you will see how to use Denodo's RESTful Web services. Denodo's web services are built on REST (Representational State Transfer) architecture principles and use HTTP.
- Using HTTP verbs (GET, POST, PUT, or DELETE), define a set of operations.
- The data is usually returned in HTML, XML, or JSON format.
- Every view in Denodo can be published as a REST web service, allowing external applications to access the data.
- ODATA 4.0 web services are also supported by Denodo.
8. Creating a Web Service
- Right Click on the Derived View/BaseView -> New -> Data services -> REST Web Service.
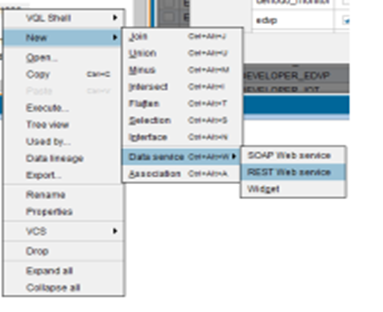
- This will display the view from which the web service was built. On use case Demand, several views can be introduced as part of a single web service.
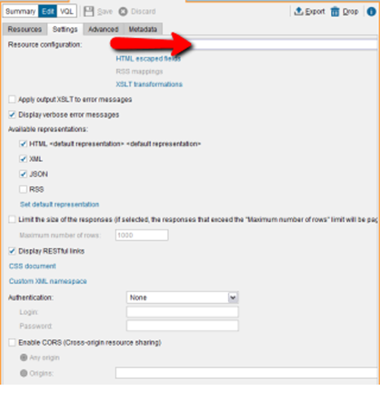
- Give your web service a logical name and choose from JSON, XML, or HTML to represent the data.
9. Deploying Web Service
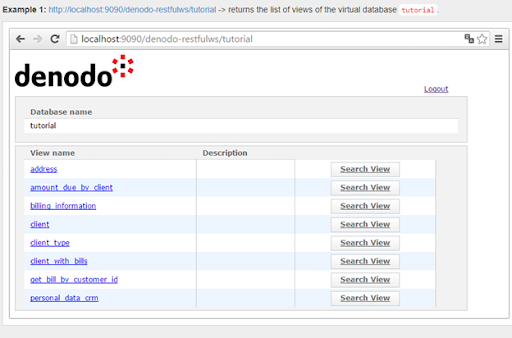
- Deploy the web service by right-clicking it.
- This step will deploy the web service and provide you with the URL where you can access it.
Conclusion
We hope this tutorial is very useful to you and with this, you have mastered the concepts of implementing the 3 C’s principles of Denodo to connect, combine and consume. Initially, we have covered the concepts like basics of Data Virtualization and its operations, the data services like REST and SOAP, and other Big data and Agile BI so as to make you understand it from scratch.
Related Articles:
About Author
As a senior Technical Content Writer for HKR Trainings, Gayathri has a good comprehension of the present technical innovations, which incorporates perspectives like Business Intelligence and Analytics. She conveys advanced technical ideas precisely and vividly, as conceivable to the target group, guaranteeing that the content is available to clients. She writes qualitative content in the field of Data Warehousing & ETL, Big Data Analytics, and ERP Tools. Connect me on LinkedIn.
Upcoming Denodo Training Online classes
| Batch starts on 26th Feb 2026 |
|
||
| Batch starts on 2nd Mar 2026 |
|
||
| Batch starts on 6th Mar 2026 |
|

