
Core Java Tutorial
Last updated on Nov 17, 2023

Core Java Tutorial - Table of Content
- What is a Java Program?
- History and Versions of Java
- Features of Java
- Why learn Java Programming?
- Different Applications of Core Java Programming
- JDK, JRE, and JVM in Core Java
- Core Java Architecture (JVM Architecture) Overview
- Core Java variables and data types
- Core Java data types
- Core Java classes and objects
- What is Java EE?
- Exception Handling
- Is Maven part of Java?
- Conclusion
What is a Java Program?
Java is one of the popular programming languages first developed by James Gosling and other engineers at Sun Microsystems. It is an object-oriented programming language that is class-based and useful for building many high-end desktop and web apps. Java is popular as an Android programming language.
First, it was developed for use in the distributed environment setup of the internet. Java language was designed to run on various platforms such as Windows, Linux, UNIX, and Macintosh. It is an object-oriented language and works well with other languages, too.
Now Oracle has taken over "Java" Sun Microsystems, so all Sun Microsystem products are under Oracle's license. Recently, Java has become more than a language as time passes. It is also known as a "platform" because it has its runtime environment, its own set of APIs, and distributed programs through RMI. Java is used to create executable content that you can distribute through networks. "Java" refers to the software tools used to develop and implement executable content using the Java programming language.
History and Versions of Java:
As I said earlier, Java is a product of Sun Microsystems. The history of the Java program starts with a green team of Sun Microsystems. The primary aim of developing this program is to provide "simple, robust, platform-independent, portable, high performance, secured, object-oriented, and dynamic" apps. Java is used mainly in mobile devices, games, internet games, e-business solutions, and banking sectors. The following are the crucial points of Java history:
- James Gosling, Patrick Naughton, and Mike Sheridan first developed the Java project in 1991. The small team of Sun Microsystem engineers is called the "Green team".
- At first, they designed Java for small enterprises and embedded systems in electronic appliances such as set black boxes.
- Initially, it was named "Green Talk" by James Gosling's team, and the file extension to save this file was .gt.
- After that, it was named "OAK" and developed as a part of the green project.
- OAK is a symbol of strength and the national tree of countries like France, Romania, Germany, and the United States of America.
- In 1996, Oak was later named "Java", and it was an Oak technologies trademark.
- James Gosling chose "Java" because it is easy to spell and fun to call.
- Java is also an island of Indonesia where the first coffee was produced (also known as "Java coffee"). It is a type of espresso bean.
- Java is just a technology name, not an acronym.
- At first, it was developed by Sun Microsystems, but now it is a subsidiary product of Oracle.
Versions details:
- JDK beta -> 1995
- JDK version 1.0 -> January 1996
- JDK version 1.1 -> February 1997
- J2SE version 1.2 -> December 1998
- J2SE 1.3 -> may 2000
- J2SE 1.4 -> February 2002
- J2SE 5.0 -> september 2004
- Java SE 6 -> december 2006
- Java SE 7 -> July 2011
- Java SE 8 LTS -> March 2014
- Java 22 or JDK 22 is the latest edition.
Features of Java:
Java offers many advanced features. In the below diagram, you will get some ideas;
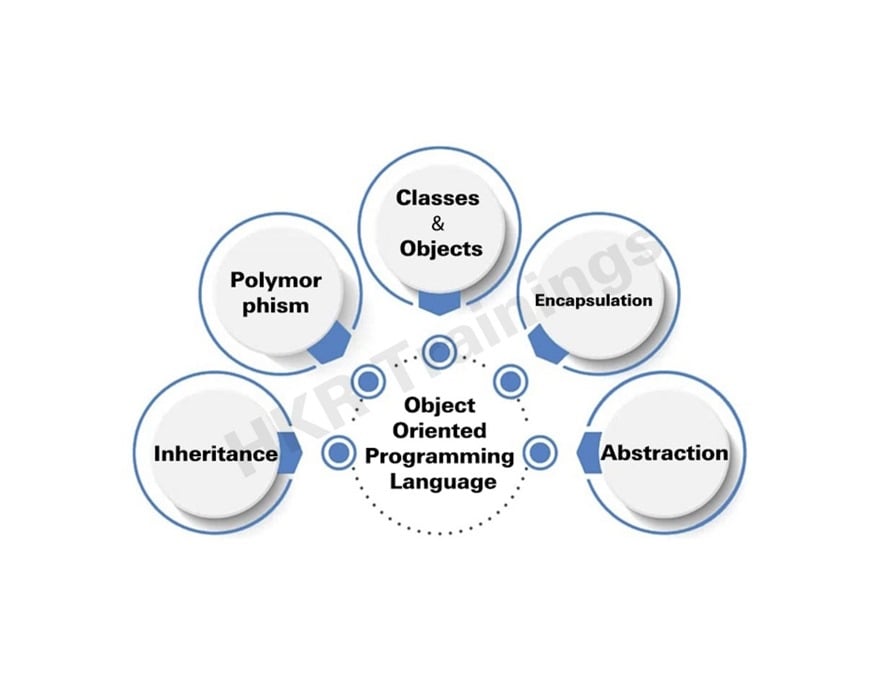
- Java is object-oriented programming
- Encapsulation
- Inheritance
- Abstraction
- Classes and objects
- Polymorphism
1) Java OOPs
In Java, the concept of OOPs stands for object-oriented programming that includes features like inheritance, classes, objects, encapsulation, etc. So, let us look at these features in brief:
2) Encapsulation
It is a basic OOP concept in Java, a method of hiding class implementation details from unknown access. It only presents a public interface that helps students interact with the class.
3) Inheritance
It is a method and a part of OOP concepts in Java where an object obtains all the key features and properties of a parent (primary) object. It helps to build new classes on the existing classes.
4) Abstraction
In Java, Abstraction is the method that hides implementation details and only showcases its main benefit to the user.
5) Classes and Objects
Classes and objects in Java are the key components of Java OOPs. A class in Java helps to develop individual objects and is also considered a factory to generate objects. An object in Java is a type of class variable and an essential element of OOP.
6) Polymorphism
Polymorphism is also an essential element of Java OOPs, enabling you to execute an action in multiple ways. It allows all objects of various classes to be treated as common class objects.
Java Careers
Learning Java language skills opens up multiple career opportunities across the world. Modern software tools and techniques use it widely. These include the following areas:
- Android and Web App Development
- Development of Enterprise Software
- Developing Big Data Technologies
- Game Development
Hence, multiple job roles and opportunities are available after learning the core Java skills.
Java Application Types
The following are the various types of Java apps:
- Desktop Apps: These are the standalone apps or traditional software we install on every device, such as Antivirus, App Store, Media Player, etc. We use Swing, AWT, etc., toolkits in Java to build various apps.
- Enterprise Apps: These apps are distributed, such as banking, financial services apps, etc. It offers load-balancing features and high-level security
- Mobile Apps: The mobile apps for various mobile gadgets are built using Java language such as Java ME, Android, etc.
- Web Apps: Web apps execute on the server side and are built using Spring, Servlet, Hibernate, etc., in Java.
Why learn Java Programming?
Java is a primary programming language that students and working professionals use to become successful software engineers in software companies. Here are some key advantages of the Java programming language.
- Object-oriented: In Java, everything is known as an object. It can also be extended easily because it was developed on the object model.
- Platform independent: Java is a compiled language compared to other programming languages like C and C++. Java codes are not compiled into platform-specific machines but any platform-independent bytecode. The byte code is distributed over the internet web and is interpreted by the Virtual machine or JVM.
- Simple language: Java language is designed for easy learning. If you know the basic concept of OOP Java, it makes it easy to understand the concepts.
- Secured language: Java is very secure because of the virus-free and tamper-free systems. Here, most authentication techniques are designed based on public key encryption.
- Architectural neutral system: Java compiler language generates an architectural and neutral system object file format. This feature allows the compiled code execution on many processors to run on Java runtime systems.
- Portable: Being an architectural and neutral system doesn't support any implementation dependency, which makes Java more portable software. The compiler is written in ANSI C, including a clean portability boundary and POSIX subset.
- Robust: Java language makes less effort to eliminate any error-prone type by implementing compile-time error checking and runtime checking.
Different Applications of Core Java Programming:
Now, we are using Java SE (Standard Edition) 8.0, which offers Java advancements, widespread popularity, and multiple configurations built on various platform types. For example, J2EE is used for enterprise apps, and J2ME is for mobile apps.
The latest versions of J2 are Java SE, Java ME, and Java EE. Java is popularly called "Write once and run anywhere".
Some of the essential applications are;
- Multithreaded: Java includes a multithreaded feature that enables us to write programs and perform various tasks. This feature allows software developers to construct interactive applications that run smoothly on multiple platforms.
- Interpreted: The Java byte code is designed to translate them to fly on the native machine instructions and cannot be stored anywhere. The development process in Java is more rapid and analytical because the linking is lightweight and incremental.
- High-performance system: With the help of just-in-time compilers, Java language enables high performance.
- Distributed system: Java language designed to offer a distributed internet environment.
- Offers a dynamic environment: Java is more dynamic than any other language like C or C++. Java programs contain excessive runtime information used to resolve access and verify objects in the runtime environment.
Let's Start With Java Certification with 100% Job Placements.

Core Java Certification Training
- Master Your Craft
- Lifetime LMS & Faculty Access
- 24/7 online expert support
- Real-world & Project Based Learning
JDK, JRE, and JVM in Core Java:
This section will explain Java's different environment setups, such as JDK, JRE, and JVM. First, let me discuss JVM:
1. JVM (Java Virtual Machine):
Java virtual machine is a type of abstract machine. It is a virtual machine because you can't see them physically. The Java VM offers a runtime environment where you can execute the Java bytecode. With the help of the Java Virtual Machine, you can also run programs written in any other language (You can take C and C++), which will be compiled into Java byte code.
You will get a Java VM for both hardware and software platforms. Java virtual machine, Java runtime environment, and JDK are platform-dependent because each OS is configured using multiple platforms. One crucial point is that Java is platform-independent, and three notions of Java VM are available: specifications, instances, and implementations.
The main tasks of JVM are as follows;
- Loading of codes
- Verifying codes
- Code execution
- Offers runtime environment
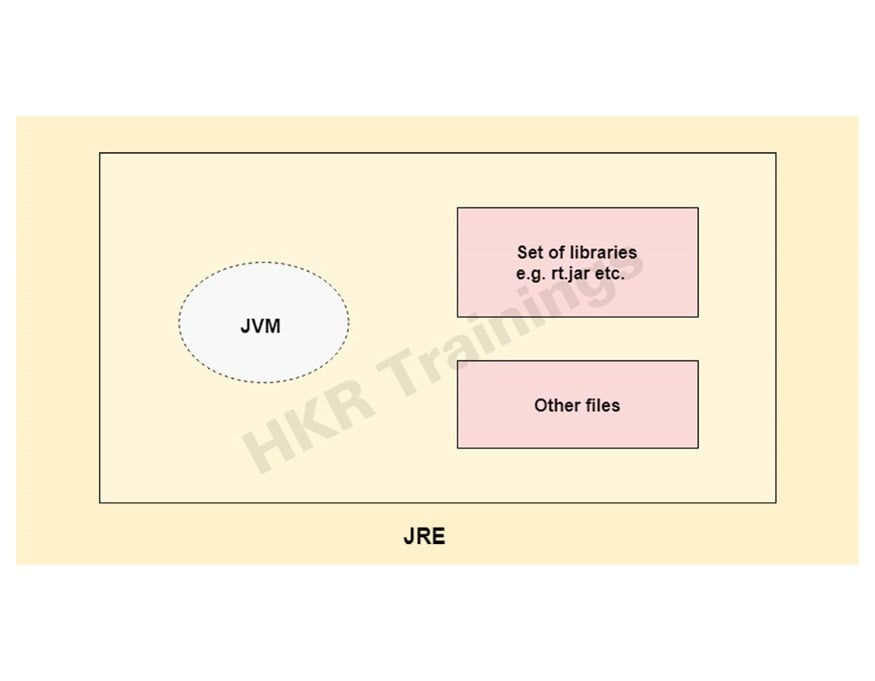
2. Java Runtime Environment (JRE):
JRE means Java runtime environment, and it is written as a Java RTE. The Java runtime environment consists of software tools used to develop Java apps. It is used to provide the runtime environment and the JVM implementation. This one physically exists. A Java virtual machine also consists of a set of libraries and other files that the JVM uses.
The following diagram will explain the JVM activities that other companies have released.
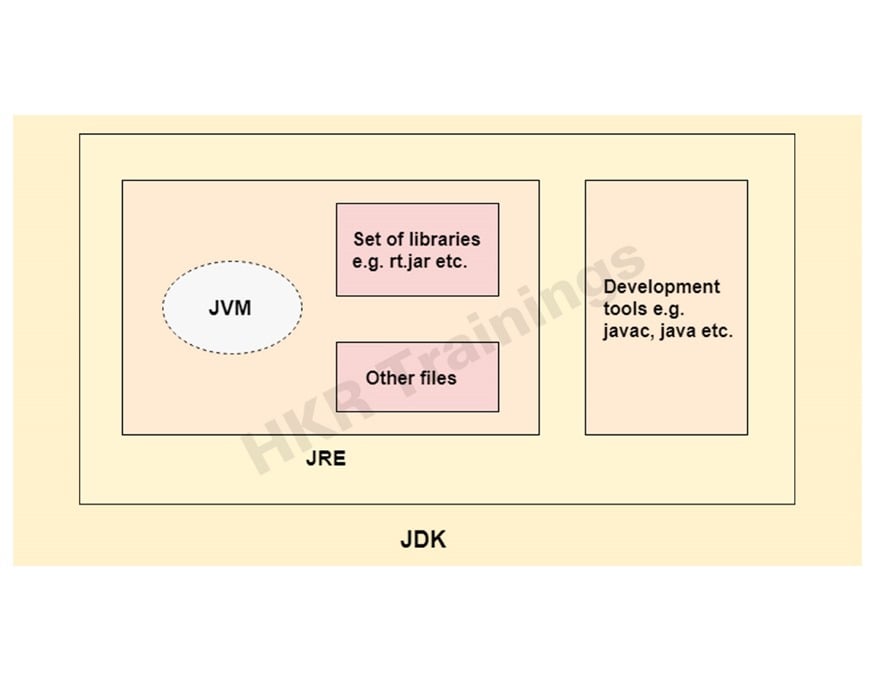
3. JDK or Java Development Kit:
JDK means Java development kit. The Java development kit is a tool kit for software development environments used to develop only Java applications and Java applets. This Java development kit physically exists. The JDK contains JRE and development tools.
JDK is an implementation of the given Java platforms which Oracle corporations release;
- The standard edition of the Java platform
- Enterprise edition of Java platform
- Micro edition of Java platform
The Java development kit consists of a Java virtual machine (JVM) and a few other resources such as an interpreter or loader (Only Java codes), a compiler or (Java c), an archiver or (jar), and a documentation generator (Javadoc) to complete the implementation of Java application.
Core Java Architecture (JVM Architecture) Overview:
The primary purpose of core Java is to define specifications, implementations, and Runtime instances. The following diagram explains the JVM internal architecture; this consists of a class loader, execution engine, and memory, as shown below:
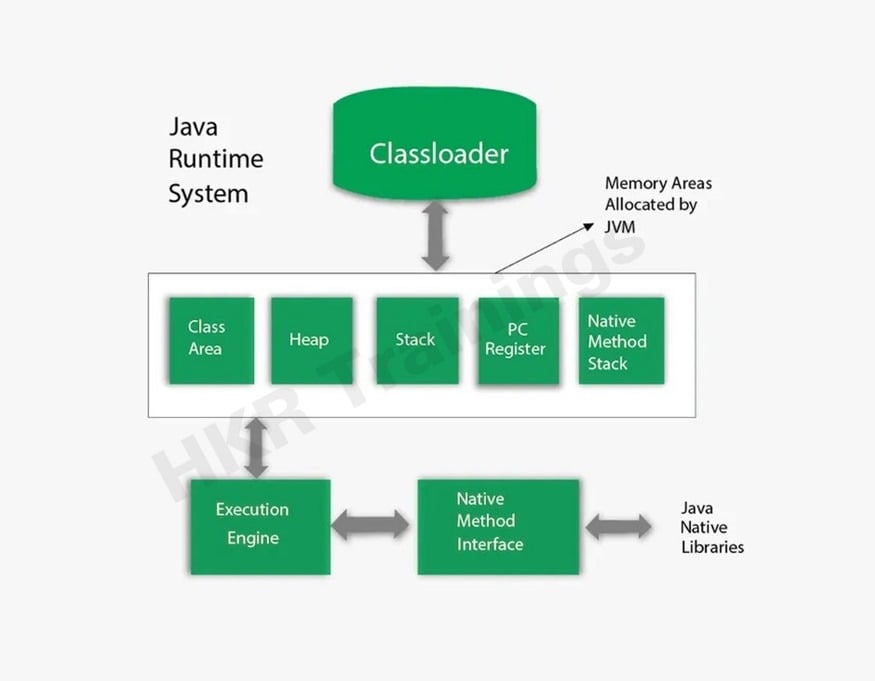
Let me explain the components in brief:
1. Classloader:
The class loader is a fundamental component of JVM and acts as a subsystem used only for loading the class files. When you run the Java program, it will first be loaded by the class loader. You can see three built-in class loaders in core Java,
- Bootstrap class loader: This is considered a first-class loader that can be used as a superclass of the extension class loader. It will load only the rt.jar file that consists of Java class files like Java. Lang package, Java.util package classes, Java.sql package class, Java.net package classes, etc.
- Extension class loader: This is a child class loader of bootstrap and parent system class loader. It helps load the jar files located in the directory $Java_HOME/JRE/lib/ext directory.
- System/Application class loader: This is one of the child class loaders of an extension class loader. This class loader helps to classify the classpath. Classpath will be set as the current directory by default. This process is also known as the application class loader.
Java offers various internal class loaders. Suppose you want your own set of class loaders; you need to extend the class loader class.
2. Class or method area:
Here, the class or method area helps store the per-class structures like runtime constant pools, the code used for methods, and fields or method data.
3. Heap:
It is available as a runtime data area to allocate the objects.
4. Stack:
Usually, core Java stacks store data formats. It consists of local variables and partial results. The stack plays a vital part in the method invocation and returns. Each thread consists of a private Java virtual machine stack and creates the same thread multiple times.
5. Program counter Register:
The program counter register holds the address of the Java virtual machine directions being executed.
6. Native method stack:
This component contains the native methods used for application development.
7. Execution engine:
This execution engine consists of the following components:
- Virtual processor
- The interpreter helps to read the bytecode stream that executes the instructions.
- Just-in-time or JIT compiler is used to improve the application performance. JIT compiler compiles the part of byte data code that offers similar functionality and reduces the compilation time. "Compiler" refers to a translator that transfers instructions to a Java virtual machine that specifies CPU.
8. Java native interface:
Java native interface is a framework that offers an interface to communicate between two apps written in any programming language, such as C, assembly programs, and C++. The core Java uses the native interface to send information to the console windows and interact with operating system libraries.
Core Java variables and data types:
First, let me discuss Core Java variables:
A variable is nothing but a container that holds the value during the execution of Java programs. The variables are assigned with data types. Variables are used to locate the memory. There are three core Java variables: local, instance, and static.
Variable: A variable is a name given to a reserved area that allocates the memory. In short, you can refer to it as a name of a memory location. It is a combination of "vary + able" where the value can be changed.
Types of Variables:
- Local variable
- Instance variable
- Static variables
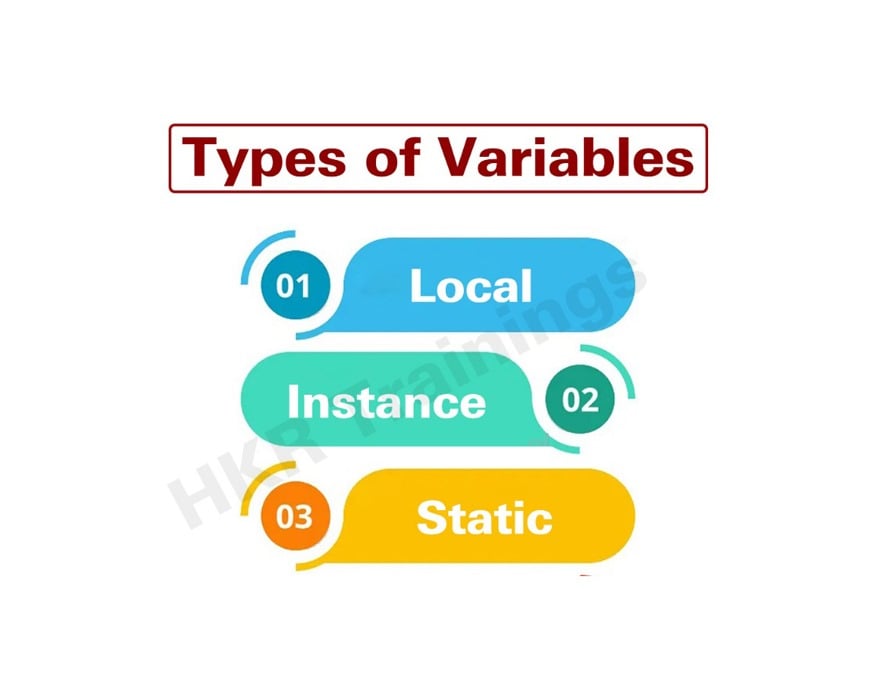
- Local variables: These are declared inside the body of the method. One crucial point is that you can use the variable within that method and methods in the class even if you know the variables exist. A local variable cannot be defined using any "Static" keywords.
- Instance variables: These can be declared inside the class library but are visible outside the method body. It can't be declared as a "Static". The name was given "instance" because the value is instance-specific and not shared among many other instances.
- Static variables: These are declared static and cannot be declared local. You can create a single copy of the static variable and share it among other instance classes. Memory allocation of static variables happens when the class is loaded in the memory location.
If you have any doubts about Java, get them clarified by Java Industry experts in our Java Community.
Subscribe to our YouTube channel to get new updates..!
Core Java data types:
Data types define the different sizes and values that can be stored in the data variables. There are two types of data types available:
- Primitive data type
- Non-primitive data type
Let me explain them one by one,
Primitive data types include Boolean, char, int, long, float, and double, whereas non-primitive data types include classes, arrays, and interfaces.
Core Java primitive data types are the fundamental building blocks of data manipulation. These are also considered the most basic data types in Java.
The following diagram explains the core Java data types:
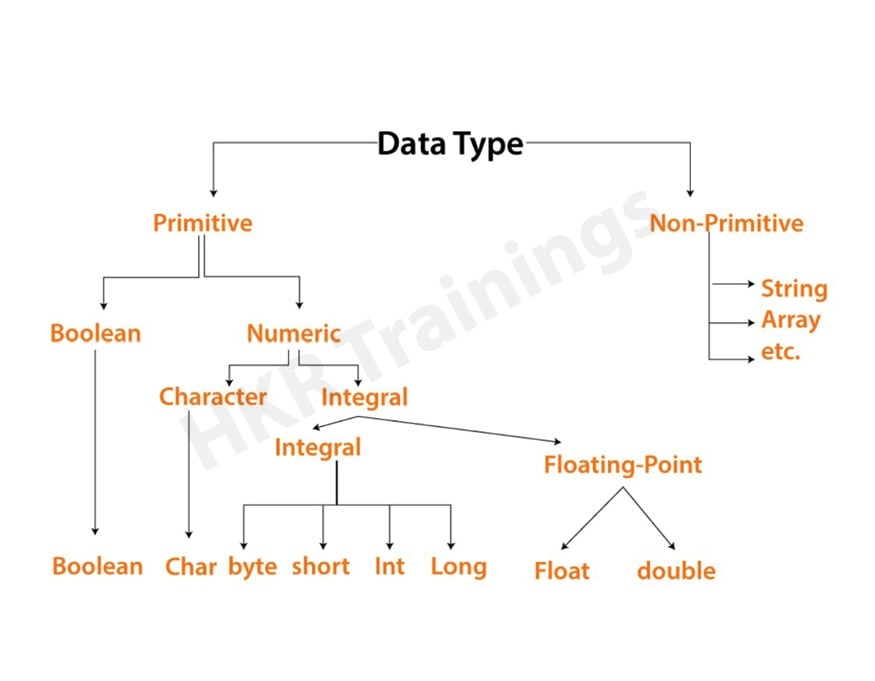
Examples of primitive data types are;
- Boolean data type
- Char data type
- Short data type
- Byte data type
- Int data type
- Float data type
- Long data type.
Non-primitive data types: These types of variables are mainly used in the writing of program codes. Examples are classes, arrays, interfaces, etc.
How do you deal with the Unicode system using Core Java?
First, we know the definition of Unicode; Unicode is a universal international standard character encoding that represents the words written in a user-defined programming language.
Why does core Java use the Unicode system?
There are many languages used in Unicode;
- ASCII or American standard code for international interchange for the United States of America.
- ISO 8859-1 is used for the Western European language.
- KOI -8 is used for the Russian language.
- GB18030 and BIG-5 are used for the Chinese language, and so on.
The problems which you can deal with the Unicode system:
- A particular code value specifies the different letters in the various program language standards.
- The encoding for languages with large characters sets the variable length. Some common characters are encoded as a single byte, two-byte, or others requiring more bytes.
To solve these problems, a new language was developed using Core Java, the Unicode system.
In the Unicode system, a character holds the 2 bytes, and core Java uses the 2 bytes for characters.
Lowest value: \u0000
Highest value: \ uffff
Core Java operators and keywords:
Core Java operators are types of symbols used to perform multiple operations. For instance, +, -, *, / etc.
There are many types of Java operators available, such as,
- Unary operators
- Arithmetic operators
- Shift operators
- Bitwise operators
- Logical operators
- Ternary operators
- Assignment operators.
1) Core Java Unary Operators:
The core Java unary operator requires only one or a single command. In general, unary operators are used to perform various operations, like,
- Increment or decrement the values one by one.
- Negation of an expression.
- Inverting any value of a Boolean.
2) Arithmetic Operators
The arithmetic operators in Java perform general mathematical operations such as addition, division, multiplication, and subtraction.
3) Shift Operators
These special type operators in Java work on the data bits that shift the bits from right to left and vice versa.
4) Bitwise Operators
In Java, the bitwise operators are symbols that simultaneously execute a specific action on the standalone bits. These operators help operate single bits of a number and are also helpful in executing updates and query operations of indexed Binary trees. There are different types of Bitwise operators, such as And (&), OR (I), XOR (^), and Compliment (-).
5) Logical Operators
The logical operators in Java help perform logical operations such as AND(&&), OR(!!), NOT, etc.
6) Ternary Operators
These operators in Java are conditional operators that are highly useful as a single-line replacement for the if-then-else statement. It uses three operands.
7) Assignment Operators
The assignment operators in Java are the commonly used operators and help allocate values to a variable.
Core Java keywords:
The Java keywords are also called "Reverse words". The keywords are a particular form of words that is key to a code. These keywords are predefined words that cannot be used as objects or variable names.
List of Core Java keywords:
- Abstract: The abstract keyword is used to declare only an abstract class. The abstract class offers the implementation of interface classes. It consists of abstract and non-abstract methods.
- Boolean: Boolean keyword is mainly used to declare the Boolean type variables. It can be true or false values.
- Break: Break keywords are used to break the loop or switch statements. It will break the current flow of the specific program under the given conditions.
- Byte: Byte keywords declare a variable with 8-bit data values.
- Catch: Case keywords catch the exception handling generated by "Try" statements. It should only be used after the "try" block.
- Case: Case keywords are used with switch statements to terminate or block the program.
- Continue: Continue keywords are used to continue the programming loop. It will continue the existing program flow and skip the code under the specified conditions.
- Do: Do keywords used in the control statements declare only loops? This keyword iterates any part of the program multiple times.
- Enum: The Enum keyword is used to specify the fixed set of constants. Enum constructors can be of type "private" or "default".
- Final: Final keywords indicate if any value holds a constant value type. It will be applied with a variable. The final keyword also restricts the users.
- Null: Null keywords specify the reference that does not refer to anything. It also removes the garbage value.
- Package: Package is used to declare a core Java package comprising classes.
- Private: Private keywords are used as an access modifier. This method or process may be accessed only within a class.
- Protected: Protected keywords are used as an access modifier. It can be accessible within and outside Java packages through any inheritance only. This protected keyword can't be applied to the class.
- Public: Public keywords are used as an access modifier. It is used to specify the items which are accessible anywhere. The public keyword has a detailed scope compared to any other modifiers.
Core Java classes and objects:
As I said, Java is an object-oriented (OOP) coding language. So we can assume that this program has the object-oriented feature, so core Java supports the following concepts:
- Inheritance
- Polymorphism
- Abstraction
- Encapsulation
- Classes
- Objects
- Message Passing
- Methods
Now, let's know the definitions of classes and objects:
Objects: Objects consist of states and behaviours. For example, a dog- this consists of various states like colour, breed, name, and behaviours, barking, and eating. One more definition is an object, an instance of a class.
Class: A class can be defined as a blueprint or template specifying the behaviour or state of an object's support type.
Classes in core Java:
We already know the definition; now it's time to see the sample program;
Public class Dog {
String breed_type;
Int age;
String color_type;
…..
…..
}
Below are the three types of class variables available;
- Local variables: These are defined inside the methods, blocks, and constructors. The variables are declared and initialized within the given methods, and variables will be destroyed when you complete the methods.
- Instance variables: Instance variables are the types of class variables visible outside any method. These instance variables can be initialized when the class gets instantiated. Instance variables are accessible from inside any constructors, blocks, and methods.
- Class variables: The class variables are those declared within a given class, outside methods, using static keywords.
Let's Start With Clojure Training
Moving ahead in this tutorial, we will discuss Java J2EE or Java Enterprise Edition concepts.
What is Java EE?
Java Enterprise Edition, Java EE, or J2EE, is a set of various specifications. This app is presently known as Jakarta EE. It offers a leading platform for developers with EE features like web services and distributed computing systems. However, the Java EE apps are generally executed on Application servers or Microservers. Examples of J2EE include banking information systems, e-commerce platforms, etc.
It is the most preferable and valuable platform for developers implementing Java language. J2EE is a highly reliable and secure platform with cross-platform compatibility. Also, J2EE uses a multilayered app model that is entirely distributed.
Moreover, Java EE includes some advanced specifications in connection to Java SE (Standard Edition). The Java Enterprise Edition is an extended edition of Java SE. Adding these updates offers enterprise-level developer needs.
What is the need for Java EE?
The Java Enterprise Edition includes many advanced Java specifications. There are multiple reasons regarding Java EE's requirement in real-time.
1) Reduced Development Time
The primary reason for using Java EE was to minimize the issues related to app development time. Having the XML Deployment descriptors with Java EE (5) edition is optional. So, developers can insert data like annotation directly into the Java source file. Further, the EE server helps developers set up the variable at runtime and deploy it automatically.
2) System Application Execution
It has become easier to build Java enterprise apps now due to the use of Java EE. This platform offers developers a robust set of APIs. It also minimizes software production time and reduces app issues by enhancing performance.
3) Robust API Support
The Java EE frequently updates and identifies different ways to improve programming and API models for new apps. Also, it will include all the latest features that the global community of developers need.
4) Minimize Issues of an Application
The Java enterprise edition mainly focuses on designing and developing enterprise apps with less complexity and making them cost-effective with lightning speed. However, today's developers frequently find the importance of distributed, portable, and transactional apps that enhance server-side technology's speed, reliability, and safety.
Let's Start With Liferay Developer Training
Specifications in Java EE
Java EE contains different types of specifications that help with reading and writing data management, designing a web page, and transaction processing. These include:
- Enterprise Specification
- Web Service Specification
- Web Specification
- Other Specifications
What is the next step after learning Java EE?
After mastering Java EE, the next step in your learning journey is to familiarize yourself with Exception Handling in Java. This key concept is essential to understand before diving into coding, as it equips you with the knowledge and skills to effectively resolve errors and exceptions that may arise while developing real-time Java applications. You can create more robust and reliable software by learning how to handle exceptions.
You can explore various available resources to gain a detailed knowledge of Exception Handling in Java. Let us know about Exception Handling in brief.
Exception Handling
In Java, exception handling is an approach that helps to enhance a Java app's performance abilities. If exceptions (errors) are ignored and not managed properly, it may compromise the real-time application.
Difference between an Error and an Exception
Both error and exception look like similar words, but there is a lot of difference between the two. An exception is an unknown fault during a program's runtime. It can cause a severe threat to an application or disturb the flow of an entire program.
An error is a state that makes a program incapable of running or collapsing. It can make the program irrecoverable and often stays in a non-executable mode only.
Use Cases of Java Exceptions
The Java exceptions help to develop reliable and robust software apps that can deal with any exceptional situation during a program's execution. Here are a few examples of exceptions in Java:
- Resource Management
- Validating Inputs
- Concurrency
- Better Network
- Custom Exceptions
Moreover, there are various exceptions in Java, such as Checked, Unchecked, and Errors.
Now, let us briefly understand the concepts of JDBC and Servlet in Java.
Java JDBC
The term Java JDBC refers to Java Database Connection. It is a software tool and an API that builds a connection between a database and an application that wishes to use the database. Further, a Java JDBC includes various components in its architecture, such as JDBC API, Application, and Drivers. Data Storage Units, and JDBC Manager.
Java Servlet
A Java Servlet is a class that helps improve application functions and supports applications accessible through request-response models. These are integral to the Java programming language and help improve web server apps managing various request types.
Let us focus on some other concepts related to the Java tutorial.
Is Maven part of Java?
Maven is a leading open-source and build automation tool or build tool mainly used for Java projects or applications. This tool helps to automate source code compilation, packaging binary codes, managing dependency, and running test scripts. As it is a Java tool, you must install Java before working with Maven.
Apache Maven is an essential base for Java enhancement, and it is mainly used as a build tool for Java apps.
Maven is also known as a project management tool. Maven helps develop web application packages in Java projects. This tool provides multiple features that help in creating web application packages. These include POM files, build life cycles, repositories and dependencies, build plugins and profiles, etc. So, if you want to use Maven for your Java project, you must install a Maven Java compiler to help you work on any project.
You can explore the Maven Training to learn more about a Maven tool.
Is Spring Boot related to Java?
Spring Boot is an open-source Java-based framework that helps in developing Spring-based apps. In other words, Spring Boot is an IDE tool that offers a ready-to-use development ecosystem. It helps to debug, install, run, and deploy an application.
Spring Boot application has multiple features such as:
- Standalone spring apps.
- No code generation to configure XML.
- It offers automatic configuration.
- This framework also supports Maven and Gradle.
- It also provides starter PMOs and dependencies.
- Spring Boot offers standard non-functional features that are production-ready for real-time apps. These include metrics, security, health checks, etc.
Spring Boot is also a data model under the Spring framework. The architecture of Spring Boot is a layered architecture comprising layers like the Presentation Layer, Persistence Layer, Business Layer, and Database Layer. Further, there is another essential tool, Spring Initializr, a web-based application tool that produces the Spring Boot project structure. It is mainly used to develop many Java-based projects. Also, Spring Initializr is a metadata model that is helpful for metadata projects. Furthermore, there are multiple modules available in Spring Initializr.
To get more details on Spring Boot, you can explore Spring Boot Training.
MVC Framework in Java
The term MVC refers to Model-View-Controller. It is a popularly known design pattern that is helpful for web development. It is generally used to design user interfaces and helps organize our code. Moreover, it is a design framework that allows the building of mobile, desktop, and web apps. It also divides applications into three elements: Model, View, and Controller.
Further, the MVC architecture also offers various features such as:
- Tag Support
- POJO Actions & Forms
- Easy to integrate
- AJAX & Plugin Support
- Profiling and Template Support
- View options or tools like free market, XLST, etc.
However, you can explore the ASP.Net Training programs to gain expertise in MVC technology.
Conclusion:
I hope I have given full justice to this amazing Java tutorial. In this core Java tutorial, we have covered all the basic to advanced-level concepts. This tutorial best suits those familiar with computer programs and software programming languages. To gain in-depth knowledge of this Core Java tutorial, explore the best practices of a few basic Java-related programs. You can enroll in an online course to get practical expertise on Java apps apart from theoretical learning.
So, if you want to gain a deep knowledge of Java and become a skilled web developer, consider the top certification programs to enhance your career in the software development industry.
About Author
Upcoming Core Java Certification Training Online classes
| Batch starts on 30th Jul 2026 |
|
||
| Batch starts on 3rd Aug 2026 |
|
||
| Batch starts on 7th Aug 2026 |
|