
Informatica Cloud Tutorial
Last updated on Jun 12, 2024


- Reviewed by
- Deeksha (Expert in Cloud Computing and Devops)
What is Informatica Cloud?
Informatica is an American software development company founded in 1993. Its headquarters are in Redwood City, California, and it is also known as Informatica Power Centre. Informatica uses the extract, transform, and load (ETL) tool, which is widely used in building an enterprise data warehouse.
Informatica launched its Informatica Integrated Cloud Services (IICS) in 2017. The main goal is to accelerate data that drives digital transformation in businesses. Informatica Power Center data integration connects and retrieves data from different sources and processes them. The PowerCenter server fulfills tasks on a workflow that workflow managers create, and the workflow monitor in the power centre monitors the workflows.
Informatica's IICS is in massive demand for data integration and management platforms that work similarly to SaaS. This tool has helped more than 9,000 customers. Clients like Allianz, Fannie Mae, ING, and Samsung use Informatica's power career centre as their data integration system.
Learn new & advanced Architecture in Informatica Cloud with HKR's Informatica Cloud Training!
What is the difference between Informatica and Informatica Cloud?
Informatica Cloud offers almost all the key features that Informatica Power Center offers. Additionally, Informatica Cloud provides Cloud Designer.
- It provides more advanced data integration features than the Power Center Designer.
- We do not have to connect all the ports manually as we do in PowerCenter.
- We can also create reusable mappings using parameterized values.
Informatica Cloud Architecture
Informatica architecture is a type of Service-oriented Architecture (SOA). An SOA is a group service where one can connect with another, and it simplifies data transfer during this communication.
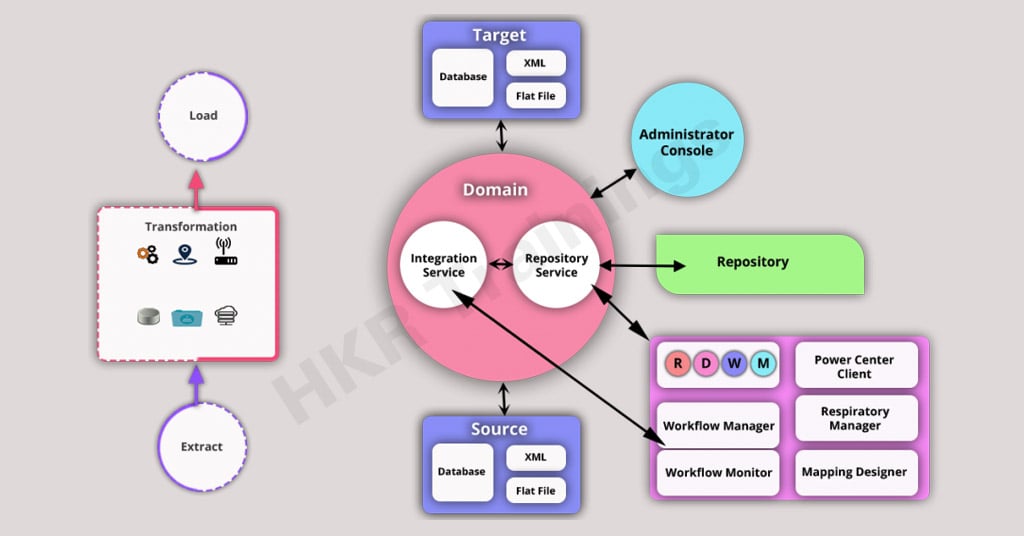
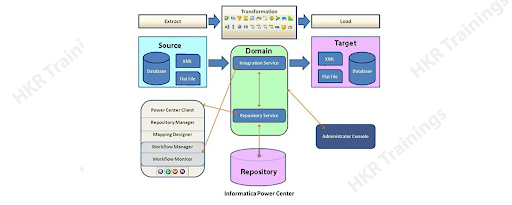
Informatica ETL tool has the below services and components, such as:
- Informatica domain: It is an administrative unit that contains nodes and services, which are further divided into folders and subfolders.
- Repository service: These services connect the clients and the Power Center repositories. They are multi-threaded processes, and they connect the metadata and offer access to other services.
- Integration service: it integrates the movement of data from targets to sources.
- Reporting services: these handle metadata and allow other services to access the same.
- Repository manager: manages objects in the repository.
A workflow manager is needed to create workflows and tasks and execute them. - Mapping designer: It helps create mapping metadata and store it in the IICS repository.
- Source and Target: Metadata's source and target include data type, precision, scale, and other information about the source and target objects stored in the IICS repository.
Informatica Features
Let us explore the various features of Informatica:
- It offers excellent data transformation features that control and cleanse data during the ETL process.
- Informatica PowerCenter also provides data quality management and data profiling capabilities.
- It offers multiple pre-built adapters and connectors to connect with a data source and take out data from various sources. These include databases, web services, files, etc.
- The ETL tool supports performance optimization methods and is highly scalable, enabling it to manage large-scale data and enhance its processing speed.
- It also offers powerful metadata handling features that allow you to capture and effectively manage metadata across the ETL process.
- This tool provides in-depth tracking and error-handling features. It allows you to log and audit the ETL tasks and track their progress.
- Informatica Power Center also provides real-time and batch-processing features. It allows you to develop ETL workflows to manage real-world data integration needs.

Informatica Cloud Training
- Master Your Craft
- Lifetime LMS & Faculty Access
- 24/7 online expert support
- Real-world & Project-Based Learning
Why do organizations so widely accept Informatica?
Informatica is widely accepted due to the following reasons:
-
It allows you to work closely and smoothly with information business and technology.
It is effortless to use, and many automated processes are available.
You can implement this tool to supervise operations and governance.
Your data analysis and software can be fed with data in real-time.
Advanced data transformations can be done while moving from source to destination.
It also provides master data management to connect essential data to a common destination.
Informatica PowerCenter installation
The latest version of Informatica PowerCenter is Informatica 10.4, which was released on December 2nd, 2019.
Prerequisites
We must install a database like Oracle, Microsoft SQL Server, or DB2. Informatica uses this for the metadata repository.
- A minimum of 35GB of free disk space
4GB of RAM is needed
Adobe Flash plug-in is required
It requires x86 chip Set
Downloading the Software
To download Informatica PowerCenter:
1.Go to https://edelivery.oracle.com website and enroll for a free account (if you don’t have an account).
2.Login to your registered account and accept the given T&Cs.
3.Select 'All Categories' from the left drop-down.
4.Give 'Informatica PowerCenter' in the search box and click 'Search.'
'Informatica PowerCenter and PowerCenter Adapters' will be shown. Click on the software link, select your operating system, and click 'Continue.' Choose the version you need and click on 'Download.' A set of zip files will be downloaded to your local machine.
Extract all the zip files and subzip files into a single folder where you want to set up the installation. You will get two folders—one for the client and the other for the server.
Check out here for frequently asked Informatica interview questions & answers.
Server Installation
Open the server folder and run the installer. The installation wizard will open. Click on 'Install Informatica.' It will verify and show the list of prerequisites; click on 'Next'. It will then ask you to provide the license key. The license key file will be available in your installation folder where the zip files have been extracted. It will also give the setup path by default, which you can change. Click on 'Next' and then click on 'Install'.
Once the installation is completed, it will ask for the Domain. Select 'Create a domain' and click 'Next'. You will get a Windows alert to allow access. Click on 'Allow access'. Next, we need to set up the database. Give the database type, user ID, password, and other details. We will have an option to see if the connection has been established. Click on 'Test Connection'. If it is successful, click on 'Next'. It will then prompt for the encryption key. Give a secure keyword and click on 'Next'. Click on 'Ok'.
The next screen will be for the domain node setup. Provide all the details, such as Domain name, node hostname, domain name, domain username, and domain password, and click 'Next.' Make sure to note all these details somewhere for future purposes. Click on 'Next' for the next screen as well. After successful installation, you will get the admin home page link.
Client Installation
Open the client folder in your local system where the extracted file is located. Run the installer. The installation wizard will open. Select 'Install Informatica' and click 'Next.' Select all the clients in the next screen and click 'Next.' The default server installation directory is shown. You will have the option to change this, too. Click on 'Next.'
The next step is to configure the transformation studio. Select 'Install data transformation studio and a standalone copy of Eclipse' and click 'Next.' The installation summary will appear. Click on 'Install.' Once the client has successfully installed, you will receive the post-installation summary. Click on 'Done.'
Components of Informatica Cloud
Components are resources that assist in mapping and tasks; there are many components in the Informatica cloud.
API collections
An API collection gives the following mapping schemas
- Request schema used to map incoming fields in transformation
- Response schema is used to map response fields from the Rest API
Fixed-width file formats
one can create and save multiple fixed-width file formats that specify the formatting details for fixed-width flat files. It can be used as a source or target in mappings and mapping tasks.
Business services
A business service is a web service that includes configured operations.
Hierarchical schemas
A hierarchical schema is an asset based on a schema file, sample JSON file, XML sample file, or XML schema imported into Data Integration.
File listeners
A file listener listens to a particular folder and the file patterns. Some events trigger a notification in the below assets.
- Task flows
File ingestion tasks
B2B gateway partners
Intelligent structure models
An intelligent structure creates a model that articulates the expected output data. An intelligent structure model is used in mappings to analyze structured, semi-structured or unstructured data. Users can create multiple formats by using
- JSON files
Avro files
Parquet files
XML FILES
ORC files
Microsoft Excel files, etc.
User-defined functions
One can create user-defined functions using the Informatica ICS transformation language. User-defined functions are reusable functions that you can use in expressions.
Explore Informatica Sample Resumes! Download & Edit, Get Noticed by Top Employers
Advantages of Informatica Cloud
The following are the advantages of this ETL tool, such as:
- We don't have to worry about managing the server locally as we don't have to set up infrastructure on-premise.
- It allows companies to monitor data across instances of cloud integration services centrally.
- The cloud administration hub enables monitoring of all the jobs.
- It helps in improving performance.
- Informatica Cloud audit logs provide visibility into all the jobs and users.
- It gives published APIs that can integrate with third-party tools.
- It also offers extensive connectors for cloud and on-prem sources.
- This tool offers greater document control.
- It offers speed and agility.
- Scaling up the server is eas
Connectivity
- Informatica offers a wide range of intelligent, high-performing, in-built cloud connectors.
- It makes it easy to connect data endpoints, including databases, data warehouses, apps, APIs, and big data repositories.
IMAGE
Connectors provided by Informatica Cloud
Many pre-installed connectors are available in Informatica the cloud, and in addition to them, one can create new connections for any connector installed in Informatica, the intelligent cloud service. One needs connectors to build connections. Connections are provided to access features like data in cloud and on-premise apps, flat files, databases and platforms.
1) Web service consumer connector:
A web service consumer connector connects web service apps that support SOAP API to consumers and transforms data.
2) OData connector:
The OData connector is Open Data Protocol (OData), a standard version of OASIS with best practices for building and consuming RESTful APIs. With OData, one can customize their needs and develop RESTful APIs.
3) REST V2 Connector:
REST V2 Connector interacts with web service applications built on REST architecture. It can also be used in other areas, like Source transformation, Target transformation, or midstream in a Web Services transformation. For example, It is used to midstream a mapping to pass one or many requests to a web service application and process the response data.
4) JSON Target Connector:
The JSON target connector converts source data into JSON format using a JSON template. In synchronization tasks, JSON Target Connectors use objects as targets.
Access to Informatica Cloud
A new user can get 30 days of free trial access to the Informatica cloud. On Informatica's official website, in the top right corner, there is a free trial; by clicking on it and providing the necessary details, one can get free trial access for 30 days.
Creating a mapping and configuring in Informatica Cloud
To create a mapping in Informatica, one needs to follow the steps :
Step1: Open designer in IICS, then,
Click New, and then in the New Asset dialogue box,
then click mapping.
Step2:
Click Create. The Mapping Designer appears with a new mapping dialogue box displaying the mapping canvas.
Step3:
Click on the Properties panel and enter m_Accounts_by_State to give a name.
Step4:
To save mapping in a specific location, browse to the folder you want and then map to save it, or it will be saved in the default location.
Why should you learn Informatica?
Informatica is commonly used across global enterprises that want to remain on top of their results. With more than 30% of the world's information already stored in existing systems like Mainframe, there is an excellent chance for a helpful tool like Informatica regarding data integration. Along with that, it is your key to big data. Therefore, companies give top-notch salaries to experts who are well-versed in this top ETL tool.
Informatica Cloud Use Cases
Let us explore the various use cases of Informatica Cloud:
1) Data Synchronization
In data synchronization, you can explore the following:
- From Software-as-a-Service to SaaS
On-premise application to cloud app
Cloud App to Cloud app
On-premise app to on-premise app
2) Data Replication
The data replication allows you to;
- Copy data sets
Reserve or Warehouse data (Backup)
3) Mappings
In the mappings section, you will have the;
- Methods to Extract, Transform, and Load data from multiple sources to different target areas.
4) Tasks of Maintaining Systems
In these tasks, you will find the following:
- Execute CRUD operations-Create Update Delete
- Loading and pulling data in bulk to third-party systems or apps.
5) Monitoring
In monitoring, you will get the following:
- The usage of activity logs for successful and failed tasks.
- A summary of the dashboard is used for jobs, data processing, and availability.
- Audit logs are used for all events developed by a firm's users.
Development
There are two parts of development within Informatica Cloud: mappings and data synchronization tasks.
1) The Data Synchronization tasks in Development are ETL-based jobs that help load data from a particular source to a target using data synchronization. This process also provides some change during the transfer.
2) Mappings are like flows that enable you to chain different composite activities. These include joins, functions, and filters that closely build a complex integration method.
Reporting
Reporting within the Informatica Cloud is categorized into Activity Monitoring and Activity Log.
- The Activity Monitoring is accountable for producing a list of all the currently executing tasks. Each task is listed, including its time/date and rows processed.
- In reporting, the activity log can summarize all the successful and failed executed tasks
Every process also reports information like date, time, status, success and error rows, and error messages. Each job has a session log that can be retrieved by the user, giving logging-level runtime data.
Why is data integration technology used?
Nowadays, every company deals with a vast data set. They come from many sources and need to be processed to provide insightful data on making business decisions. However, quite often, such data have the following issues:
- There will be large amounts of data for large business entities. Here, the data can be in any format, thereby making it available in different databases and in unstructured formats.
- This unstructured data in multiple databases must be combined, collated, and news to work seamlessly.
- Firms implement unique interfaces between databases. If the particular database changes, the interfaces need to be updated.
Here, data integration technology came into existence to solve all those complicated issues that arise in enterprises. With the help of this technology, data from different databases can be connected very smoothly and reliably. However, data integration technology has different architectures that perform operations on the data. Informatica uses ETL architecture to perform data integration.
Now, we will go through ETL and how Informatica performs ETL to solve business problems.
What is ETL?
ETL is a popular data integration platform that includes an ETL structure, It processes and uploads data into a target DB or file. It's the cornerstone of a data warehouse.
The ETL system helps perform the following actions: They are:
- Retrieve data from different sources.
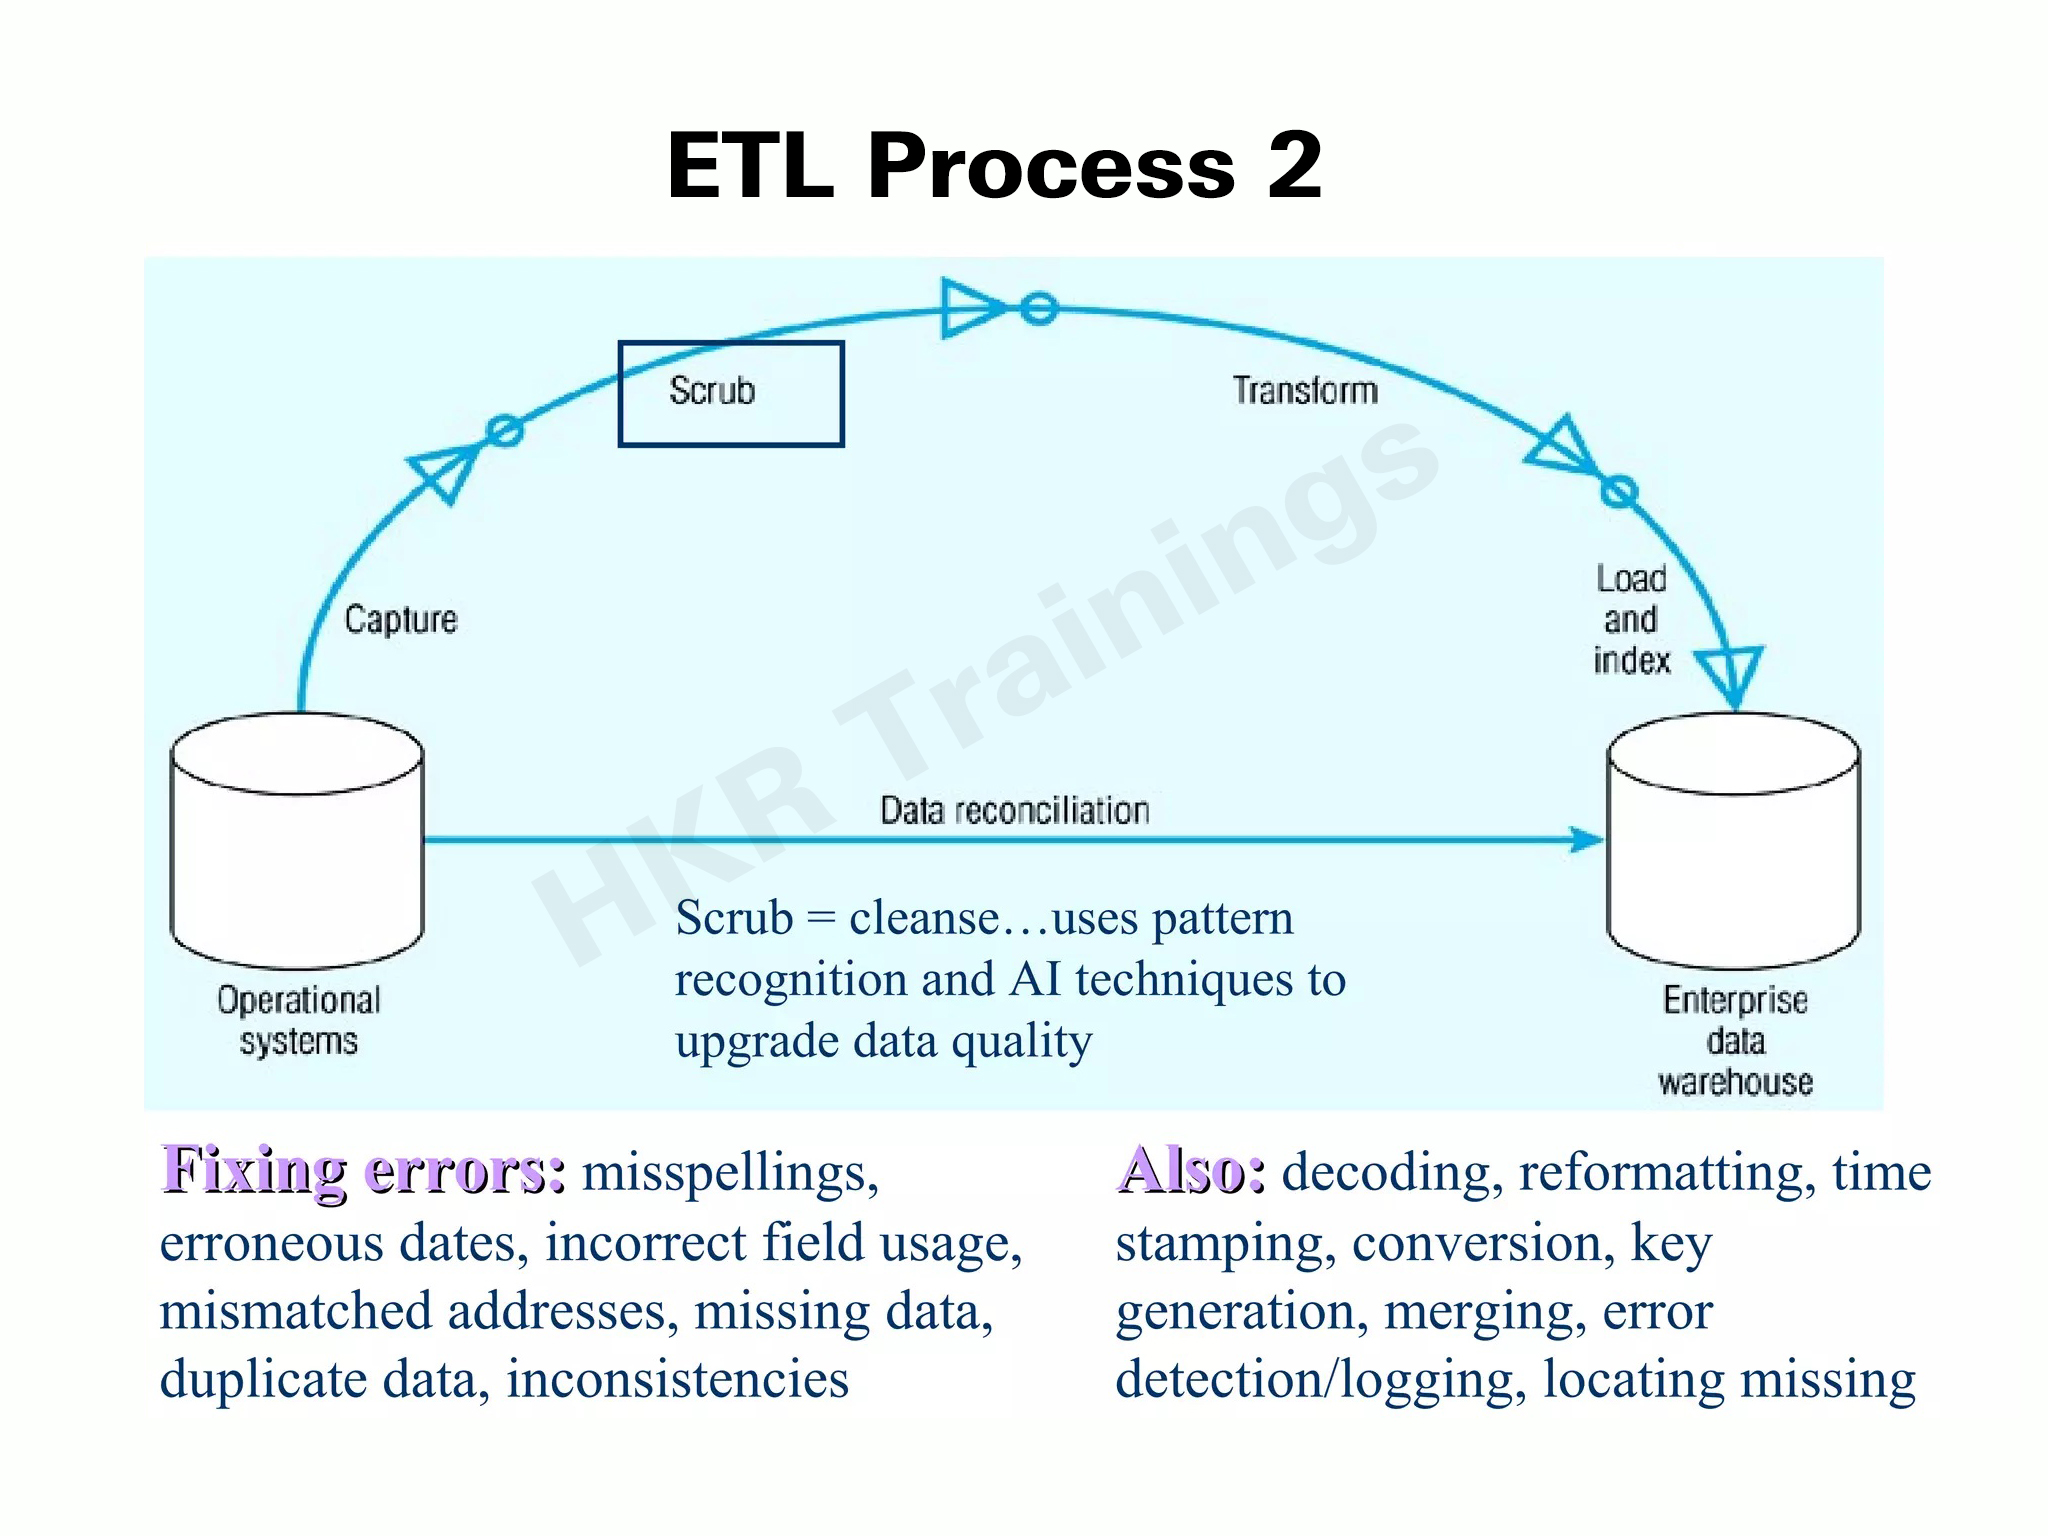
It transforms and cleans the data.
Indexes of data.
Summary of data.
Loads data to the warehouse.
Tracks changes to the source data required for the warehouse.
Keys to Restructure.
Keeps the metadata in place.
Refresh the warehouse with updated data.

Subscribe to our YouTube channel to get new updates..!
What is the use of Informatica ETL tools?
Informatica Power Center is a premium data integration solution that is currently available. The explanation it offers the best option for large companies is that it is:
- Database neutral and can, therefore, interact with any database
- The most effective data transformation tool. Converts data from one program to another format
Now, we will learn about how Informatica performs ETL.
How Does Informatica Perform ETL?
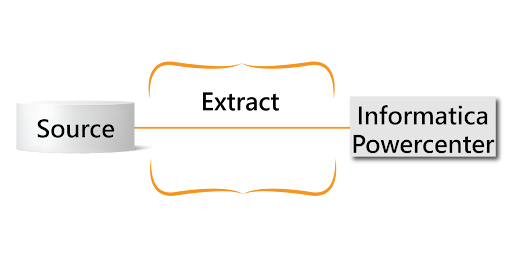
ETL: Extract
- Power Center can read data, row by row, from a table (or a group of similar tables) in a database or from a file
- This database or file shall be referred to as the source
- The source structure is found in the source description entity.
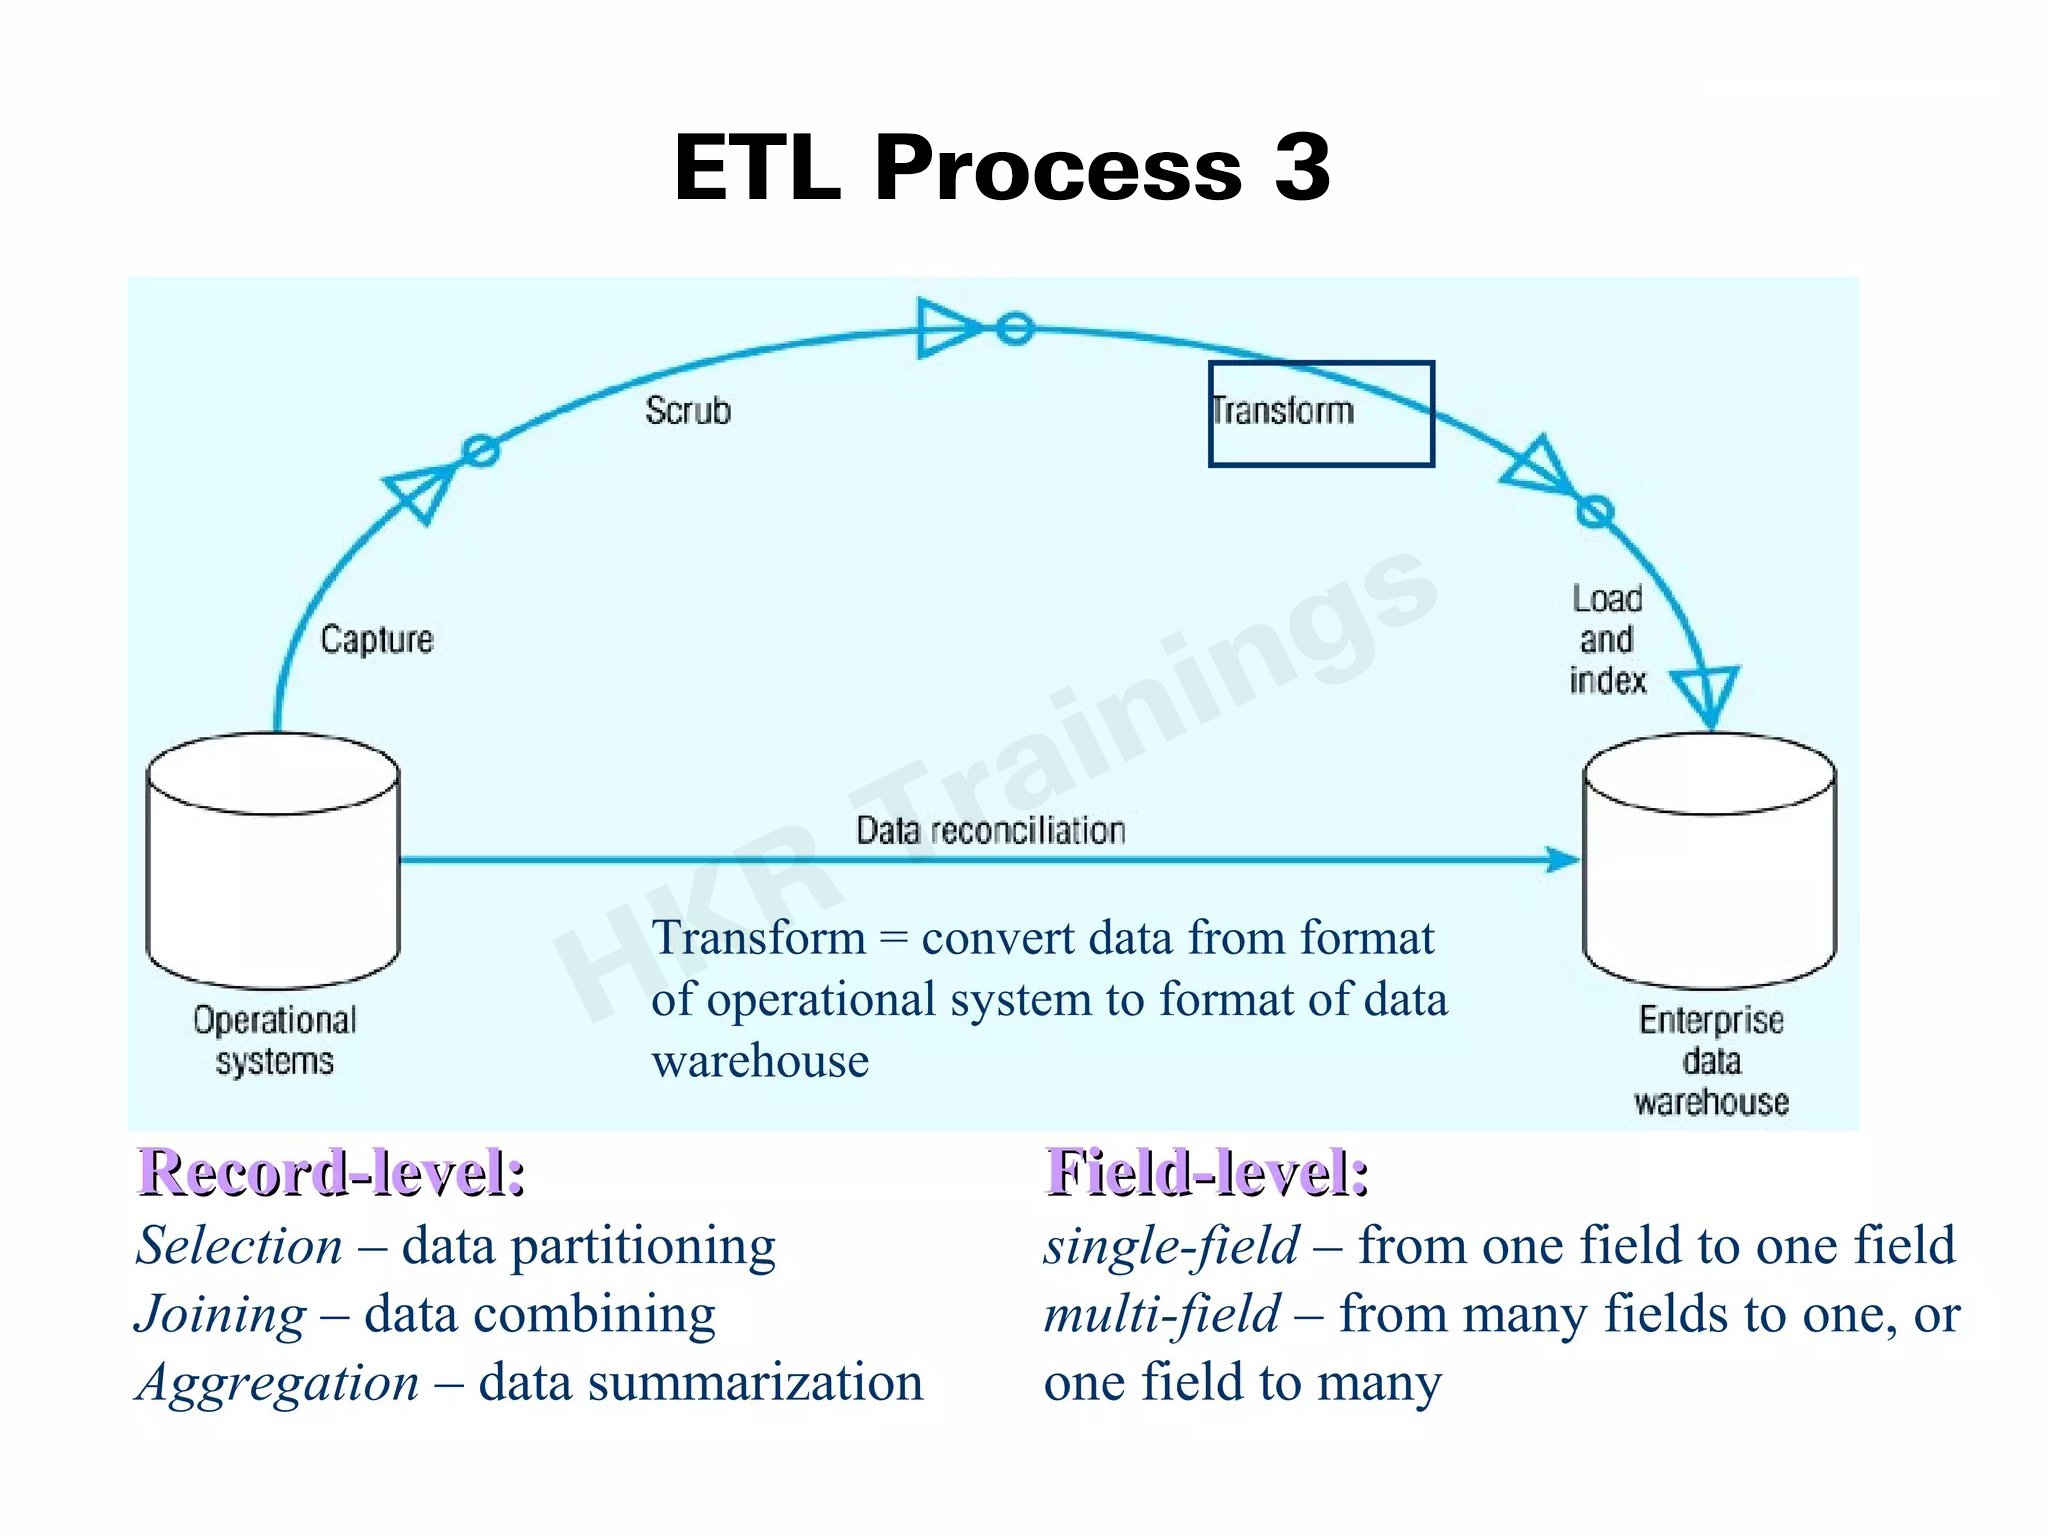
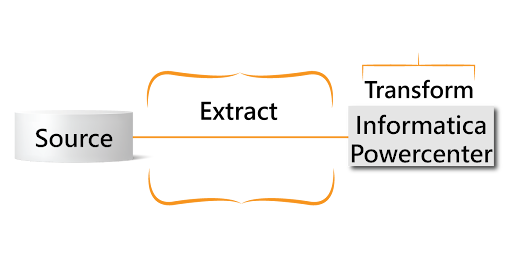
ETL: Transform
- Informatica PowerCenter converts rows to the format the second (target) method can use.
- The logic of this conversion is described in transformation objects.
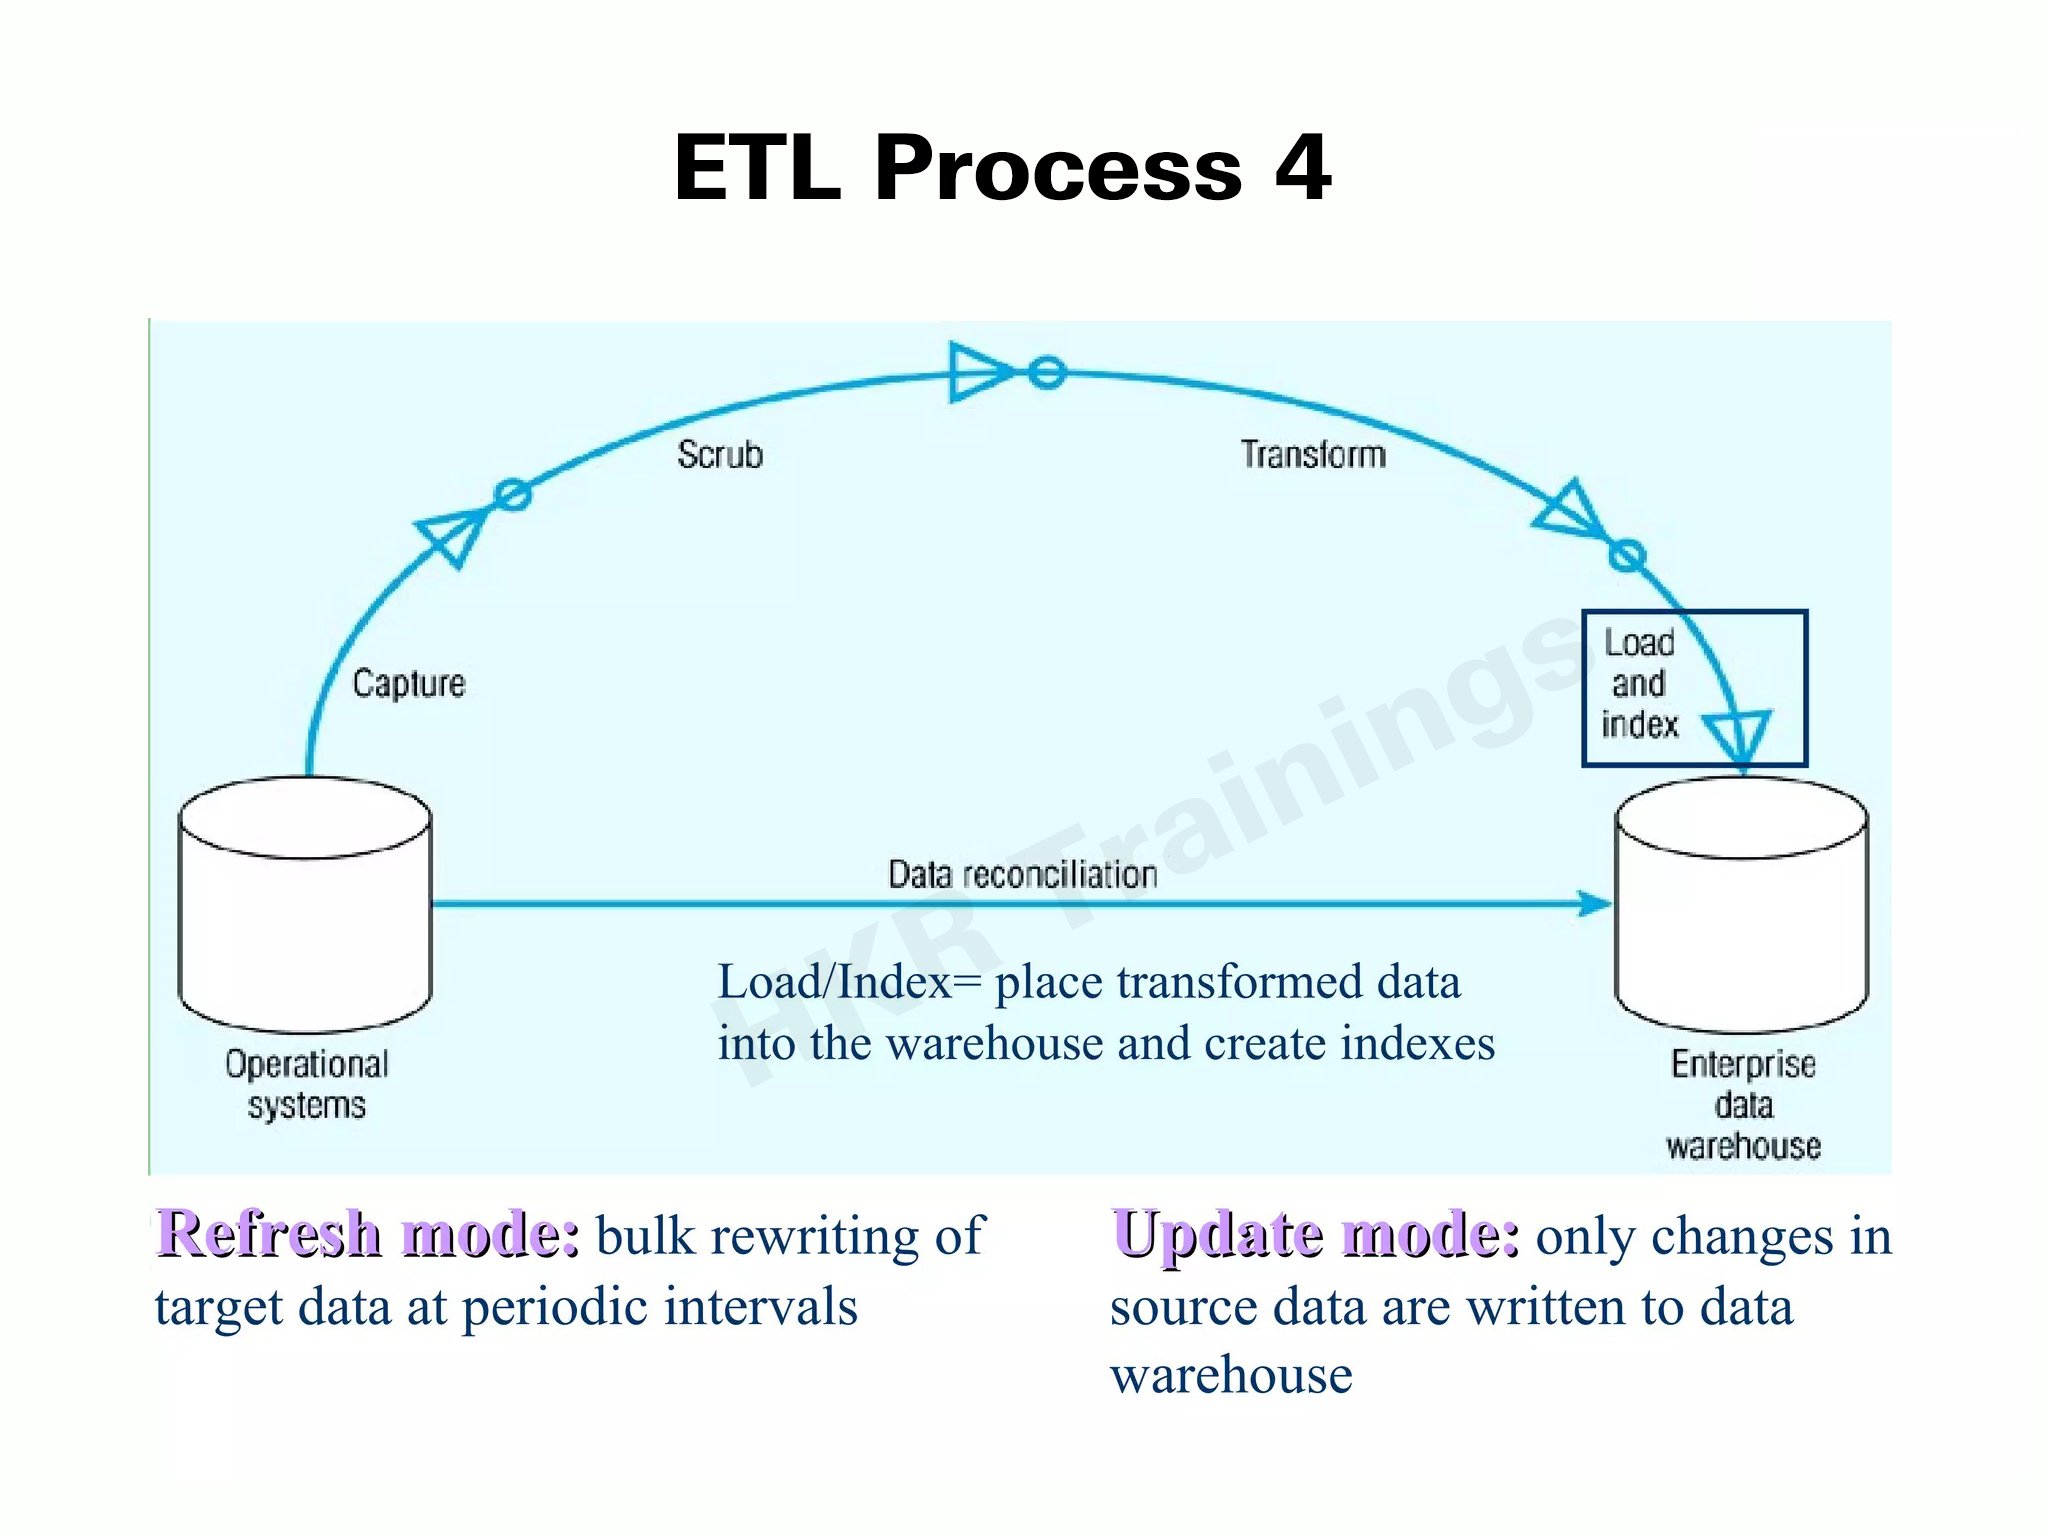
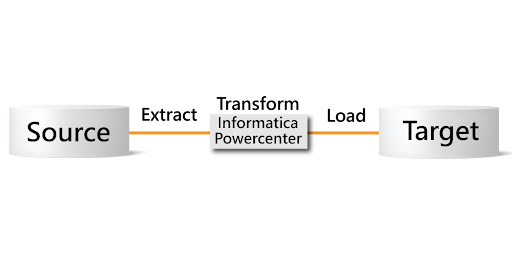
ETL: Load
- Informatica PC writes data, row by row, to a table (or group of associated tables) in a database or to a file.
- This database or file shall be referred to as the goal
- The configuration of the target is included in the target description object.
Applications of Informatica:
The real-time applications of Informatica are:
- Changing from a traditional old system like a mainframe to a modern DB system needs data transfer from the old to the new system.
- If a company looks to set up its data warehouse, an ETL tool will be needed to transfer the data from output to the newly built data warehouse.
- Informatica can also be used as a data-cleaning tool.
- This tool also includes online resources, business data, etc.
Informatica PowerCenter Architecture:
Informatica's Power Center uses a Service-Oriented-Architecture (SOA) consisting of the following components:
1) Repository Service:-
It is a separate process that performs various functions, such as recovering, inserting, and updating the metadata in the repository databases.
2) Integration Service –
It is an integration service that transforms data from sources into mapping targets.
3) Reporting Service – This service enables the production of reports.
4) Nodes – A service role node runs apps, and a computer role node performs computations.
5) Informatica Designer -
It is an interface used to build and manage Power Center mapping objects, such as, sources, targets, and mapplets.
6) Workflow Manager –
A Workflow Manager executes tasks like emails, sessions, and shell commands. It contains a task developer, worklet designer, and workflow designer to manage and develop workflows.
7) Workflow Monitor –
A Workflow Monitor displays workflows that have run at least once. Workflows can be run, stopped, resumed, and aborted from the workflow monitor. It covers the Navigator window, Output window, Time window, Gantt Chart view, and Task view.
8) Repository Manager –
It allows navigation through multiple folders and repositories to manage user permissions, perform folder functions and view metadata.
For more information on the Informatica architecture, click on the Informatica Certification Training.
Client Components of Informatica PowerCenter:
The client components of Informatica Power Cen
- Power Center Repository Manager
Informatica PowerCenter Designer
Power Center Workflow Manager & Monitor
Informatica workflow designer
Admin Console
Server Components of Informatica Power Center:
- Repository Service
SAP BW Service
Integration Service
Web Services Hub
Conclusion
Informatica's cloud service is a widely used all-in-one tool. Many companies rely on this due to its diversity in applications. It allows users to take full advantage and the ability to integrate services. One can check and monitor the tasks carried out or finished. Connecting is very easy with its high-performing and intelligent built-in connectors. Through this article, you will gain expertise on various topics related to Informatica, such as its architecture, components, features, etc. I hope you enjoyed this learning, and if you want more information, do visit the HKR Trainings website.
About Author
Upcoming Informatica Cloud Training Online classes
| Batch starts on 1st Aug 2026 |
|
||
| Batch starts on 5th Aug 2026 |
|
||
| Batch starts on 9th Aug 2026 |
|