
Selenium Tutorial
Last updated on Nov 17, 2023

- What is Selenium?
- Selenium Installation
- Launch browsers in selenium
- Selenium Webdriver Commands
- Advantages & Limitations of Selenium
- Selenium WebDriver Architecture
- Waits in Selenium
- Handling Dropdowns in Selenium WebDriver
- Elements of Selenium Webdriver
- Selenium with TestNG
- TestNG Annotations
- Conclusion
What is Selenium?
Selenium is a popular, open-source, web-based test automation tool. This test automation framework supports different browsers and platforms, including programming languages. It is also easy to deploy Selenium on various platforms like Windows, Solaris, Linux, etc.
Moreover, you can build test scripts in Selenium using programming languages like Java, Python, C#, etc. Selenium is not only a single tool but a software suite for testing web apps. You can also automate the test functionality using Selenium. Further, you can integrate it with other automating testing tools like Jenkins, maven, Docker, etc. Moreover, Selenium has a large user base with great community support. Also, its usage results in higher ROI with faster go-to-market facilities.
Learn the basics of Selenium and take your automation testing skills to the next level!
Become a master of Selenium by going through this HKR Selenium Training!
Components of selenium
Selenium has four different types of components, such as:-
- Selenium IDE
- Selenium RC
- Selenium WebDriver
- Selenium Grid
1. Selenium IDE
In the Selenium suite, Selenium IDE or Integrated Development Environment is the simplest tool for web automation testing. It is very easy to install and learn. You don't need to use any coding language while preparing test cases or scripts on Selenium IDE. But you can only use it as a prototyping tool due to its simplicity. It cannot be a complete solution for developing and managing complex test scripts.
Also, Selenium IDE supports autocomplete mode while developing tests, which helps testers to move commands much faster. Further, it limits the users from giving invalid commands.
Moreover, Selenium IDE is a firefox plugin that lets testers create faster test cases. The major benefit of using Selenium IDE is that you can export the tests recorded through the plugin to different coding languages. Such as Java, Python, etc.
2. Selenium RC
Selenium Remote Control (RC) is a Java tool that allows testers to develop test scripts for automated web apps. He can write these test scripts in any programming language that it supports. Moreover, it is considered the best tool to test AJAX-based web UI within the CI system.
Selenium RC is useful to overcome the various loopholes of Selenium IDE or Core components. It also supports different browsers and platforms, including error handling and DB testing. Moreover, Selenium Remote Control (RC) has two different components: Selenium RC Server and Selenium RC Client.
3. Selenium WebDriver
It is an open-source web automation testing tool with a group of APIs that are useful for web app testing. Selenium WebDriver is useful to check whether the web app is working as expected or not. Also, it allows cross-browser TestingTesting and supports different browsers like Chrome, Safari, Firefox, etc.
Moreover, you can use any programming language, like Java, PHP, .Net, etc., to develop test scripts in Selenium WebDriver. Further, it utilizes the browser's native compatibility for automation testing. Also, it gained much popularity and user-base with the growing demand. It can easily liaise with the browser and is much faster than Selenium RC. Also, it doesn't need the use of Selenium Server to execute test scripts.
4. Selenium Grid
It is also one of the important components of the Selenium Software suite and a web testing tool. That allows its users to run tests on different browsers in different systems. Thus, you can run multiple tests across different OS, browsers, and systems in parallel. It allows TestingTesting under different environments so that you can save a lot of test execution time with distributed test execution.
Also, you can easily connect with Selenium RC using any browser or OS. Moreover, to run Selenium automation scripts easily, many online platforms offer an online Selenium Grid. They give access to run these scripts much faster. Further, Selenium Grid supports Hub-Node Architecture so you can test scripts in parallel mode. Here, the Hub is the major network, and the others are nodes where the Hub controls the test script's execution.
Selenium Installation
Let us know the Selenium environment setup in detail.
- Install Java
- Install Eclipse IDE
- Install and Configure Selenium WebDriver
Step 1. Install Java
Before you move further to use Selenium, you must first install JDK (Java Software Development Kit). However, Java installation needs configuration of the Java environment for smooth driving of Selenium using Java codes. Let us know the steps to install JDK.:-
- Open the website "Oracle" and go to "Java Downloads Page", and then click on the option "Java Platform" or JDK.
- You can see "Java SE Downloads" there.
- Then on the next page, you can see the "Accept License Agreement" button. Please select it and hit the download link of the suitable JDK that corresponds to your machine's Operating System.
Once the download is complete, you can run the installer by following the below steps.:-
- Navigate to the Start button and then find "System".
- Click on the "System" button.
- Then go to the "Advanced System Settings" option.
- In the" Advanced" tab, you must hit the option "Environmental variables."
- Then, in the System variables tab, you need to choose "New" and enter the name of the variable "Java HOME". You will see the complete path to installing JDK will be there.
- Next, on the New System Variable page, you can see the configuration of environment variables Name and Value.
- Later, you have to configure those Environment Variables. For this, you need to Edit the System Variable Path.
- Inside the "Variable value" option, you need to enter the path, %Java_HOME%bin; and then click on the "Ok" button. It's complete now.
- Then, to cross-check the version you installed, run the following command in cmd- Java -version. You will see the installed Java version in your system.
Step 2. Install Eclipse IDE
Now let us see the installation process of Eclipse IDE.
- For this, you need to download the latest version of "Eclipse IDE for Java Developers" from the downloads section of the Eclipse website. Depending on the system architecture, you can download the suitable version.
- After downloading the file, you need to open the Zip file to extract it and save it to the directory. Here, you can see the Root folder, where Eclipse resides.
- Now, open the folder and start the "Eclipse.exe", and it will run.
Thus, the process ends here for installing Eclipse IDE. Now, the last part is to install Selenium WebDriver.
Step 3. Install and Configure Selenium WebDriver
You must open the browser and navigate the Seleniumhq.org site to download Selenium WebDriver.
- Choose the "download version" that suits you best from the "Download" menu. You will find many drivers for different coding languages here, but you should only install them for Java.
- All the drivers will download into a zip file that contains JAR files. You can find two types of JAR files- the lib folder and the changelog file.
- After saving the JAR file, you need to download the "Selenium Java Client" from the same downloads page.
- Then extract the Zip file and save the same to your Selenium folder.
- Next, you must download the Chrome Driver using the Google Chrome browser. You will find it in the Third-party drivers section on the downloads page. You can also see Gecko Driver if you use the Mozilla Firefox browser to download it.
- By clicking the download option, you will navigate to the next page to see the latest browser versions available. Here, you can select the one that best suits your system settings.
- Hence, you can easily download the Driver and save the file in a safe location after extracting it from the Zip file. In Gecko Driver's case, you must also follow the same steps.
- Now, you can easily build a new project in the Eclipse IDE. Then you can add all the external JAR files from the available lib directory.
- Here, you need to start the Eclipse and build a New project.
- Give "project- name" and create a "Class".
- Create a class file there and enable the Public access modifier.
- Further, you can add referenced libraries to the new project by clicking "Build path">Goto "Configure Build Path" and then add all the "external JAR files".
- Thus, you're all set to start your first ever Selenium program.
So, in this way, you can install Selenium to start using it further.
Frequently asked Selenium Interview Questions and Answers !!
Launch browsers in selenium:
Here, we are going to learn the selenium Webdriver commands that are used to launch different web browsers such as Safari, IE, Chrome, firefox, etc.
As you all are aware of, the Selenium WebDriver calls native methods of different browsers in order to invoke the automating scripting. So we have the different web drivers for different browsers like FirefoxDriver for Firefox browser, InternetExplorerDriver for IE, etc.
Locators in Selenium WebDriver
Here we are going to learn about the need of locators and different locators used in selenium WebDriver in the process of automation.
A simple automation process in selenium can be described as follows:
- Launching browser
- Opening the desired website to be automated
- Locating web elements like a textbox
- Performing operations on the located web elements like writing in the textbox
- Performing assertion like checking ‘Success’ message
The above mentioned 5 points are implemented in the below code as follows:
//Launching Firefox browser

WebDriver driver = new FirefoxDriver();

//Opening google.com

driver.get("http://www.google.com");

//Initializing webelement searchBox
WebElement searchBox = driver.findElement(By.name("q"));//Writing a text "ArtOfTesting" in the search box

searchBox.sendKeys("ArtOfTesting");
In the code, an operation is performed on the web element, we need to locate it with by.name(“q”).
There are 8 locators in selenium. They are:
- By Id – Locates element using id attribute of the web element.
WebElement element = driver.findElement(By.id("elementId"));
- By className – Locates the web element using className attribute.
WebElement element = driver.findElement(By.className("objectClass"));
- By tagName – Locates the web element using its HTML tag like div, a, input etc.
WebElement element = driver.findElement(By.tagName("a"));
- By name – Locates the web element using name attribute.
WebElement element = driver.findElement(By.name("male"));
- By linkText – Locates the web element of link type using their text.
WebElement element = driver.findElement(By.linkText("Click Here"));
- By partialLinkText – Locates the web element of link type with partial matching of text.
WebElement element = driver.findElement(By.partialLinkText("Click"));
7. By cssSelector – Locates the web element using css its CSS Selector patterns. In Selenium, we can use these CSS Selector rules/patterns for locating web elements and later perform different operations on them.
Syntax: WebElement element = driver.findElement(By.cssSelector("div#id"));
For example-
//Locating searchBox element using CSS Selector

WebElement searchBox = driver.findElement(By.cssSelector("div#searchBox"));

//Performing click operation on the element

searchBox.sendKeys("HKR Trainings");
- By xpath – Locates the web element using its XPaths. An XPath can be defined as a query language used for navigating through the XML documents in order to locate different elements. The basic syntax of an XPath expression is-
WebElement element = driver.findElement(By.xpath("//div[@id='id']"));
These locators are very powerful and help in creating robust locators for complex web elements. There are some scenarios where we cannot use id attributes or locators like classNamename, in such cases,you need to take advantage of the CSS selector and XPath locators.
Related Article: Selenium vs Tosca

Selenium Certification Training
- Master Your Craft
- Lifetime LMS & Faculty Access
- 24/7 online expert support
- Real-world & Project Based Learning
Selenium Webdriver Commands:
Here we are going to learn the basic selenium webdriver commands that helps in performing operations like opening an URL, clicking on buttons, writing in a textbox and closing the browser, etc.
Now let’s see the commands in detail:
Opening a URL:
One can open an URL by using the Get and Navigate methods.
The driver.get()method is used to navigate a webpage by using the string URL as follows:driver.get("https://hkrtrainings.com/");
The driver.navigate().to() method does the task of opening a web page like driver.get() method. driver.navigate().to("https://hkrtrainings.com/");
Clicking on the WebElements:
Click()method is used to perform the click operations on the web elements.The click() method is applied on the webElements identified, to perform the click operation.
//Clicking an element directly

driver.findElement(By.id("button1")).click();

//Or by first creating a WebElement and then applying click() operation

WebElement submitButton = driver.findElement(By.id("button2"));

submitButton.click();
Writing and clearing text in a textbox
The sendKeys() method can be used for writing in a textbox or any element of text input type.
//Creating a textbox webElement

WebElement element = driver.findElement(By.name("q"));

//Using sendKeys to write in the textbox

element.sendKeys("ArtOfTesting!");

The clear() method can be used to clear the text written in a textbox or any web element of text input type.

//Clearing the text written in text fields

driver.findElement(By.name("q")).clear();
Fetching text written over an web element:
In order to fetch the text written over a web element for performing some assertions or debugging. For this, we have the getText() method in selenium webDriver.
//Fetching the text written over web elements

driver.findElement(By.id("element123")).getText();
Backward and forward navigating in a browser:
Selenium provides navigate().back() command to move backward in the browser’s history.
//Navigating backwards in browser

driver.navigate().back();

Selenium provides navigate().forward() command to move forward in a browser.

//Navigating forward in browser

driver.navigate().forward();
We can also perform a refresh of the web page in the seleniumWebdriver by using the following syntax as follows.
- Using driver.navigate().refresh() command
- Using sendKeys(Keys.F5) on any textbox on the webpage
- Using driver.get(“URL”) with current URL
- Using driver.navigate().to(“URL”) with current URL
Advantages of Selenium:
- Open-Source:- The biggest benefit of Selenium is its open-source availability and portability.No many upfront costs are required as you can download it free. Also, you will get great community support freely.
- Language support:- Selenium is compatible with any coding language you use, such as Java, Python, Ruby, JS, etc. Developers can use it with any language that they are comfortable working with.
- Supports Operating Systems:- It supports multiple OS such as Windows, Linux, UNIX, Mac, etc. Moreover, it allows you to develop a custom testing solution using the suite of solutions from Selenium on any platform. Also, you can execute them on any other platform.
- Support across browsers:- Selenium is compatible to work with any browser like Chrome, Firefox, Safari, etc. It will be highly helpful while you perform cross-browser TestingTesting in parallel.
- Support for programming languages and frameworks:- Selenium easily integrates with any coding language and framework for different purposes, such as source code compilation, app testing and reporting, etc. Also, it supports many open-source, free-to-use tools for many other features.
- Tests across devices:- You can apply Selenium automation testing across multiple devices like Android, iPhone, etc. So, you can produce relevant results and act on several issues regularly.
- Constant updates:- Due to large community support, the updates in the software are constant. You don't need any special skill for this, which makes it very cost-effective.
- Loaded Selenium suites:- Selenium is not just a single tool but a software suite of various tools and services. Each tool in this suite is built to serve different testing needs and the test environment needs.
- Ease of implementation:- It is easy to use and apply Selenium as it offers user-friendly features. So, you can build and execute tests much more effectively. Also, you can script your extension to customize and develop various actions.
- Reusability and Add-ons:- Using Selenium test automation scripts, you can run concurrent tests across different browsers and platforms. You can also get many add-on tools here regarding functional TestingTesting.
Limitations of Selenium:
- You cannot test the windows app:- Selenium cannot enhance its support for Windows apps as it can only test the web apps.
- Mobile TestingTesting is not permitted:- You can conduct tests on any desktop browser and OS using Selenium. But you cannot test on mobile platforms. For this, you may need the support of another tool Appium to manage mobile app testing.
- Limited reporting:- Selenium doesn't offer to produce a good report. For this, you can use the TestNG framework to get lengthy reports.
- Handling pop-up windows:- Managing windows-based pop-ups is beyond Selenium's capacity. These pop-ups are part of the OS.
- Handling captcha:- Captcha handling is also a drawback in Selenium, but you can use many 3rd-party tools for this. They help to automate the captcha but with some limitations.
- Handling dynamic Elements:- Some web elements may be dynamic, which is difficult to handle. You can use Dynamic XPath or CSS Selectors to manage these dynamic elements.
- Maintenance and Scalability:- It is a bit difficult to maintain Selenium, and it will be tough to scale it with your growth.
- Image Testing is impossible:- With Selenium, you cannot possibly test images. For this, you can use Sikuli for testing images easily.
Selenium WebDriver Architecture:
Selenium WebDriver is one of the most crucial components of the Selenium Software suite. It supports web browsers like Chrome, Firefox, Internet Explorer, Safari, etc. However, the Selenium Architecture includes the following basic components.
- Selenium Client Libraries
- Browser Drivers
- JSON Wire Protocol
- Real Browsers

Selenium Client Libraries
Developers have built Selenium client libraries or language bindings to support different coding languages. Further, Selenium supports multiple programming languages like Java, Ruby, Python, etc.
Browser Drivers
To communicate between the web browser and the Selenium WebDriver, Browser Drivers are highly useful. Also, it makes sure that no information is shared with the browser regarding the browser functionalities' internal logic. Moreover, a browser driver is particular to the coding language used in test automation.
JSON Wire Protocol
JSON or JavaScript Object Notation is an open rule for swapping data on the web. Also, it supports data structures like an object, array, etc., which makes it easier to read and write data from JSON files. These components play a crucial role in the Selenium test automation process. Moreover, this protocol acts as a transport tool to move data between a client and a server.
Real Browsers
You can see that Selenium supports multiple browsers such as Chrome, Firefox, Safari, IE, Opera, and others.
Subscribe to our YouTube channel to get new updates..!
Waits in Selenium:
In Selenium, you must have heard about "waits" that play an important role in test execution. It runs based on some commands known as scripts that allow page loading through it. Selenium waits have many uses. We can see many web apps are built using AJAX and JavaScript frameworks.
So, when we load a page using the browser, some browser elements may load at various intervals. Therefore, we cannot interact with them easily. Selenium waits make the pages less energetic and reliable. Thus, it offers various options to the user that are adequate and best suitable.
Implicit Wait
The Selenium implicit wait is useful to inform the web driver to wait some time before throwing an exception "No Such Element Exception". However, the default setting is set to "0". Once we set the time for this, the browser will wait for some time set by you before it throws the above exception or error.
The syntax we can use for the implicit wait is-
driver.manage().timeouts().implicitlyWait(TimeOut,TimeUnit.SECONDS)
Explicit Wait
The Explicit wait in Selenium is a dynamic wait based on specific conditions. This exception will inform the Web Driver to wait for certain expected conditions before throwing the exception or error "ElementNotVisibleException". Moreover, it is an intelligent wait in Selenium but only applicable to certain elements.
The syntax we can use for the Explicit wait is -
WebDriverWait wait = new WebDriverWait(WebDriverRefrence,TimeOut)
Fluent Wait
The Selenium Fluent Wait is similar to explicit wait, using which you can execute the wait for an element's action. It is useful only when you're unaware of the time for clicking or visibility of the element. However, the syntax we can use in the Fluent Wait is-
Wait, wait = new FluentWait(WebDriver reference)

.withTimeout(timeout, SECONDS)

.pollingEvery(timeout, SECONDS)

.ignoring(Exception.class)
Handling Dropdowns in Selenium WebDriver :
Here, you will learn about handling various dropdowns in Selenium Web Driver.
But before you dive deep into the process of handling dropdowns, you need to know about the 'Select' class.
A 'Select' class in Selenium WebDriver is useful to select and deselect an option within the dropdown. However, Selenium WebDriver offers three different methods to select an option from the dropdown such as:-
- selectindex
- selectby value
- selectbyVisibleText
Stepwise, you will see a test case describing the process of handling dropdowns in Selenium WebDriver.
Step-1. Start the Eclipse IDE and open the test suite "Demo_Test" that you have created. Here you can use a demo test case, for example.
Step-2. You need to click on the" src" folder and build a new file going to New > Class. Then give the class name as "Dropdwn_test" and hit the "Finish" button.
Step-3. Let us now check the coding section.
For this, you need a Chrome Browser. After downloading the file "chromedriver.exe.file", you must set up the property "Run test on Chrome Browser" to the path of the downloaded file.
Then it would help if you started the Chrome Driver by initiating the ChromeDriver Class using the syntax-
r driver=new ChromeDriver()
Now you are ready to start the Chrome Browser easily. Then again, you need to create a code for automating the second test scenario.
Step-4. Then you need to find the dropdown menu by testing the HTML codes.
Step-5. Now you need to automate the third test scenario for which you need to create a code. This code will help to select "Database Testing" from the dropdown menu. You can see the final code sample, which will look something like this:-
import org.openqa.selenium.By;

import org.openqa.selenium.WebDriver;

import org.openqa.selenium.chrome.ChromeDriver;

import org.openqa.selenium.support.ui.Select;

public class Dropdwn_Test {

    public static void main(String[] args) {

        System.setProperty("webdriver.chrome.driver","D:\\ChromeDriver\\chromedriver.exe");

        WebDriver driver=new ChromeDriver()

      driver.navigate().to("https://www.abc.com/selenium/testing.html");

Select dropdown = new Select(driver.findElement(By.id("testingDropdown")));

dropdown.selectByVisibleText("Database Testing");

        driver.close();

    }

}
Step-6. Then do a "Right click "on the Eclipse code and choose the option Run As > Java Application.
Thus, executing all the above scripts allows you to start the chrome browser and automate all the test scenarios.

Elements of Selenium Webdriver
Types of Select Methods:
- selectByVisibleText Method: To select an option based on the text over the option.
dropdown.selectByVisibleText("Database Testing");
2. selectByIndex Method:To select an option based on its index, beginning with 0.
dropdown.selectByIndex(3);
3. selectByValue Method: To select an option based on its ‘value’ attribute.
dropdown.selectByValue("Database");
Types of DeSelect Methods:
- deselectByVisibleText Method: To deselect the option based on the text over the option.
- deselectByIndex Method: To deselect the option based on its index
- deselectByValue Method: To deselect the option its ‘value’ attribute.
- deselectAll Method:To deselect all the selected options.
Right Click in Selenium:
In automation, right click is performed in selenium, just by performing actions like up, down or entering keys to select the desired context menu element. In order to perform the right click in selenium, we take the advantage of the Action class that is used to generate the complex gestures like right click, double click and drag and drop, etc.
Syntax to perform the right click on an element:
Actions action = new Actions(driver);

WebElement element = driver.findElement(By.id("elementId"));

action.contextClick(element).perform();
Here, we are instantiating an object of Actions class. After that, we pass the WebElement to be right clicked as a parameter to the contestClick() method present in the Actions class. Then, we call the perform() method to perform the generated action.
Double Click in Selenium:
Similar to that of performing the right click on the lament, double click is also used to perform some actions on the elements by using the actions class.
Syntax to perform the double click on the element:
Actions action = new Actions(driver);

WebElement element = driver.findElement(By.id("elementId"));

action.doubleClick(element).perform();
Here, we are instantiating an object of Actions class. After that, we pass the WebElement to be double clicked as a parameter to the doubleClick() method present in the Actions class. Then, we call the perform() method to perform the generated action.
Mouse Hover in selenium:
In order to perform mouse hover over an element, using selenium WebDriver with java, actions class is must.
Syntax:
Actions action = new Actions(driver);

WebElement element = driver.findElement(By.id("elementId"));

action.moveToElement(element).perform();
Here, we are instantiating an object of Actions class. After that, we pass the WebElement to be mouse hovered as a parameter to the moveToElement() method present in the Actions class. Then, we will call the perform() method to perform the generated action.
Drag and Drop in Selenium WebDriver:
In order to handle drag and drop events in the selenium WebDriver takes the advantage of the Actions class.To perform the drag and drop on an element, we need to use different methods of the Actions class namely:
- clickAndHold(WebElement element) – Clicks a web element at the middle(without releasing).
- moveToElement(WebElement element) – Moves the mouse pointer to the middle of the web element without clicking.
- release(WebElement element) – Releases the left click (which is in the pressed state).
- build() – Generates a composite action.
The following is the code snippet for performing the drag and drop operation is stated below:
//WebElement on which drag and drop operation needs to be performed
WebElement fromWebElement = driver.findElement(By Locator of fromWebElement);
//WebElement to which the above object is dropped
WebElement toWebElement = driver.findElement(By Locator of toWebElement);
//Creating an object of Actions class to build composite actions
Actions builder = new Actions(driver);
//Building drag and drop action
Action dragAndDrop = builder.clickAndHold(fromWebElement)

     .moveToElement(toWebElement)

     .release(toWebElement)

              .build();

//Performing the drag and drop action

dragAndDrop.perform();
Handling Alerts:
With the help of the alert class, we can handle alerts in the selenium WebDriver. Click on “Generate Alert Box” and “Generate Confirm Box” buttons to generate the alert and confirm boxes. The script below will first generate alert boxes by clicking on these buttons and use alert class methods to accept/dismiss them.
public void alertAutomation() throws InterruptedException{
//Create firefox driver's instance
WebDriver driver = new FirefoxDriver();
//Set implicit wait of 10 seconds
driver.manage().timeouts().implicitlyWait(10, TimeUnit.SECONDS);
//Launch sampleSiteForSelenium
driver.get("https://artoftesting.com/samplesiteforselenium");
//Handling alert boxes
//Click on generate alert button
driver.findElement(By.cssSelector("div#AlertBox button")).click();

Thread.sleep(3000);

//Using Alert class to first switch to or focus to the alert box

Alert alert = driver.switchTo().alert();

//Using accept() method to accep the alert box

alert.accept();

//Handling confirm box

//Click on Generate Confirm Box

driver.findElement(By.cssSelector("div#ConfirmBox button")).click();

Thread.sleep(3000);

Alert confirmBox = driver.switchTo().alert();

//Using dismiss() command to dismiss the confirm box

//Similarly accept can be used to accept the confirm box

confirmBox.dismiss();

}
Scrolling a web page:
Scrolling an web page is needed inthe automation because the application requires scrolling up and down to show the full products list of an ecommerce store. For example, if you consider amazon ecommerce stores, if you want to look for more products, you need to scroll up or down, so that more items will be loaded on your page you are viewing.
Syntax for scrolling a web page:
JavascriptExecutor js = (JavascriptExecutor)driver;

js.executeScript("scrollBy(0, 2500)");
Refreshing a webpage in selenium:
There are several ways to refresh a webpage in selenium. They are :
1.Using driver.navigate() command
Syntax: driver.navigate().refresh();
2.Opening current URL using driver.getCurrentUrl() with driver.get() command
Syntax:driver.get(driver.getCurrentUrl());
3.Opening current URL using driver.getCurrentUrl() with driver.navigate() command
Syntax: driver.navigate().to(driver.getCurrentUrl());
4.Pressing F5 key on any textbox using sendKeys command
Syntax: driver.findElement(By textboxLocator).sendKeys(Keys.F5);
5.Passing ascii value of F5 key i.e. “\uE035” using sendKeys command
Syntax: driver.findElement(By textboxLocator).sendKeys("\uE035");
Keyboard Actions in selenium WebDriver:
Selenium contains an Actions class that comes with different methods for keyboard interactions. There are 3 actions for handling the keyboard action, keyDown(),keyUP(), and sendKeys().
Actions Class methods for keyboard interactions:
- keyDown(Keys modifierKey)-
The keyDown(Keys modifierKey) method takes the modifier Keys as parameter. - keyDown(WebElement element, Keys modifierKey)-
This is another implementation of keyDown() method in which the modifier key press action is performed on a WebElement. - keyUp(Keys modifierKey)-
The keyUp() method is used to simulate the modifier key-up or key-release action. This method follows a preceding key press action. - keyUp(WebElement element, Keys modifierKey)-
This implementation of keyUp() method performs the key-release action on a web element. - sendKeys(CharSequence KeysToSend)-
The sendKeys(CharSequence KeysToSend) method is used to send a sequence of keys to a currently focussed web element. - sendKeys(WebElement element, CharSequence KeysToSend)-
This implementation of sendKeys() method is used to send a sequence of keys to a web element.
Related Article: What is XPath in Selenium?
Selenium with TestNG:
TestNG Basics:
What is testNG?
TestNG is a JUnit-inspired testing framework that provides a range of features such as data-driven testing, parameterization support, different utility annotations and test case aggregation that help to construct stable and efficient testing projects.
Syntax: @Test
public void sampleTest() {

   //Any test logic

   System.out.println("Hi! ArtOfTesting here!");

}
Features of TestNG:
The different features associated with testNG are:
- It comes with different types of assertions like checking the quality of the expected and actual result, asserting if the condition is true or false, etc.
- Running tests in parallel.
- It makes tests dependent on one another.
- Prioritizing and grouping of the tests can be done easily.
- It performs data driven testing and provides configurable reports.
Next we are going to learn how to test an application using testNG. In order to perform the testing we need an automation tool, testing framework or libraries, and the programming language that supports both the tools and libraries.
For UI automation-Selenium WebDriver is perfect, testNG as the testing framework and java as the programming language.
For example if you want to automate the Google calculator feature on the chrome browser, you need to run the test on the chrome browser. For this you need to set the webdriver.chrome.driver system property and point to a chrome driver executable file-
- Download the latest ChromeDriver binary from Chromium.org download page and place the executable on your local machine.
- Set the webdriver.chrome.driver property to the chromeDriver.exe’s location as-System.setProperty(“webdriver.chrome.driver”, “chromeDriver.exe path”);
The following is the code snippet to perform the test on the Google calculator.
public class calculatorTest {

@Test

//Tests google calculator

public void googleCalculator(){

//Creating a driver object referencing WebDriver

WebDriver driver;

          //Setting the webdriver.chrome.driver property to its executable's location

System.setProperty("webdriver.chrome.driver", "/lib/chromedriver.exe");

/Instantiating driver

driver = new ChromeDriver();

//Set implicit wait of 10 seconds

driver.manage().timeouts().implicitlyWait(10, TimeUnit.SECONDS);

//Launch google

driver.get("http://www.google.co.in");

//Write 2+2 in google textbox

WebElement googleTextBox = driver.findElement(By.id("gbqfq"));

googleTextBox.sendKeys("2+2");

//Click on searchButton

WebElement searchButton = driver.findElement(By.id("gbqfb"));

searchButton.click();

//Get result from calculator

WebElement calculatorTextBox = driver.findElement(By.id("cwos"));

String result = calculatorTextBox.getText();

//Verify that result of 2+2 is 4

Assert.assertEquals(result, "4");

}

}
TestNG Annotations:
An annotation is metadata that possesses information related to the class, method and interface. TestNG makes use of these annotations to provide several features that aid in the creation of a robust testing framework.
Here, we are going to learn different testNG annotations. They are:
@Test:The @Test is the most important and commonly used annotation of TestNG. It is used to mark a method as Test. So, any method over which we see @Test annotation is considered as a TestNG test.
@Test

public void sampleTest() {

   //Any test logic

   System.out.println("Hi! ArtOfTesting here!");

}
@BeforeSuite
The annotated method will run only once before all tests in this suite have run.
@AfterSuite
The annotated method will run only once after all tests in this suite have run.
@BeforeClass
The annotated method will run only once before the first test method in the current class is invoked.
@AfterClass
The annotated method will run only once after all the test methods in the current class have been run.
@BeforeTest
The annotated method will run before any test method belonging to the classes inside the
@AfterTest
The annotated method will run after all the test methods belonging to the classes inside the
@DataProvider
Using @DataProvider we can create a data driven framework in which data is passed to the associated test method and multiple iteration of the test runs for the different test data values passed from the @DataProvider method. The method annotated with @DataProvider annotation return a 2D array or object.
//Data provider returning 2D array of 3*2 matrix
@DataProvider(name = "dataProvider1")
   public Object[][] dataProviderMethod1() {

      return new Object[][] {{"kuldeep","rana"}, {"k1","r1"},{"k2","r2"}};

   }

   //This method is bound to the above data provider

   //The test case will run 3 times with different set of values

   @Test(dataProvider = "dataProvider1")

   public void sampleTest(String str1, String str2) {

      System.out.println(str1 + " " + str2);

   }
@Parameter
The @Parameter tag is used to pass parameters to the test scripts. The value of the @Parameter tag can be passed through testng.xml file.
Sample testng.xml with parameter tag-
@Test (timeOut = 500)

      Sample Test Script with @Parameter annotation-

public class TestFile {

   @Test

   @Parameters("sampleParamName")

   public void parameterTest(String paramValue) {

      System.out.println("sampleParamName = " + sampleParamName);

   }
@Listener
TestNG provides us different kinds of listeners using which we can perform some action in case an event has triggered. Usually, testNG listeners are used for configuring reports and logging.
@Listeners(PackageName.CustomizedListenerClassName.class)
public class TestClass {

    WebDriver driver= new FirefoxDriver();@Test

    public void testMethod(){

    //test logic

    }

}
@Factory
The @Factory annotation helps in the dynamic execution of test cases. Using @Factory annotation, we can pass parameters to the whole test class at run time. The parameters passed can be used by one or more test methods of that class.
Data Driven Testing using @Dataprovider:
Data-driven testing can be carried out through TestNG using its @DataProvider annotation. A method with @DataProvider annotation over it returns a 2D array of the object where the rows determine the number of iterations and columns determine the number of input parameters passed to the Test method with each iteration.
This annotation takes only the name of the data provider as its parameter which is used to bind the data provider to the Test method. If no name is provided, the method name of the data provider is taken as the data provider’s name.
@DataProvider(name = "nameOfDataProvider")
public Object[][] dataProviderMethodName() {

//Data generation or fetching logic from any external source

//returning 2d array of object

return new Object[][] {{"k1","r1",1},{"k2","r2",2}};

}
After the creation of the data provider method, we can associate a Test method with a data provider using the ‘dataProvider’ attribute of @Test annotation. For successful binding of data providers with the Test method, the number and data type of parameters of the test method must match the ones returned by the data provider method.
@Test(dataProvider = "nameOfDataProvider")
public void sampleTest(String testData1, String testData2, int testData3) {

System.out.println(testData1 + " " + testData2 + " " + testData3);

}
Running tests in parallel using testNG:
We can perform the parallel processing of the tests by using the TestNG suite. In order to make the test execution of the testNG parallel, testng.xml file comes with suitetest, classes, packages with the suite being the root tag.
In order to run tests in parallel we need to add two key value pairs to the suite section as below
- parallel=”{methods/tests/classes}”
- thread-count=”{number of thread you want to run simultaneously}”.
Multi-Browser testing:
Multi-browser testing is to support testing in multiple browsers. For this we need to use the @paramterannotation of the testNG that passes different values of the browser to test the script s from the testng.xml file.
The value of the browser parameter can then be used to instantiate the corresponding driver class of Selenium WebDriver. As the browser value is used across all the test methods so, it is better to use the browser variable in @BeforeTest method.
@Parameters("browser")
@BeforeTest
public void setBrowser(String browser)
{

   if (browser.equalsIgnoreCase("Firefox")) {

      driver = new FirefoxDriver();

   }

   else if (browser.equalsIgnoreCase("Chrome")) {

      System.setProperty("webdriver.chrome.driver",

         + pathToChromeDriverBinary + "chromedriver.exe");

      driver = new ChromeDriver();

   }

   else {

      throw new IllegalArgumentException("Invalid browser value!!");

   }

   driver.get(URL);

   driver.manage().timeouts().implicitlyWait(10, TimeUnit.SECONDS);

   driver.manage().window().maximize();

}
As discussed above the value of the browser variable will be passed to the test scripts through testng.xml file. This testng.xml file will have a parameter tag containing the browser variable and its value.
Here, we will create two tests, one each for Firefox and Chrome browser with different browser values. Refer to the below snippet of testng.xml file to understand the test parameterization concept.
Indeed, having parallel=”tests” in the Suite tag makes the two tests run in parallel.
On executing the test using testng.xml, the test will run in parallel for all the specified browsers(Firefox and Chrome in case of our example).
Soft Assertion in TestNG:
Assertions are used to compare the actual result with the expected ones. For example, if we had multiple assertions in our test method and wanted to execute some code after the particular assertion statement,in that scenario testNG comes with the SoftAssert class.
Syntax: SoftAssert softAssert = new SoftAssert();
TimeOut in testNG:
If you want to limit the test execution time by specifying an upper limit of timeout exceeding which the test method is marked as a failure. TestNG provides us timeOut attributes for handling these requirements. In the @Test annotation, the timeOut attribute is specified with a particular value, if the test method exceeds that value then it shows failure by throwing the ThreadTimeoutException.
Syntax: @Test(timeOut = 1000)
Conclusion:
Selenium is an open-source tool with web-automation testing capabilities having different components. These components help developers in different environments to test software. Moreover, Selenium supports different languages, OS, and browsers during automation testing.
It has many benefits as well as some limitations. Selenium is the best tool for test automation as it is easy to implement and use. There is a large developer community that frequently updates it with new changes. Also, it is compatible with any device like Android, iPhone, etc. So, using this testing tool will give many benefits in software automation testing. I hope you have gone through the tutorial to gain all the basic skills regarding Selenium.
What is Selenium Python?
Considering that Selenium is really an open-source testing tool, downloading it from the internet is free. It is a functional testing tool that can also work with other types of testing tools.
With the help of the Selenium Python bindings, you can create functional tests for the Selenium WebDriver. The Selenium Python APIs may be used to create incredibly effective tests that enable interaction with the WebElements on the AUT, similar to various Selenium language bindings (Application Under Test).
The bindings offer a remote WebDriver that enables you to connect to a remote cloud Selenium Grid as well as local browser drivers for popular browsers including Chrome, Firefox, Internet Explorer, etc.
Become a master of Selenium Python by going through this HKR Selenium with Python Training!
Why Selenium Python?
Among the most widely used tools for automation testing is Selenium. Using automation tools like Selenium, automation testing entails the process of turning any manual testing process into a test script.
The reasons why we favor Selenium for automation testing include the following:
- A variety of programming languages, including Python, C#, Java, Ruby, Perl, and others, can be used to create Selenium test scripts.
- The Selenium test scripts could be run on a variety of operating systems, including Windows, Mac, Linux, and others.
- Additionally, the test scripts can be used with a variety of browsers, including Safari, Firefox, Internet Explorer, and Chrome.
- For organizing the test cases and producing test reports, the Selenium testing tool could be connected to additional testing tools like TestNG and Junit.
- Selenium is linked with testing technologies from Maven, Docker, and Jenkins in order to provide continuous testing.
Selenium with Python
Python can be used in one of two methods to execute Selenium test scripts:
- Setup Selenium with Python
- Set up PyDev within Eclipse.
Let's look at how to set up Selenium using the Python programming language:
Setup Selenium with Python
The following 5 steps need to be taken to configure Selenium using Python:
1) Downloading and Installing Python for Windows
a) Downloading: Refer to the following URL to obtain the most current edition of Python for Windows platforms:https://www.Python.org/downloads
- The newest Release version list is displayed after clicking the aforementioned link, and we chose the Python 3.8.1 version from there.
- The Python-3.8.1 version window will then be displayed on the screen. Next, locate the
- File section, and then follow the link for the Windows x86-64 web-based installer.
b) Installing: Double Click on the downloaded executable file to open the Python 3.8.1(64-bit) setup window
- Select Customize installation and check the box "Add Python 3.8 to path".
- Post this, follow the installation process, and check/uncheck the options as per your requirements.
- When the setup is complete, we receive the message "Setup was successful," which indicates that Python has been successfully installed for the Windows OS.
- The configuration window will then close when you click the Close button.
c) After that, we'll determine whether Python was successfully installed and is operating as intended.
- When we type the command "Python" at the command prompt and hit Enter, the Python interpreter shell opens, allowing us to run the Python program.
2) Installing Selenium Libraries for Python
Now that we have successfully installed Python on our operating system, we will now load the Selenium libraries at once. For this, we'll run the command shown below in the command prompt:
Python -m pip install -U Selenium
Additionally, this program will successfully install Selenium -3.141.0, the most recent Selenium package. After running the aforementioned command, the Selenium folder including all the Selenium libraries will be immediately created.
3) Download and Instal PyCharm
Once the Selenium libraries have been successfully installed in Python, we are prepared to download PyCharm, a Python IDE.
Follow the steps below to download PyCharm:
- Refer to the link below to download PyCharm.
https://www.jetbrains.com/pycharm/download/#section=windows - After clicking the aforementioned link, the following window will appear in which we can download Windows by selecting the Download option beneath the Community area.
- The PyCharm Community Edition Setup box will then display on the screen once you double-click the executable file to install PyCharm.
- Follow the installation steps, selecting options as per your requirements to complete the installation.
- Once the Installation is done, click on “Finish” to complete the process.
4) Create a new project and write the Selenium test script
A) Creating New Project: When PyCharm has been successfully installed, we will launch the PyCharm IDE to start a new project.
To start a new project in PyCharm, follow the steps listed below:
- First, double-click PyCharm to launch it, then select Create New Project.
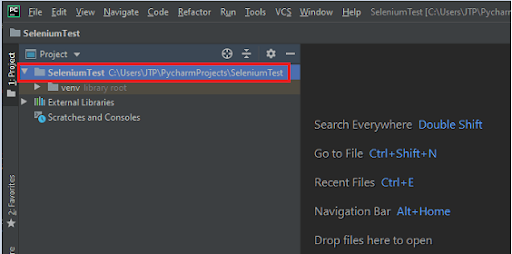
- Then after, we will select the Create button and enter SeleniumTest as the project name.
- The following window will appear after hitting the Create button:
B) Adding Selenium Test Scripts: Follow the steps below to add Selenium test scripts to PyCharm:
- You can add any of the options in the list according to your needs by selecting New from the context menu when you right-click on the SeleniumTest project.
- However, in this case, we are adding the Python file, thus we will add the Directory that aids in managing them separately.
- Supply the Directory name; in this case, we say Demo.
- Hit the Enter key after that.
- Following the creation of a Directory, we will right-click the Demo Directory, select New from the pop-up menu, and then choose Python File.
The above can be summarised as Demo → New → Python File - We give Sample1 as the name of the Python file.
- Hit the Enter key after that.
- We now have the IDE which can be used to create or write new Selenium Test Scripts.
C) Write the Selenium Test Script
- We will first visit the Google Home page for our testing purposes, and then we will search for hkrtrainings from there.
- To ensure that you fully get how a Python Selenium test script is written, we are writing our sample test script step-by-step.
- To do this, take the following actions:
- To import the web driver, we will first type the following statement from Selenium import webdriver
- We'll then launch the Google Chrome browser after that. We have access to a variety of browser types, and we may choose any of them from the list, including Chrome, Edge, Firefox, Internet Explorer, Opera, Safari, and more.The sample code to launch the Google Chrome browser is as follows
webdriver.Chrome is the driver ()
- The sample code for the following phase, which will include increasing the size of our browser window, is as follows:
driver.maximize window() - We will then go to the provided URL. Here is a sample of the code:driver.get("https://www.google.com/")
- By using the Name property value of the Google search text box, we are attempting to locate it in this phase.
- Right-click on the Google search text field and choose the Inspect option from the pop-up menu.
- All the exact codes required to create the Google search text box will be launched in the developer tool window.
- Additionally, copy the "q" value for its Name attribute. Here's an example of code:
- driver.find_element_by name("q").send_keys("hkrtrainings")
- Once the Google search text field has been located, the Google Search button will also be located. As a result, proceed as follows:
- Right-click the Google search button, and then from the resulting pop-up menu, choose "Inspect":
- All the precise scripts used in the creation of the Google search button will be available when the developer tool window is launched.
- Then, as seen in the figure below, duplicate the value of its name attribute, which is "btnK":
- The sample code is also as follows:
driver.find_element_by_name("btnK").send_keys(Keys.ENTER)
- We close the browser in the final step. Additionally, the following sample code is used to close the browser:
driver.close()
After completing all of the aforementioned processes, our final test script will appear as follows:
from Selenium import webdriver

import time

from Selenium.webdriver.common.keys import Keys

print("sample test case started")

driver = webdriver.Chrome()

#driver=webdriver.firefox()

#driver=webdriver.ie()

#maximize the window size

driver.maximize_window()

#navigate to the url

driver.get("https://www.google.com/")

#identify the Google search text box and enter the value

driver.find_element_by_name("q").send_keys("hkrtrainings")

time.sleep(3)

#click on the Google search button

driver.find_element_by_name("btnK").send_keys(Keys.ENTER)

time.sleep(3)

#close the browser

driver.close()

print("sample case successfully completed")
Run and validate the test scripts
We will run our test scripts after we have finished writing the Selenium test script.
Here, we'll use two methods to run our test scripts:
- Run in Python IDE
- Run in Command Prompt
- Run in Python IDE
The Selenium test script will therefore be run in Python IDE for this initial example.
- Run "Sample1" from the pop-up menu by performing a right-click on the code.
- Due to a missing Chrome driver executable file, this script will throw an exception when started.
- After clicking the aforementioned link, we will select the zip file according to the platform of our operating system. Because we use the Windows
- operating system, we clicked on the zip file to download the executable file.
- We can place this file into the Python folder and unzip it after downloading the exe file.
- Next, we will add a new subdirectory to the Python IDE called libraries as Browsers.
- Right-click on the Project(SeleniumTest) → New → Directory.
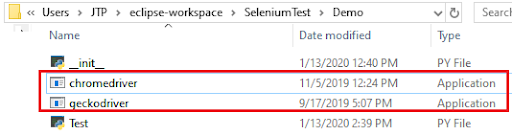
- Additionally, we can manually add each executable file for the driver to the Browsers directory.
- We will copy the chrome driver exe file from the Python folder and paste it in the Browser folder:
- At this point, open PyCharm IDE and copy the absolute path of the chromdriver.exe file.
- Driver = webdriver.Chrome() should be replaced with the statement below.
driver=webdriver.Chrome(r"C:\Users\JTP\PycharmProjects\SeleniumTest\Browsers\chromedriver.exe")
- As shown in the screenshot below, the code will produce a Syntax Error if r is not included.

- Thereafter, when we run sample 1 again, the code will run correctly, as shown in the image below:
- All of the test cases are automated by the aforementioned test script, which also opens the Google Chrome browser.
Run in Command Prompt
The procedure is as follows to run the test script mentioned above in the Command prompt:
- Note where Sample1.py is located and copy it.
- Paste the following command into the command prompt after going to the specific folder:
- Hit the Enter key once the example test case has finished staring.
- And once all the scenarios have been automated, the notification will be displayed as a sample test case that has been successfully finished.
Configure PyDev in Eclipse
- Install PyDev
- Execute the Selenium test scripts using Python.
Check the ref and write using screenshots
For the installation of PyDev in Eclipse, the following steps need to be followed:
- PyDev installation
- Set the preference
- Create a new project
- Create a new package
- Create a PyDev Module
PyDev installation
- Head over to Eclipse Marketplace. Browse for PyDev in the search bar under Help > Eclipse Marketplace.
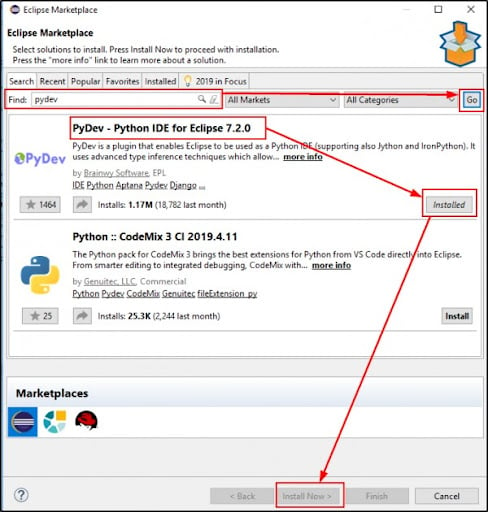
- Choose the PyDev and PyDev Mylyn Integration checkbox on the following screen. Click Finish.
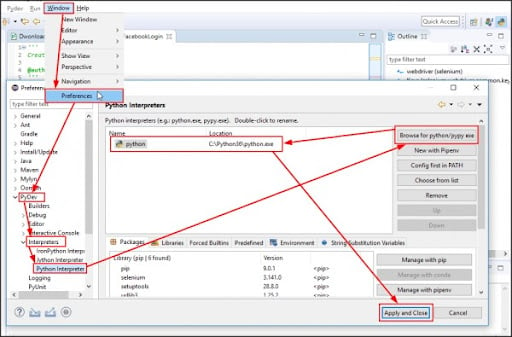
- Then, select the Python Interpreter option under Windows> Preferences> PyDev. To add Python.exe as an interpreter, select the Browse Python.exe option here. Lastly, click Apply and Close.
- You've just finished setting up PyDev in Eclipse.
- Next, select File> New> PyDev Project to start creating a package. Click Finish after entering the project name.
- Simply right-click the project and choose project> New> Pydev Package/ PyDev Module to generate PyDev packages and modules.
Set the preference
Follow the steps below to set the preference:
- Choose the Preference option under Window on the Eclipse Ide toolbar.
- After expanding PyDev and Interpreters, we can choose the Python Interpreter from the list shown in the Preference Window. To find Python/pypy.exe, select Browse: PyDev → Interpreters → Python Interpreter
- When we select Browse for Python/pypy.exe, we will enter the Python executable file path and interpreter name.
- To accomplish this, select the Browse button in the Select Interpreter pop-up window, then select the Python executable file path on our local system by clicking the OK button.
- Choose the folders by clicking the Select All button, followed by the OK button.
- After that, click Apply and Close to finish the setting preference procedure.
- We will start a new Python project after successfully establishing the preference.
Create a new project
Follow the steps listed below to establish a new project:
- Navigate to the File menu, pick New, then choose Other from the pop-up menu: File → New → Other
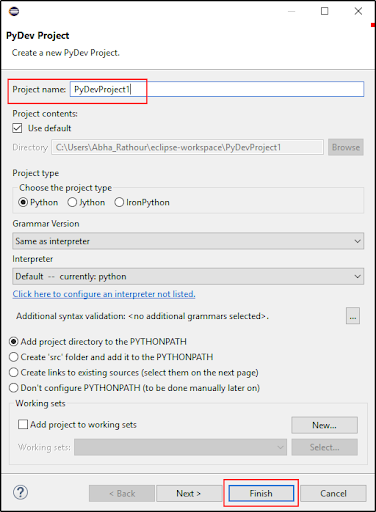
- When the Other option is chosen, a [New] window will display, allowing us to broaden PyDev, pick PyDev Project, and afterward press the Next button.
- After clicking the Next option, we will enter the Project name and then select Finish.
- The Eclipse is used to create the Python project.
- We will build a new Python Package once we have finished creating a Python project.
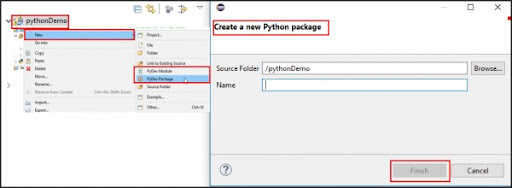
Create a New Package
To build a new package, follow the steps below:
- Choose PyDev Package from the provided Popup menu when you right-click on the recently formed project(SeleniumTest), go to New, and then click.
- After that, enter the PyDev Package's name and press the Finish button.
- We will develop a PyDev module after generating a PyDev package.
Create a PyDev Module
The steps following should be followed to develop a PyDev module:
- Select the newly formed Package[Demo] with the right mouse button, then pick New, PyDev Module from the list, then click OK: Demo → New → PyDev Module
- Then type [Test] into the PyDev Module's name field and press the Finish button.
- The next step is to choose the Empty template from the provided list and press the OK button.
- Once the Python model has been built, we are prepared to build and run our Selenium test scripts.
Write and Execute the Selenium test script
Step 1: We will use the following statement to import the web driver in the first phase:
from selenium import webdriver
Step 2: We'll then launch the Google Chrome browser afterward.
- The executable files of the Chrome driver must be downloaded from this link in order to open Google Chrome or another browser (Firefox, IE, etc.):
- Finally, put the downloaded exe file into the Python package (demo) to get around the errors.
Here is a sample of the code:
#open Google Chrome browser

driver = webdriver.Chrome()
Step 3: The next step is to maximize the browser window and remove all of its cookies.
Here's an example of code:
#maximize the window size

driver.maximize_window()

#delete the cookies

driver.delete_all_cookies()
Step 4: Next, we will go to the URL for the Gmail program in this step.
Here is a sample of the code:
#navigate to the url

driver.get("https://www.gmail.com")
Step 5: After entering the Gmail app's URL, we will locate the username text box and enter its value.
Follow the steps below to locate the username text box:
- Simply right-click the username text field.
- then choose the Inspect option from the pop-up menu that appears.
- All the precise codes utilized in the creation of the usernametext box will be displayed in the developer tool window after it has opened.
- Then, duplicate the value of its identifierId attribute, which is
#identify the user name text box and enter the value

driver.find_element_by_id("identifierId").send_keys("xyz11@gmail.com")

time.sleep(2)
Step 6: In this stage, we will locate and choose the Next button.
Follow the instructions below to locate the Next button:
- Select the Inspect option from the pop-up menu that appears when you right-click the next link.
- When the developer tool window opens, each of the specific scripts used to create the Next
- Additionally, duplicate the absolute XPath value, which is: //span[@class='RveJvd snByac'] from the section on chropath.
#click on the next button

driver.find_element_by_xpath("//span[@class='RveJvd snByac'][1]").click()

time.sleep(3)
Step 7: This phase entails locating the password text field and passing its value.
Follow the steps below to locate the password textbox:
- In the pop-up menu that appears when you right-click on the password text box, select "Inspect."
- The developer tool window will appear and display each unique piece of code used to create the password text field.
- Additionally, copy the password value for the name attribute.
#identify the password text box and enter the value

driver.find_element_by_name("password").send_keys("########")

time.sleep(3)
Step 8: In this stage, we will locate and choose the Next button.
Follow the instructions underneath to locate the Next button:
- Select the Inspect option from the pop-up menu that appears when you right-click the next icon.
- When the developer tool window opens, each of the specific scripts used to create the Next
- Take a copy of its absolute XPath value, which is: //span[contains(text(),'Next')] from the chropath section
Look at the sample code:
#click on the next button

driver.find_element_by_xpath("//span[contains(text(),'Next')][1]").click()

time.sleep(3)
Step 9: We'll terminate the browser as the test script's final action.
Here's an example of code:
#close the browser

driver.close()
Conclusion
Python is among the most popular languages and is rising in popularity year after year. Although PyUnit is the standard framework for test automation in Python, the majority of users use the PyTest framework instead.
Additionally, running Selenium Python tests concurrently is not too difficult. In this thorough Selenium Python lesson, we dove deeply into the essential elements of using Selenium in Python to run cross-browser tests.
By running Python automation tests on a cloud Selenium Grid, the combined power of Python and Selenium may be fully realized. Expanding the overall browser coverage, this strategy also aids in raising the caliber of the final result.
Python Tutorial
The most fundamental use case for Python is as a scripting and mechanization dialect. Python isn't only a trade for shell contents or group records; it is likewise used to computerize collaborations with internet browsers or application GUIs or to do framework provisioning and setup in apparatuses,for example, weak force and Salt. In any case, scripting and computerization speak to just a hint of a greater challenge with Python.
Become a Python Certified professional by learning this HKR Python certification training !
As indicated by the most recent TIOBE Programming Community Index, Python is one of the main 10 well known programming dialects of 2017. Python is a universally useful and abnormal state programming dialect. You can utilize Python for creating work area GUI applications, sites and web applications. Additionally, Python, as an abnormal state programming dialect, enables you to concentrate on centre usefulness of the application by dealing with normal programming errands. The straightforward linguistic structure standards of the programming dialect further makes it less demanding for you to keep the code base intelligible and application viable.
Top 30 frequently asked Python interview questions and answers !
The quickest developing utilization of Python is for information science, machine learning, and scholastic research - says a Stack over stream examination.These are really the greatest patterns in tech as of late. As we can peruse, Python turned into a typical decision for that reason.For what reason did individuals go gaga for this broadly useful programming dialect for research and information science? All things considered, there are numerous reasons.
Become a Tenserflow Certified professional by learning this HKR Tenserflow Training !
Conclusion
Python is a high-level coding language that helps to build dynamic websites and software and automate various tasks. There is a large active community that contributes relevant updates to the multiple modules and libraries of Python. It helps as an excellent resource for many programmers across the globe. Further, it is a beginner-friendly and easy-to-understand language for entry-level coders. Python’s versatility is highly admirable and helpful in accomplishing many tasks. Thus, learning Python language can give you more relevant insights.
About Author
Upcoming Selenium Certification Training Online classes
| Batch starts on 28th Jul 2026 |
|
||
| Batch starts on 1st Aug 2026 |
|
||
| Batch starts on 5th Aug 2026 |
|